Free original lessons
Draw a Realistic Ocean Wave: Crest, Foam and Curl Construction
Learn to build a believable wave using crest, foam and curl geometry. Step-by-step construction, common fixes, and four self-contained practice tasks.
Free lesson
Four exercises
Worked answers
Object Drawing Lessons
A convincing wave is mostly a shape problem: where the crest sits, how the lip curls, and where foam lines follow the water's motion. This lesson treats the wave as a set of connected arcs and tapered bands rather than a single outline. You will place a crest line, build a curling lip with a clear inside and outside edge, and add foam that hugs the curl instead of floating on top. All measurements are hypothetical examples; measure your own paper and tools. The convention for judging shape is defined in the rubric so that valid stylistic alternatives are accepted.
Practice materials: Printable downloads are not available for this lesson yet. Use the instructions and four exercises below.
Reference illustration
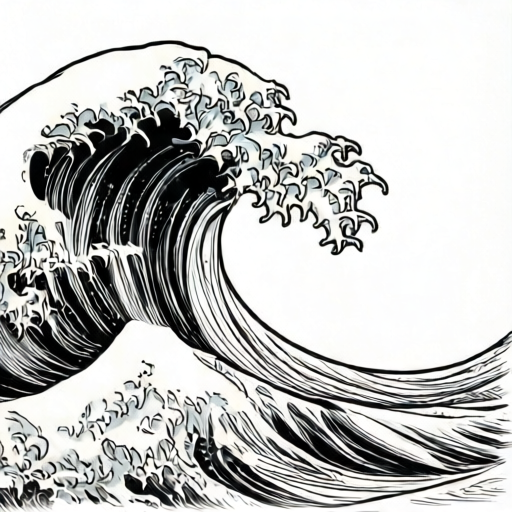
Use the stated measurements and conventions for each exercise.
Set the crest and the curl axis
Begin with two light guide lines: a crest line that rises from left to right, and a curl axis that bends back toward the crest. The crest line is the top edge of the unbroken water; the curl axis is the imaginary center of the falling lip. Keep both lines light so they can be adjusted.
Decide the wave's direction before adding detail. A rightward-breaking wave has its lip falling toward the left; a leftward-breaking wave mirrors this. Mark the direction with a small arrow outside the drawing area so the construction stays consistent.
- Draw a rising crest line about one-third of the page wide.
- Add a curved curl axis that starts at the crest's highest point and hooks back over the wave face.
- Mark the lip's outer edge as a second arc offset from the curl axis by a consistent gap.
- Check that the gap between crest and curl axis narrows toward the tip.
Build the lip with inside and outside edges
The curling lip reads as solid only when it has two edges: an outside edge facing the viewer and an inside edge facing the hollow. Draw the outside edge first as a smooth taper from thick at the base to thin at the tip. Then draw the inside edge slightly shorter, so the lip appears to have thickness.
Avoid making the lip a perfect circle. Real wave lips are asymmetric: the base is wider, the tip is narrower, and the curve accelerates near the end. A slight flattening on the outside edge helps the lip feel weighted.
- Taper the outside edge from about 8 mm at the base to 2 mm at the tip (hypothetical values).
- Draw the inside edge 1–2 mm shorter than the outside edge at the tip.
- Shade the hollow side lightly to separate it from the lip.
- Confirm the lip tip points in the breaking direction marked earlier.
Place foam lines that follow motion
Foam is not random texture; it is a record of where water is moving fastest. Place foam lines along the crest, around the lip base, and inside the hollow where the curl meets the face. Each foam line should follow the local curve rather than cross it.
Use three foam zones: a thin crest line, a thicker band at the lip base, and scattered patches inside the hollow. Keep the patches elongated along the direction of motion. If a foam line crosses the lip edge at a sharp angle, it will look pasted on.
- Draw a thin foam line just below the crest, following its rise.
- Add a thicker foam band where the lip meets the wave face.
- Place two or three elongated patches inside the hollow, aligned with the curl.
- Erase any foam line that crosses the lip edge at more than about 30 degrees (hypothetical guide).
Unify the wave with value and edge control
Use value to separate the lip, hollow and face. The hollow is usually the darkest area because it faces away from the light; the lip's outside edge catches light; the face is mid-tone. Keep edges soft where water curves away and sharper where foam meets air.
Check the whole wave by stepping back. The crest, lip and foam should read as one connected form. If any part looks like a separate object, adjust its edge or value rather than adding more detail.
- Shade the hollow with the darkest value.
- Leave the lip's outside edge lighter than the hollow.
- Soften the transition between face and hollow.
- Sharpen only the foam edges that face the viewer.
Worked example
Construct a rightward-breaking wave on a 15 cm wide area. The crest rises 6 cm from left to right. The curl axis hooks back 4 cm over the face. The lip tapers from 8 mm at the base to 2 mm at the tip. Place three foam zones: crest line, lip base band, and two hollow patches.
Worked answer
Draw the crest line rising 6 cm across 15 cm. From the highest point, draw the curl axis hooking 4 cm back over the face. Offset the outside lip edge by 8 mm at the base and 2 mm at the tip. Draw the inside edge 1–2 mm shorter at the tip. Add a thin crest foam line, a thicker band at the lip base, and two elongated patches inside the hollow aligned with the curl. Shade the hollow darkest and keep the lip's outside edge light.
Four practice exercises
Exercise 1
A wave is drawn on a 20 cm wide area. The crest rises 8 cm. The lip base is 10 mm thick and the tip is 3 mm. What is the taper ratio from base to tip?
Show answer and check
10:3
Why: Compare the two thickness values directly: 10 mm at the base and 3 mm at the tip gives a ratio of 10 to 3.
Check: Divide both values by 1 mm and confirm the ratio simplifies to 10:3.
Exercise 2
You place a foam band 12 mm wide at the lip base and a crest line 3 mm wide. The wave face is 60 mm tall. What percentage of the face height is covered by the two foam zones combined?
Show answer and check
25%
Why: Add the two foam widths: 12 mm + 3 mm = 15 mm. Divide by the face height: 15 ÷ 60 = 0.25, which is 25%.
Check: Multiply 60 mm by 0.25 to get 15 mm, matching the combined foam width.
Exercise 3
A curl axis is 5 cm long. The outside lip edge is 1 cm shorter at the tip and 2 cm longer at the base. What is the total length of the outside lip edge if it follows the axis?
Show answer and check
6 cm
Why: Start with the 5 cm axis. Add 2 cm at the base and subtract 1 cm at the tip: 5 + 2 − 1 = 6 cm.
Check: Reverse the calculation: 6 cm minus 2 cm plus 1 cm returns to 5 cm.
Exercise 4
You draw three foam patches inside the hollow. Each patch is 4 mm long and 2 mm wide. The hollow area is 40 mm by 20 mm. What percentage of the hollow area do the three patches cover?
Show answer and check
3%
Why: One patch area is 4 × 2 = 8 mm². Three patches are 24 mm². The hollow area is 40 × 20 = 800 mm². Divide 24 by 800 to get 0.03, or 3%.
Check: Multiply 800 mm² by 0.03 to get 24 mm², matching the three patches.
Common mistakes
- Drawing the lip as a full circle. Taper the lip from a wide base to a narrow tip and flatten the outside edge slightly.
- Placing foam lines across the curl instead of along it. Align each foam line with the local curve of the lip or crest.
- Making the hollow lighter than the lip. Darken the hollow and keep the lip's outside edge lighter to show depth.
- Using the same edge sharpness everywhere. Soften curved transitions and sharpen only foam edges facing the viewer.
Self-check rubric
- Crest line rises consistently and connects to the curl axis without a break.
- Lip has two distinct edges and tapers from base to tip.
- Foam lines follow local motion and do not cross the lip edge at sharp angles.
- Hollow is darker than the lip's outside edge.
- Edges are soft on curved transitions and sharp only where foam meets air.
- Valid stylistic alternatives are accepted if the crest, lip and foam relationships remain consistent.
Questions and answers
Do I need to measure exact millimeters?
No. The millimeter values are hypothetical examples. Measure your own paper and choose consistent gaps that suit your scale.
Can I draw a leftward-breaking wave?
Yes. Mirror the crest line and curl axis, and keep the foam zones on the same relative sides.
How much foam is too much?
If foam covers more than about one-third of the wave face, reduce patches so the crest and lip remain readable.
What if my wave looks flat?
Increase the value difference between hollow and lip, and check that the lip has two distinct edges.