Free original lessons
Draw a Beam Balance Scale: Beam, Pans and Pointer
Learn to draw a front-view beam balance with central pivot, two pans, suspension chains and a pointer, using a clear construction sequence and checkable geometry.
Free lesson
Four exercises
Worked answers
Object Drawing Lessons
This lesson teaches a reliable way to draw a beam balance in front view. You will set a vertical centerline, place the pivot, draw a horizontal beam with equal arms, hang two pans by short chains, and add a pointer that reads against a small scale. The method uses simple measurements and symmetry checks so the drawing looks balanced even when the beam is tilted. All measurements below are hypothetical examples; measure your own paper and tools. The convention for judging line quality and proportion is defined in the rubric, and valid alternative styles are accepted.
Practice materials: Printable downloads are not available for this lesson yet. Use the instructions and four exercises below.
Reference illustration
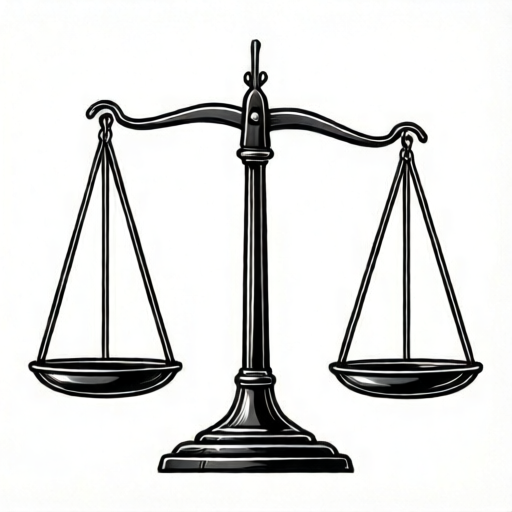
Use the stated measurements and conventions for each exercise.
Set the centerline and pivot
Begin with a light vertical centerline. Mark a pivot point on it about one third down from the top of the page. The pivot is the fixed point from which the beam turns.
Draw a small circle for the pivot housing, then a short vertical post below it down to a base line. Keep the post centered on the centerline so the scale stands straight.
- Draw a vertical centerline with a ruler or straight edge.
- Mark the pivot point on the centerline.
- Draw a small circle around the pivot point.
- Draw a vertical post from the pivot circle down to a horizontal base line.
- Check that the post is centered on the centerline.
Draw the beam and equal arms
The beam is a long bar that turns on the pivot. Draw it as a narrow rectangle or a double line. For a level beam, make it horizontal; for a tilted beam, rotate it about the pivot by a small angle such as ten degrees.
Mark equal distances from the pivot along the beam to locate the two suspension points. Equal arms are the key proportion: measure from the pivot center to each suspension point and compare.
- Draw the beam through the pivot at your chosen angle.
- Mark a suspension point on each side at the same measured distance from the pivot.
- Draw short hooks or rings at the suspension points.
- Check equal arm lengths with a ruler.
Hang the pans and chains
Each pan hangs below its suspension point. Draw two or three short chain lines from the hook down to the pan rim, then draw the pan as a shallow bowl or a flat dish in front view.
Keep the chains short and similar in length so the pans sit at matching heights when the beam is level. When the beam is tilted, one pan rises and the other lowers; the chains stay attached to the same hooks.
- Draw two short chain lines from each hook downward.
- Draw the pan rim as a shallow curve or a flat line.
- Add the pan body below the rim.
- Check that both pans are the same size and hang from matching hooks.
Add the pointer and scale
The pointer is a thin needle attached to the beam at the pivot and extending downward or upward past the post. Draw it straight and centered on the pivot.
Add a small fixed scale behind the pointer tip: three short marks, with the middle mark aligned to the centerline. The pointer shows whether the beam is level. Keep the pointer length consistent with the post so it does not look detached.
- Draw the pointer from the pivot along the beam's center direction.
- Draw three short scale marks on the post or a small plate behind the pointer tip.
- Align the middle mark with the centerline.
- Check that the pointer passes through the pivot center.
Worked example
Draw a level beam balance with a beam length of 120 mm, a pivot at the center, suspension points 50 mm from the pivot on each side, and a pointer 40 mm long below the pivot.
Worked answer
A front-view scale with a vertical centerline, pivot circle at the center, horizontal beam 120 mm long, hooks at 50 mm left and right of the pivot, two matching pans hanging by two chains each, and a straight pointer 40 mm long passing through the pivot to a three-mark scale.
Why: The beam is 120 mm, so each half is 60 mm. Placing hooks at 50 mm from the pivot leaves 10 mm to each beam end and keeps the arms equal. The pointer starts at the pivot center and extends 40 mm downward, ending near the middle scale mark.
Check: Measure both arm lengths from the pivot center; they should both read 50 mm. Check that the beam total is 120 mm and that the pointer passes through the pivot center.
Four practice exercises
Exercise 1
Draw a level beam balance with a beam length of 100 mm and suspension points 40 mm from the pivot on each side. Use two chains per pan and a pointer 30 mm long.
Show answer and check
A centered pivot, horizontal beam 100 mm long, hooks at 40 mm left and right, two matching pans with two chains each, and a 30 mm pointer through the pivot.
Why: Each half of the beam is 50 mm, so 40 mm hooks leave 10 mm to each end and keep the arms equal. The pointer length is shorter than the post but still visible.
Check: Measure both arms from the pivot center; both should be 40 mm. Confirm the beam total is 100 mm and the pointer starts at the pivot center.
Exercise 2
Draw the same scale tilted so the left side is lower. Keep the beam length 100 mm and the hooks 40 mm from the pivot. Describe how the pans and pointer change.
Show answer and check
The beam rotates about the pivot; the left hook lowers and the right hook rises. The left pan hangs lower and the right pan higher. The pointer tilts away from the middle scale mark.
Why: A tilt rotates the beam about the fixed pivot. Equal arms mean the hooks move in opposite vertical directions. The pointer, attached at the pivot, shows the tilt against the fixed scale.
Check: Check that both hooks are still 40 mm from the pivot along the beam. Confirm the pointer still passes through the pivot center and no longer aligns with the middle mark.
Exercise 3
Draw a beam balance with a beam length of 140 mm and hooks 60 mm from the pivot. Add a three-mark scale behind the pointer. State the distance from each hook to the nearest beam end.
Show answer and check
Each half of the beam is 70 mm. With hooks at 60 mm from the pivot, each hook is 10 mm from its nearest beam end. The scale has three marks with the middle mark on the centerline.
Why: Subtract the hook distance from the half-beam length: 70 mm minus 60 mm equals 10 mm. The scale marks are placed behind the pointer tip, with the middle mark aligned to the centerline.
Check: Measure each arm from the pivot center; both should be 60 mm. Measure from each hook to the beam end; both should be 10 mm.
Exercise 4
Draw a beam balance with a beam length of 80 mm and hooks 30 mm from the pivot. Use three chains per pan. Check whether the arms are equal and whether the hooks fit inside the beam ends.
Show answer and check
Each half of the beam is 40 mm. Hooks at 30 mm from the pivot leave 10 mm to each beam end, so the arms are equal and the hooks fit inside the beam.
Why: Half the beam is 40 mm. The hook distance of 30 mm is less than 40 mm, so each hook sits inside the beam end with 10 mm remaining. Three chains per pan are acceptable if both pans use three.
Check: Measure both arms from the pivot center; both should be 30 mm. Confirm each hook is 10 mm from its beam end and that both pans have three chains.
Common mistakes
- Drawing unequal beam arms. Measure from the pivot center to each suspension point and adjust until the distances match.
- Placing the pivot off the centerline. Redraw the post and pivot so both sit on the same vertical centerline.
- Making the pans different sizes. Use the same rim width and depth for both pans, then compare with a ruler.
- Letting the pointer miss the pivot center. Start the pointer at the pivot center and draw it as a straight line through that point.
Self-check rubric
- Centerline and pivot are aligned vertically.
- Beam arms are equal within 2 mm when measured from the pivot center.
- Two pans are present and similar in size.
- Chains attach to the suspension hooks and are short and similar.
- Pointer passes through the pivot center and aligns with the middle scale mark when the beam is level.
- Line quality is clear and consistent; alternative pan shapes are accepted if both pans match.
Questions and answers
Must the beam be horizontal?
No. A tilted beam is valid if the arms remain equal and the pans hang from the same hooks. The pointer then shows the tilt.
How many chains should each pan have?
Two or three short chains are typical in front view. Choose one number and use it for both pans.
Can I draw the pans as flat dishes instead of bowls?
Yes. A flat dish is a valid alternative if both pans match and the chains attach to the rim.
What does the pointer do?
It indicates whether the beam is level by aligning with the middle scale mark.