Free original lessons
Draw a Black Swan: S-Curve Neck and Reflection Check
Learn to draw a black swan in profile using a long S-curved neck, body ellipse, and an upside-down reflection check below the waterline.
Free lesson
Four exercises
Worked answers
Object Drawing Lessons
This lesson teaches a reliable construction for a black swan in profile. You will build the body from a tilted ellipse, shape the long S-curved neck with guide arcs, place the head and bill, then test the pose by constructing an upside-down reflection below a waterline. The reflection is not decoration: it is a check that the neck curve and body mass read correctly from a second viewpoint. Work on plain paper with a pencil, eraser, and a dark drawing tool. All measurements below are hypothetical examples; measure your own paper and tools before relying on any number.
Practice materials: Printable downloads are not available for this lesson yet. Use the instructions and four exercises below.
Reference illustration
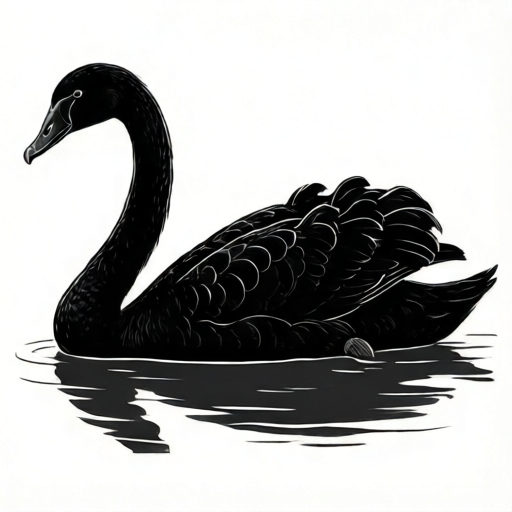
Use the stated measurements and conventions for each exercise.
Set the waterline and body ellipse
Draw a light horizontal waterline across the middle of your page. This line separates the swan from its reflection and gives you a fixed reference for every later check. Above the line, sketch a tilted ellipse for the body. A black swan's body is deep and rounded, with the tail end slightly higher than the chest when the neck is raised. Keep the ellipse light so you can adjust it.
Mark the chest point at the front of the ellipse and the tail point at the back. These two anchors control the neck attachment and the body mass. If the ellipse looks like a circle, flatten it slightly; if it looks like a thin oval, deepen it. The body should feel heavy enough to support the long neck.
- Draw a light horizontal waterline.
- Sketch a tilted ellipse above the line for the body.
- Mark the chest point and tail point on the ellipse.
- Check that the ellipse is tilted and reads as a deep, heavy body, not a circle or a thin oval.
Build the long S-curved neck with guide arcs
The neck is the defining feature. Start at the chest point and draw a light guide arc that rises steeply, then bends backward near the top. A second guide arc continues from that bend toward the head. Together the two arcs form an S curve: the lower arc leans forward, the upper arc leans back. Keep both arcs light and separate so you can adjust the bend without erasing the whole neck.
Define a simple convention for the neck width: measure the neck thickness at the base, then reduce it gradually toward the head. Do not use a single universal width; letter styles and drawing styles vary. What matters is that the neck tapers smoothly and that the S curve is readable. If the neck looks like a straight tube, increase the backward bend in the upper arc.
- Start at the chest point and draw a forward-leaning lower arc.
- Draw a backward-leaning upper arc from the bend to the head position.
- Taper the neck width gradually from base to head.
- Check that the two arcs form a clear S curve.
Place the head, bill, and body details
At the top of the upper arc, sketch a small rounded head. The bill extends forward and slightly downward from the head. A black swan's bill is long and curved, so keep it simple but distinct. Add a small eye mark on the side of the head facing the viewer. Because the swan is in profile, only one eye is visible.
Add the wing shape as a soft curve over the body ellipse. The wing should follow the body mass, not float above it. Draw the tail as a short, slightly pointed shape at the back. Keep all details light until the reflection check is complete; details are easier to adjust while the construction is still soft.
- Sketch a small rounded head at the top of the upper arc.
- Draw a long, slightly downward-curving bill.
- Add one eye mark on the visible side.
- Draw a soft wing curve over the body and a short tail shape.
Construct the upside-down reflection check
Below the waterline, construct an upside-down version of the swan. Mirror the body ellipse downward, then mirror the neck arcs so the S curve reverses. The reflection should touch the waterline at the same points where the swan touches it. This is a check, not a separate drawing: if the reflection looks wrong, the original construction likely has a problem.
Use the reflection to test three things: the neck curve, the body mass, and the head position. If the reflected neck bends in a way that looks unnatural, adjust the original arcs. If the reflected body looks too small, deepen the original ellipse. Keep the reflection lighter than the swan so it reads as a reflection rather than a second bird.
- Mirror the body ellipse downward below the waterline.
- Mirror the neck arcs so the S curve reverses.
- Align the reflection contact points with the swan's contact points.
- Adjust the original construction if the reflection looks unnatural.
Worked example
A student draws a waterline at 10 cm from the top of a 20 cm page. They sketch a body ellipse 6 cm wide and 4 cm deep, tilted so the tail is higher than the chest. The neck base is 1 cm thick and tapers to 0.5 cm at the head. The lower neck arc rises 5 cm and leans forward; the upper arc rises 4 cm and leans back. The head sits at the top of the upper arc, and the bill extends 2 cm forward. The reflection mirrors the body and neck below the waterline. Check whether the construction is consistent.
Worked answer
The construction is consistent. The waterline divides the page evenly. The body ellipse is tilted and reads as a deep, heavy body mass rather than a circle or thin oval. The neck tapers from 1 cm to 0.5 cm, which is a smooth reduction. The two arcs lean in opposite directions, creating an S curve. The reflection mirrors the body and neck below the waterline, so the contact points align. The only adjustment is to keep the reflection lighter than the swan so it reads as a check rather than a second bird.
Four practice exercises
Exercise 1
On a page with a waterline at 8 cm from the top, sketch a body ellipse 5 cm wide and 3.5 cm deep, tilted so the tail is higher than the chest. Draw a neck base 0.8 cm thick tapering to 0.4 cm at the head. Use two guide arcs: a lower arc that rises 4 cm and leans forward, and an upper arc that rises 3 cm and leans back. Describe where the head and bill go.
Show answer and check
The head sits at the top of the upper arc. The bill extends forward and slightly downward from the head, about 1.5 cm long. The eye is a small mark on the visible side of the head.
Why: The tilted body ellipse reads as a deep, heavy body mass rather than a circle or thin oval. The neck tapers smoothly from 0.8 cm to 0.4 cm. The two arcs lean in opposite directions, forming an S curve. The head and bill follow the upper arc, so the pose reads as a profile.
Check: Check that the ellipse is tilted and reads as a deep, heavy body, not a circle or thin oval. Check that the neck thickness reduces smoothly. Confirm the two arcs lean in opposite directions. Verify the bill length is about 1.5 cm and points forward and slightly down.
Exercise 2
A student draws a neck as a single straight line 9 cm long from the chest to the head. The body ellipse is 4 cm wide and 4 cm deep. Identify two problems and describe how to fix them using guide arcs and a tilted ellipse.
Show answer and check
Problem one: the neck is a straight line, so there is no S curve. Fix by replacing the line with two guide arcs that lean in opposite directions. Problem two: the body ellipse is circular, so the body mass looks like a ball. Fix by flattening and tilting the ellipse so it reads as a deep, heavy body rather than a circle.
Why: A black swan's neck is defined by a long S curve, which requires two arcs leaning in opposite directions. A circular body ellipse does not convey the deep, heavy body mass needed to support the neck.
Check: Confirm the revised neck has two arcs leaning in opposite directions. Check that the revised ellipse is tilted and reads as a deep, heavy body, not a circle. Check that the neck tapers smoothly from base to head.
Exercise 3
With a waterline at 12 cm from the top, a student mirrors a body ellipse downward. The original ellipse is 6 cm wide and 4 cm deep. The reflected ellipse is 6 cm wide and 4 cm deep but shifted 1 cm to the left. Describe how to correct the reflection and why alignment matters.
Show answer and check
Shift the reflected ellipse 1 cm to the right so it aligns with the original ellipse. Alignment matters because the reflection is a check: if the reflected body is shifted, the contact points with the waterline no longer match, and the check cannot reveal problems in the original construction.
Why: The reflection should mirror the original construction directly below the waterline. A horizontal shift breaks the mirror relationship and makes the reflection unreliable as a check.
Check: Measure the horizontal distance between the original and reflected ellipse centers. Confirm they are aligned vertically. Check that the contact points with the waterline match.
Exercise 4
A student draws a swan with a neck base 1.2 cm thick tapering to 0.3 cm at the head. The lower arc rises 6 cm and leans forward; the upper arc rises 5 cm and leans back. The head is placed at the top of the lower arc instead of the upper arc. Describe the problem and the fix.
Show answer and check
The head is placed at the top of the lower arc, which breaks the S curve because the upper arc is left unused. Fix by moving the head to the top of the upper arc and adjusting the bill to extend forward from that position.
Why: The S curve is formed by the lower arc leaning forward and the upper arc leaning back. The head belongs at the top of the upper arc so the curve reads as a complete S. Placing the head on the lower arc shortens the neck and removes the backward bend.
Check: Confirm the head sits at the top of the upper arc. Check that the lower arc leans forward and the upper arc leans back. Verify the neck tapers smoothly from 1.2 cm to 0.3 cm.
Common mistakes
- Drawing the neck as a straight tube. Use two separate guide arcs that lean in opposite directions to create a clear S curve.
- Making the body ellipse too circular. Flatten and tilt the ellipse so it reads as a deep body rather than a ball.
- Drawing the reflection as a separate bird. Mirror the existing construction downward and keep the reflection lighter than the swan.
- Placing the head too far forward or backward. Check the head position against the upper arc and adjust the arc before adding details.
Self-check rubric
- The waterline is clearly drawn and used as a reference.
- The body ellipse is tilted and reads as a deep, heavy body mass.
- The neck is built from two guide arcs that form a readable S curve.
- The neck tapers smoothly from base to head.
- The head, bill, and eye are placed consistently with the profile pose.
- The reflection is an upside-down mirror of the construction below the waterline.
- The reflection is lighter than the swan and used as a check.
- Valid alternative styles are accepted if the S curve, body mass, and reflection check remain readable.
Questions and answers
Do I need to draw the reflection perfectly?
No. The reflection is a check. It should be close enough to reveal problems in the neck curve and body mass, but it does not need to be a finished drawing.
How wide should the neck be?
There is no single universal width. Measure the neck thickness at the base and taper it gradually toward the head. Keep the taper smooth and the S curve readable.
Can I use a different drawing style?
Yes. The construction works with many styles. The rubric rewards a readable S curve, a convincing body mass, and a useful reflection check, not a single fixed appearance.
What if my paper is a different size?
Measure your own paper and scale the waterline and ellipse accordingly. Any numerical values in this lesson are hypothetical examples, not fixed requirements.