Free original lessons
Drawing a Deer Step by Step: Body, Legs, and Branching Antlers
Learn to construct a deer from simple body masses to legs and branching antlers, with a clear convention, worked example, and four practice tasks.
Free lesson
Four exercises
Worked answers
Object Drawing Lessons
This lesson teaches a reliable order for drawing a deer: establish the body ellipse, add leg tubes, place the neck and head, then build branching antlers. You will use a simple convention for proportions and a rubric that accepts valid stylistic variation. All measurements are hypothetical examples; measure your own paper and tools before drawing. The goal is a coherent deer structure, not a single universal outline.
Practice materials: Printable downloads are not available for this lesson yet. Use the instructions and four exercises below.
Reference illustration
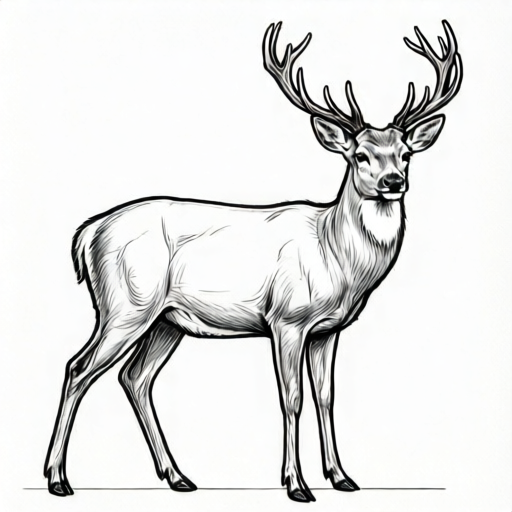
Use the stated measurements and conventions for each exercise.
Set a working convention before drawing
Choose a sheet and mark a baseline near the bottom and a midline across the middle. Let one unit equal the distance from baseline to midline, and use that unit to compare parts. This unit is a drawing convention, not a rigid rule.
Let one unit equal the baseline-to-midline distance. Let x-height be the body-ellipse height expressed in units, so x-height = 1 means the body ellipse is one unit tall. On a 20 cm tall sheet, a hypothetical example is a baseline-to-midline distance of 4 cm, so one unit = 4 cm; with x-height = 1, the body ellipse is 1 × 4 cm = 4 cm tall. These numbers are hypothetical; measure your own paper and adjust.
Draw lightly so you can revise. Keep the body ellipse tilted slightly so the deer reads as standing, not floating.
- Mark a baseline and a midline; set the distance between them as one unit.
- Choose an x-height in units (the body-ellipse height in units) and note it at the top of the page.
- Draw a light horizontal guide for the ground line where the hooves will meet.
Build the body mass and leg tubes
Start with a single ellipse for the torso. Its long axis runs from chest to rump; its short axis is the body height. Place the ellipse so its lower edge sits above the ground line by roughly one leg length.
Legs are tubes, not sticks. Draw two front leg tubes and two hind leg tubes, each with a slight taper toward the hoof. Front legs attach under the chest; hind legs attach under the rump and angle slightly backward.
Check that all four hooves reach the ground line. If a leg is too short, lengthen the tube rather than lowering the body.
- Draw the torso ellipse with the chosen height.
- Add four leg tubes, tapering toward the hooves.
- Align hooves to the ground line and adjust tube lengths.
- Add a short neck tube from the chest toward the head position.
Place the head and branch the antlers
The head is a small wedge at the top of the neck. Keep it simple: a rounded muzzle and a skull mass. Ears sit behind the eyes; eyes sit on the sides of the head.
Antlers grow from the top of the skull. Use a branching sequence: a main beam curves upward and slightly back, then tines branch off. Count branches before drawing so the antler structure is deliberate.
A labeled antler tine diagram helps: label the main beam, the first tine, the second tine, and the tip. Branch counts can vary; the rubric accepts any consistent count you state.
- Draw the head wedge and muzzle.
- Add ears and eye marks.
- Draw the main beam of each antler from the skull.
- Add tines one at a time, counting aloud or marking each branch.
- Label the main beam and tines on a separate diagram if helpful.
Refine and self-check
Darken the final lines and erase construction guides. Check that the body ellipse, leg tubes, neck, head, and antlers connect without gaps.
Use the rubric to score structure, proportion, branching clarity, and convention use. Valid alternatives include different antler branch counts, slightly different leg angles, and varied ear shapes, provided the deer reads coherently.
- Erase guides and darken final lines.
- Check connections between body, legs, neck, head, and antlers.
- Score with the rubric and note one improvement.
Worked example
On a 20 cm tall sheet, set one unit to 4 cm (the baseline-to-midline distance). Draw a deer with a body ellipse 1 x-height unit tall (4 cm), four leg tubes reaching the ground line, a head wedge smaller than the torso height, and antlers with a stated branch count of three tines per antler.
Worked answer
Set one unit = 4 cm as the baseline-to-midline distance, and set x-height = 1 unit, so the torso height is 1 × 4 cm = 4 cm. Mark a baseline and a midline 4 cm apart to establish the unit. Draw the torso ellipse 4 cm tall and about 7 cm long. Add four leg tubes about 5 cm long, tapering to hooves on the ground line. Add a neck tube and a head wedge about 2.5 cm tall. Draw main beams and add three tines per antler, counting each. Erase guides and check connections. The result is a coherent deer with a stated branch count.
Four practice exercises
Exercise 1
On a 15 cm tall sheet, set one unit to 3 cm (the baseline-to-midline distance). Draw a deer with a body ellipse 1 x-height unit tall (3 cm), four leg tubes, and antlers with two tines per antler. State your branch count.
Show answer and check
A deer drawing with a 3 cm torso ellipse (x-height = 1 unit = 3 cm), four tapered leg tubes on the ground line, a head wedge smaller than 3 cm, and antlers with two tines each; branch count stated as two.
Why: The x-height convention ties body height to the sheet; leg tubes and ground line ensure standing posture; stating branch count makes antler structure checkable.
Check: Measure torso height against 3 cm (1 x-height unit); verify four hooves touch the ground line; count two tines per antler.
Exercise 2
Draw a deer facing right with a body ellipse 1 x-height unit tall (for example, 4 cm if one unit = 4 cm) and antlers with four tines per antler. Keep the head smaller than the torso height.
Show answer and check
A right-facing deer with a torso ellipse 1 x-height unit tall (for example, 4 cm), four leg tubes, a head wedge shorter than the torso height, and antlers with four tines each.
Why: Facing direction affects leg attachment and antler orientation; a stated branch count keeps the antlers deliberate; head size is checked against torso height.
Check: Confirm facing direction, measure torso height against your stated unit (for example, 4 cm), count four tines per antler, and compare head height to torso height.
Exercise 3
Draw a deer with a body ellipse 1 x-height unit tall (for example, 5 cm if one unit = 5 cm) and legs 6 cm long. Place all hooves on a ground line. Add antlers with three tines per antler and label the main beam.
Show answer and check
A deer with a torso ellipse 1 x-height unit tall (for example, 5 cm), 6 cm leg tubes, hooves on the ground line, three tines per antler, and a labeled main beam.
Why: Leg length is set independently of body height; the ground line checks standing posture; labeling the main beam clarifies antler structure.
Check: Measure torso height against your stated unit (for example, 5 cm), measure leg tubes near 6 cm, verify hooves on the ground line, count three tines per antler, and confirm the main beam label.
Exercise 4
Redraw the deer from the worked example but change the antler branch count to five tines per antler. Keep the body ellipse 1 x-height unit tall (4 cm in the worked example) and all hooves on the ground line.
Show answer and check
A deer matching the worked example's body and legs but with five tines per antler; branch count stated as five.
Why: Changing only the branch count tests whether antler structure is deliberate and independent of body construction; the rubric accepts valid alternative counts.
Check: Compare body and leg measurements to the worked example (torso 4 cm = 1 x-height unit, legs about 5 cm), count five tines per antler, and verify hooves on the ground line.
Common mistakes
- Drawing legs as thin sticks with no taper. Draw leg tubes with a slight taper toward the hoof so the legs read as masses.
- Letting hooves float above or sink below the ground line. Align all four hooves to the ground line and adjust tube lengths, not the body height.
- Branching antlers randomly without counting. State a branch count before drawing and add tines one at a time.
- Making the head too large for the body ellipse. Compare head width to body-ellipse height; keep the head smaller than the torso height.
Self-check rubric
- Body ellipse height matches the stated x-height within a small margin.
- Four leg tubes taper toward hooves and all hooves meet the ground line.
- Neck and head connect cleanly; head is smaller than torso height.
- Antlers show a stated branch count with visible main beam and tines.
- Construction guides are erased and final lines are clear.
- Valid alternatives are accepted: different branch counts, leg angles, ear shapes, and facing direction, provided the deer reads coherently.
Questions and answers
Do I have to use the same antler branch count as the example?
No. State your branch count and keep it consistent; the rubric accepts any clear, deliberate count.
What if my paper is a different size?
Measure your paper and set x-height to a convenient fraction of its height. The numerical examples are hypothetical; use your own measurements.
Can I draw the deer facing left or right?
Yes. Choose a direction and keep leg attachment and antler branching consistent with that view.
How do I know the proportions are acceptable?
Use the rubric: body ellipse height equals your stated x-height in units, head smaller than torso height, and all hooves on the ground line.