Free original lessons
Realistic Car Drawing: Body Shading and Surface Reflection
Learn to draw a realistic car with curved-body shading and believable reflections. Includes a worked example, four practice tasks, and a planned printable plate.
Free lesson
Four exercises
Worked answers
Object Drawing Lessons
This lesson teaches a repeatable method for drawing a realistic car in three-quarter view, focusing on how light wraps around curved body panels and how reflections appear on glossy paint. You will use a simple convention: x-height is measured from the baseline to the midline of lowercase letters, and letter styles vary, so use your own natural handwriting for labels. All numerical values are hypothetical examples; measure your actual paper and tools. The goal is not a single universal answer but a coherent, checkable drawing that reads as a car under a defined light source.
Practice materials: Printable downloads are not available for this lesson yet. Use the instructions and four exercises below.
Reference illustration
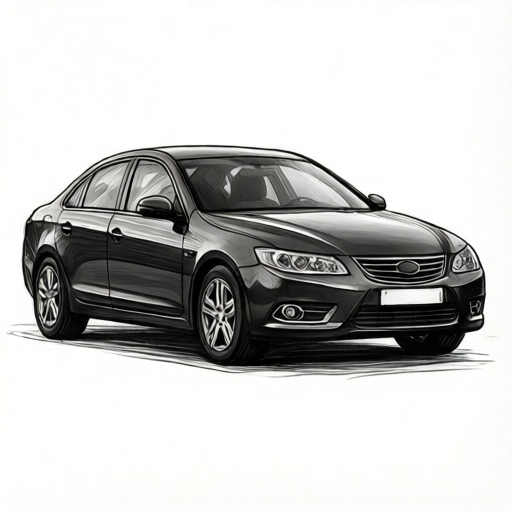
Use the stated measurements and conventions for each exercise.
Set the light source and block the body
Choose one light direction and mark it on the page with a small arrow. A single light source keeps shading consistent. Block the car as a low box with a smaller cabin box on top, then round the corners where the hood meets the fenders and where the roof meets the pillars. Keep the wheels as ellipses, not circles, because the car is seen at an angle.
Measure the car's overall length and height on your paper with a ruler. For example, if the car is 18 cm long and 6 cm tall in your drawing, the wheel diameter might be about 2.5 cm. These are hypothetical proportions; adjust to your reference. Mark the beltline (the line where the windows meet the body) and the midline of the body panels. These lines guide where shading changes.
- Draw a light arrow for the light direction, for example from the upper left.
- Block a low box for the body and a smaller box for the cabin; round the corners.
- Mark the beltline and the vertical midline of the side panel.
- Draw two wheel ellipses and check that their centers sit on the same horizontal line.
Shade curved panels with three zones
Every curved panel has a light zone, a core shadow, and a reflected-light zone. The light zone faces the light source. The core shadow is the darkest band on the side away from the light. The reflected-light zone is a slightly lighter band just inside the shadow edge, caused by light bouncing off the ground or nearby surfaces. Keep the transitions soft on the hood and roof, and sharper where panels meet.
Use a pencil and blend with a paper stump or your finger. Build tone in thin layers. A common mistake is to shade the whole side evenly; instead, follow the panel's curvature. On the door, the core shadow often runs vertically near the rear edge. On the fender, it curves around the wheel arch. Check your shading by squinting: the car should still read as a solid form.
- Identify the light zone on each panel and leave it mostly white.
- Add a core shadow band on the side away from the light.
- Add a thin reflected-light band inside the shadow edge.
- Blend softly and check that the darkest band is not at the very edge of the panel.
Place reflections on glossy surfaces
Glossy paint reflects the sky, the ground, and nearby objects. Simplify reflections into shapes: a bright sky band along the upper curve of the hood and roof, a darker ground reflection along the lower body, and a few vertical streaks on the doors. Reflections follow the surface curvature, so they bend around fenders and pillars. Keep them crisp on shiny paint and softer on matte surfaces.
Windows reflect the sky and sometimes the horizon. Draw a diagonal band across the windshield and side windows to suggest a sky reflection. Do not fill the whole window with reflection; leave some dark interior visible. Check that reflections are consistent with your light source: a sky reflection usually appears on the upper surfaces, while ground reflections appear lower.
- Draw a bright sky band along the top curve of the hood and roof.
- Add a darker ground reflection along the lower body.
- Place a few vertical reflection streaks on the doors, following the panel curve.
- Add a diagonal sky reflection on the windows and leave some dark interior visible.
Add wheels, shadow, and final checks
Shade the tires as dark cylinders with a lighter rim highlight. The wheel wells should be dark, with a soft shadow under the car. Cast shadow on the ground should fall away from the light source and be darkest near the tires. Keep the shadow shape simple and check that it connects the car to the ground.
Final checks: the car should have a clear light direction, three shading zones on curved panels, reflections that follow the surface, and a cast shadow that matches the light. Measure key proportions with a ruler and compare them to your reference. If the car looks flat, increase the contrast between the light zone and the core shadow. If it looks noisy, blend the transitions and simplify the reflections.
- Shade the tires and wheel wells, leaving a rim highlight.
- Draw a cast shadow on the ground away from the light source.
- Check proportions with a ruler and adjust the wheel ellipses.
- Squint at the drawing to confirm the form reads clearly.
Worked example
Draw a compact car in three-quarter view with light from the upper left. Use a body length of 16 cm and height of 5 cm on your paper. Show three shading zones on the door and a sky reflection on the windshield.
Worked answer
Block the body as a low box 16 cm long and 5 cm tall, with a cabin box on top. Mark the light arrow from the upper left. Draw two wheel ellipses about 2.2 cm wide and 1.8 cm tall, centered on the same horizontal line. On the door, leave the upper-left area light, add a vertical core shadow near the rear edge, and a thin reflected-light band inside it. On the windshield, draw a diagonal bright band from lower left to upper right to suggest sky reflection, leaving the lower corner dark. Add a cast shadow on the ground to the lower right, darkest near the tires. Check with a ruler that the body length is 16 cm and the wheel centers align.
Four practice exercises
Exercise 1
Draw a simple car side panel 12 cm long and 4 cm tall with light from the upper right. Show a light zone, a core shadow, and a reflected-light band. Describe where each zone sits.
Show answer and check
The light zone sits on the upper-right area of the panel. The core shadow runs vertically near the left edge. The reflected-light band sits just inside the core shadow, slightly lighter. A cast shadow falls to the lower left.
Why: With light from the upper right, the right side faces the light and stays light. The left side turns away, creating a core shadow. Light bouncing from the ground creates a thin reflected-light band inside the shadow edge.
Check: Measure the panel with a ruler to confirm 12 cm by 4 cm. Squint to check that three zones are visible and that the darkest band is not at the very edge.
Exercise 2
Draw a car hood 10 cm wide and 6 cm deep with light from the front. Add a sky reflection band and a ground reflection band. State which band is closer to the windshield.
Show answer and check
The sky reflection band runs along the rear edge of the hood, closer to the windshield. The ground reflection band runs along the front edge. The hood curves so the rear edge catches more sky.
Why: A curved hood tilts upward toward the rear, so the rear edge reflects more sky. The front edge tilts downward and reflects more ground. Keeping the bands parallel to the hood's curvature makes the reflection believable.
Check: Measure the hood to confirm 10 cm by 6 cm. Check that the sky band is nearer the windshield and that both bands follow the hood's curve.
Exercise 3
Draw two wheels for a car seen at an angle. Each wheel should be an ellipse 3 cm wide and 2.4 cm tall, with centers 8 cm apart on the same horizontal line. Shade the tires and add a rim highlight.
Show answer and check
Two ellipses 3 cm wide and 2.4 cm tall, centers 8 cm apart horizontally. Tires are dark with a lighter rim highlight on the upper-left side, consistent with light from the upper left. Wheel wells are dark.
Why: At an angle, wheels appear as ellipses wider than they are tall. Aligning centers keeps the car level. The rim highlight sits on the side facing the light.
Check: Use a ruler to check the ellipse dimensions and the 8 cm center distance. Confirm both centers lie on the same horizontal line.
Exercise 4
Draw a car body 14 cm long and 5 cm tall with light from the upper left. Add a cast shadow on the ground. Describe the shadow's direction and where it is darkest.
Show answer and check
The cast shadow falls to the lower right, away from the upper-left light. It is darkest near the tires and fades outward. The shadow shape is simple and connects the car to the ground.
Why: A cast shadow falls opposite the light source. Contact with the ground is darkest because the car blocks light most completely there. Fading outward suggests the shadow spreading.
Check: Measure the body to confirm 14 cm by 5 cm. Check that the shadow points lower right and that its darkest area touches the tires.
Common mistakes
- Shading the entire side of the car evenly, which makes it look flat. Divide each curved panel into light, core shadow, and reflected-light zones, and blend only between zones.
- Drawing wheels as circles instead of ellipses. Draw ellipses that are wider than they are tall, and check that both wheels share the same horizontal center line.
- Putting reflections everywhere, which makes the car look noisy. Limit reflections to a sky band, a ground band, and a few streaks that follow the panel curvature.
- Making the cast shadow fall toward the light source. Mark the light direction first, then draw the cast shadow on the opposite side, darkest near the tires.
Self-check rubric
- Light direction is marked and all shading, reflections, and cast shadows are consistent with it.
- Curved panels show three distinct zones: light, core shadow, and reflected light.
- Reflections follow the surface curvature and are limited to a few clear shapes.
- Wheels are ellipses with aligned centers, and proportions are checkable with a ruler.
- Cast shadow falls away from the light source and connects the car to the ground.
- Labels use the learner's natural handwriting; x-height is baseline to midline and letter styles may vary.
Questions and answers
Do I need a reference photo?
A reference helps, but you can use the described proportions and light direction. Measure your own drawing with a ruler to keep proportions consistent.
How dark should the core shadow be?
Dark enough to contrast with the light zone, but not pure black. Build it in layers and check by squinting; the form should still read clearly.
Can I use a different light direction?
Yes. Any single consistent direction works. Mark it on the page and keep all shading, reflections, and cast shadows consistent with it.
What if my handwriting is uneven for labels?
Use your natural handwriting. X-height is measured from the baseline to the midline of lowercase letters, and letter styles vary, so labels do not need to match a standard.