Free original lessons
Realistic Dog Drawing: Fur Direction and Basic Anatomy
Learn to draw a realistic dog by mapping fur flow and placing shoulder and hip landmarks. Includes a worked example, four practice tasks, and a validation plan.
Free lesson
Four exercises
Worked answers
Object Drawing Lessons
Realistic dog drawing depends on two quiet systems: the skeleton under the skin and the direction of the coat over it. This lesson teaches a repeatable method. You will place shoulder and hip landmarks first, then draw fur strokes that follow body contours and change length at joints and the tail. The convention is simple: x-height means the distance from baseline to midline of a letter, and letter styles vary, so treat all written labels as guides rather than fixed shapes. All measurements are hypothetical examples unless you measure your own paper and pencil. Work in pencil, keep strokes loose, and check proportions with simple arithmetic before adding detail.
Practice materials: Printable downloads are not available for this lesson yet. Use the instructions and four exercises below.
Reference illustration
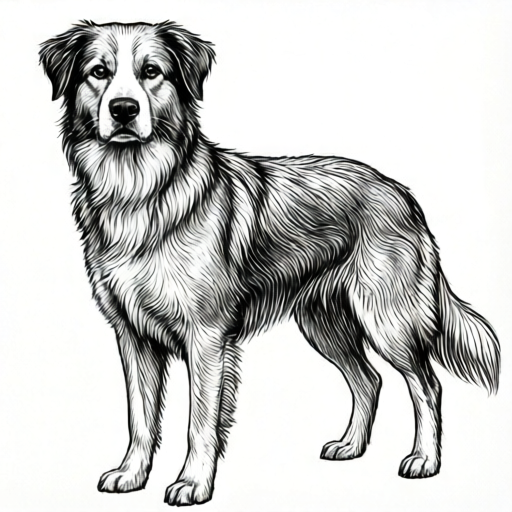
Use the stated measurements and conventions for each exercise.
Place the body landmarks before fur
Start with a light oval for the ribcage and a smaller oval for the pelvis. The shoulder joint sits near the front of the ribcage, roughly one-third down from the top line. The hip joint sits near the top of the pelvis oval, slightly forward of its rear edge. Mark both joints with small crosses. These crosses control leg angles and prevent the common error of attaching legs too far forward or backward.
Use a simple unit system. Suppose the dog's body length from chest to rump is 10 units. The shoulder cross sits about 3 units back from the chest and 2 units down from the top line. The hip cross sits about 7 units back from the chest and 1.5 units down from the top line. These numbers are hypothetical examples; adjust them to your reference. Check that the distance between the two crosses is about 4 units. If it is much shorter, the body will look compressed.
- Draw a light horizontal line for the top of the back.
- Place the ribcage oval and pelvis oval so they overlap slightly.
- Mark the shoulder cross and hip cross using the unit estimates.
- Draw straight guide lines from each cross to the paw positions.
- Check that front and rear leg lengths are plausible for the pose.
Map fur direction with arrows
Fur does not grow in one uniform direction. On the body, strokes generally flow from the head toward the tail, but they part and swirl around joints. On the front legs, fur flows downward from the shoulder to the paw. On the rear legs, it flows downward from the hip, with a slight outward fan at the thigh. On the tail, strokes follow the tail's curve and become shorter near the tip.
Draw a small arrow on each major body area before rendering individual hairs. Use three arrow lengths: long for the torso, medium for the thighs, and short for the lower legs and muzzle. Keep arrows parallel to the surface contour, not to the page edge. Where two fur directions meet, such as at the shoulder, draw a subtle V-shaped part rather than a hard line.
- Draw one long arrow along the side of the ribcage pointing toward the rear.
- Draw one medium arrow down the front of each front leg.
- Draw one medium arrow down the outside of each rear thigh.
- Draw a curved arrow along the tail following its centerline.
- Add short arrows on the muzzle pointing toward the nose.
Render strokes that follow the arrows
Begin rendering with a blunt pencil and light pressure. Make each stroke a short taper: start slightly heavier, lift at the end. Overlap strokes in the arrow direction. On the torso, use strokes about 2 to 3 centimeters long on a hypothetical A4 sheet; on the lower legs, use strokes about 1 centimeter long. These lengths are examples, not standards. Vary stroke length by about one-third to avoid a striped pattern.
At the shoulder and hip, let strokes curve around the joint rather than crossing it. At the tail, draw strokes that follow the curve and shorten progressively. Leave small gaps between stroke groups to suggest underfur. Check the overall effect by stepping back: the fur should look like it lies on a rounded form, not like a flat texture.
- Render the torso first with long, tapered strokes.
- Render the front legs downward from the shoulder.
- Render the rear thighs with medium strokes fanning slightly outward.
- Render the tail from base to tip with shortening strokes.
- Add short muzzle strokes and check that all directions match your arrows.
Check anatomy and fur together
A realistic dog reads correctly when the fur direction supports the anatomy. If a leg looks too thin, check the guide line from the joint to the paw before adding more fur. If the back looks flat, check the top line and the ribcage oval. Use a simple arithmetic check: measure the distance from the shoulder cross to the front paw and from the hip cross to the rear paw. In a standing pose, these distances should be roughly equal; if one is more than 20 percent longer, adjust the guide line.
Keep your labels consistent. If you write a letter label, its x-height is the baseline-to-midline distance, and letter styles vary, so do not treat the label as a precise measurement. Measure the actual paper and pencil you use, and record any chosen values as hypothetical examples.
- Compare front and rear leg guide lengths.
- Check that fur arrows do not cross joint crosses.
- Confirm that tail strokes follow the tail curve.
- Step back and assess whether the body looks rounded.
- Erase guide lines only after the fur direction is consistent.
Worked example
A standing dog is 10 units long from chest to rump. The shoulder cross is 3 units back from the chest and 2 units down from the top line. The hip cross is 7 units back from the chest and 1.5 units down from the top line. Draw the two crosses, check the distance between them, and describe the fur arrows for the torso, front legs, rear thighs, and tail.
Worked answer
The distance between crosses is 7 minus 3 equals 4 units horizontally. The vertical difference is 2 minus 1.5 equals 0.5 units. The crosses are about 4 units apart, which is plausible for a 10-unit body. Fur arrows: one long arrow along the ribcage toward the rear; medium arrows down the front legs from the shoulder; medium arrows down the rear thighs fanning slightly outward; a curved arrow along the tail with shortening strokes near the tip.
Four practice exercises
Exercise 1
A dog is 12 units long from chest to rump. The shoulder cross is 4 units back from the chest and 2 units down. The hip cross is 9 units back from the chest and 1.5 units down. Calculate the horizontal distance between the crosses and state whether it is plausible for a 12-unit body.
Show answer and check
Horizontal distance is 9 minus 4 equals 5 units. For a 12-unit body, 5 units is plausible because it is less than half the body length and leaves room for the ribcage and pelvis.
Why: Subtract the shoulder position from the hip position. Compare the result to the body length using a simple ratio.
Check: Recompute 9 minus 4 and confirm the result is between 3 and 6 units for a 12-unit body.
Exercise 2
Describe the fur arrows for a dog facing left. Include the torso, front legs, rear thighs, and tail. State one place where fur direction changes.
Show answer and check
Torso arrow points from head toward tail, which is left to right. Front leg arrows point downward from the shoulder. Rear thigh arrows point downward and fan slightly outward. Tail arrow follows the tail curve and shortens near the tip. Fur direction changes at the shoulder, where torso flow meets downward leg flow.
Why: Fur generally follows body contours from head to tail on the torso and downward on legs. Joints create changes in direction.
Check: Confirm each arrow matches the body area and that at least one change point is named.
Exercise 3
On a hypothetical A4 sheet, torso strokes are 2.5 centimeters and lower-leg strokes are 1 centimeter. If you draw 8 torso strokes and 12 lower-leg strokes, what is the total stroke length in centimeters?
Show answer and check
Torso total is 8 times 2.5 equals 20 centimeters. Lower-leg total is 12 times 1 equals 12 centimeters. Total is 20 plus 12 equals 32 centimeters.
Why: Multiply stroke count by stroke length for each area, then add the two totals.
Check: Recompute 8 times 2.5 and 12 times 1, then add to confirm 32 centimeters.
Exercise 4
A standing dog has a front leg guide of 6 units and a rear leg guide of 8 units. Is this within the 20 percent check? Show the arithmetic.
Show answer and check
The difference is 8 minus 6 equals 2 units. Twenty percent of 6 is 1.2 units. Since 2 is greater than 1.2, the rear guide is more than 20 percent longer, so adjust the guide line.
Why: Compare the difference to 20 percent of the shorter guide. If the difference exceeds that value, the legs are mismatched.
Check: Recompute 8 minus 6 and 0.2 times 6, then compare 2 to 1.2.
Common mistakes
- Drawing fur as a flat texture with strokes all pointing the same way. Draw direction arrows first and vary stroke direction around joints and the tail.
- Attaching the front legs too far forward on the ribcage. Place the shoulder cross about one-third down from the top line and check the distance to the chest.
- Making all fur strokes the same length. Use long strokes on the torso, medium on thighs, and short on lower legs and muzzle.
- Ignoring the hip cross so the rear legs look disconnected. Mark the hip cross near the top of the pelvis oval and draw guide lines from it.
Self-check rubric
- Shoulder and hip crosses are placed and labeled consistently.
- Fur direction arrows cover torso, front legs, rear thighs, and tail.
- Stroke length varies by body area and follows the arrows.
- Front and rear leg guide lengths are roughly equal in a standing pose.
- Valid alternatives are accepted if fur direction supports the anatomy and labels are consistent.
Questions and answers
Do I need a specific breed reference?
No. This lesson covers general dog anatomy and fur direction. Breed-specific studies are outside the boundary, but you can adapt the method to any reference.
How long should fur strokes be?
Use hypothetical examples: about 2 to 3 centimeters on the torso and 1 centimeter on lower legs for an A4 sheet. Measure your own paper and adjust.
What does x-height mean here?
X-height is the distance from baseline to midline of a letter. Letter styles vary, so written labels are guides, not fixed measurements.
Can I use a pen instead of pencil?
Yes, but pencil allows erasing guide lines. If using pen, draw guides lightly and keep them minimal.