Free original lessons
Ship in a Bottle Drawing: Hull, Masts, and Curved Glass
Learn to compose a ship hull and rigging inside a transparent bottle, using curved-glass guides, overlap cues, and a clear drawing convention for highlights and occlusion.
Free lesson
Four exercises
Worked answers
Object Drawing Lessons
This lesson teaches a repeatable way to draw a ship inside a glass bottle. You will build the bottle silhouette first, scale a simple hull and masts to fit, then combine them with deliberate overlap and glass cues. The convention is simple: solid lines describe the ship, thin double lines describe the glass edge, and short parallel strokes describe glass highlights. Keep the bottle outline at the glass boundary, show the ship through the transparent area, and use a light reflection line as the interior overlap cue. All measurements are hypothetical examples; measure your own paper and tools before drawing.
Practice materials: Printable downloads are not available for this lesson yet. Use the instructions and four exercises below.
Reference illustration
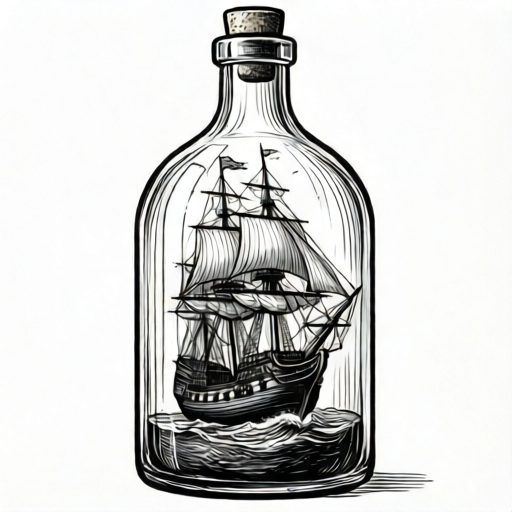
Use the stated measurements and conventions for each exercise.
Build the bottle silhouette first
Start with the bottle, not the ship. A bottle is a body plus a neck plus a mouth. Draw a vertical center line and a horizontal midline. Mark the body as a tall rounded rectangle, then curve the shoulders inward to a narrower neck. The mouth is an ellipse, not a circle, because it is seen at an angle.
Use a light pencil for construction lines. Keep the glass edge as a thin double line so it reads as transparent material rather than a solid wall. The body curve should be smooth and continuous; avoid sudden corners where the shoulder meets the neck.
- Draw a vertical center line and a horizontal midline on your paper.
- Mark the body height and width with light dots; for example, a body 12 cm tall and 7 cm wide on a 20 cm sheet.
- Curve the shoulders inward to a neck about 2.5 cm wide.
- Draw the mouth as a shallow ellipse about 2.5 cm wide and 1 cm tall.
- Trace the final glass edge as a thin double line, keeping the body curve smooth.
Scale the hull and masts to fit inside
The ship must fit within the bottle body, not the neck. Reserve a margin inside the glass edge (for example, about 1 cm on a 20 cm sheet) so the ship does not touch the wall. Place the hull low in the body and the masts rising toward the shoulder curve.
Draw the hull as a shallow three-sided profile: a horizontal deck line, a curved bottom, and a vertical stern. Add two or three masts as straight vertical lines. Crossbars are horizontal lines; keep them shorter than the body width. Rigging lines are thin straight lines connecting mast tops to the hull.
- Mark a deck line about one-third up from the bottom of the bottle body.
- Draw the hull bottom as a gentle curve below the deck line, keeping its lowest point about 1 cm above the bottom glass edge; with the deck line at 4 cm, this leaves roughly 3 cm of hull depth below the deck line.
- Place two masts: one near the center and one toward the stern, both vertical.
- Add crossbars shorter than the body width, and connect mast tops to the hull with thin rigging lines.
- Check that every mast top stays below the shoulder curve.
Combine ship and glass with overlap cues
The ship should remain visible through the bottle. Keep the outer glass contour at the bottle boundary; do not draw that contour across the ship inside the bottle. Add one or two light foreground reflection strokes that cross an interior hull or mast line, and break the ship line at each reflection so the reflection reads in front. This gives an overlap cue without making the glass look opaque.
Add glass highlights as short parallel strokes following the body curve. Keep them on one side to suggest a light source. Do not outline the entire bottle with heavy lines; transparency reads best when the glass edge is thin and the highlights are sparse.
- Draw the outer glass contour only at the bottle boundary; add a separate light reflection stroke across an interior hull or mast line.
- Break the ship line at the reflection so the reflection reads in front while the ship remains visible through the glass.
- Add three to five short highlight strokes following the body curve on one side.
- Add a small ellipse highlight near the mouth to suggest thickness.
- Check that the ship stays inside the bottle boundary. Where a separate interior reflection crosses a ship line, break the ship line at that point so the reflection reads in front.
Worked example
On a 20 cm sheet, draw a bottle body 12 cm tall and 7 cm wide with a neck 2.5 cm wide and an elliptical mouth 2.5 cm wide and 1 cm tall. Place a hull with a deck line one-third up from the bottom, two vertical masts, and three rigging lines per mast. Keep the outer glass contour at the bottle boundary; add a separate interior reflection stroke across one ship line and three short highlights.
Worked answer
The bottle body is centered with a smooth shoulder curve to the neck. The mouth ellipse is shallow. The hull sits low: its lowest point is about 1 cm above the bottom glass edge, and the deck line is about 4 cm above the body bottom, leaving roughly 3 cm of hull depth below the deck. Both mast tops stay below the shoulder. Keep the outer glass contour at the bottle boundary; do not draw it across the ship. Draw a separate light reflection stroke across one hull or mast line inside the bottle, then break that ship line at the crossing. Three short highlight strokes follow the body curve on the left side.
Four practice exercises
Exercise 1
Draw a bottle body 10 cm tall and 6 cm wide with a neck 2 cm wide and an elliptical mouth 2 cm wide and 0.8 cm tall. Add a hull with a deck line 3 cm above the body bottom and one vertical mast centered in the body, with its top 1 cm below the shoulder. Add one light reflection stroke that crosses the mast inside the bottle. Describe the overlap cue.
Show answer and check
The mast is centered and ends 1 cm below the shoulder. Keep the bottle outline at the body boundary. Draw a separate light reflection stroke across the mast inside the body and break the mast line where the reflection passes, so the reflection appears in front while the mast remains visible through the glass.
Why: The bottle’s outer contour describes its boundary, while an interior reflection stroke provides the foreground overlap cue. A thin reflection and visible ship lines keep the glass readable as transparent.
Check: Confirm the mast ends below the shoulder, the outer glass contour stays at the bottle boundary, and the separate light reflection crosses the mast with the mast line broken at that point.
Exercise 2
A bottle body is 12 cm tall and 7 cm wide. A hull is drawn 1 cm from the bottom and 1 cm from each side. The deck line is 4 cm above the bottom. Two masts are placed at 3 cm and 5 cm from the left glass edge. State whether the masts fit inside the body and explain your check.
Show answer and check
Yes, both masts fit: 3 cm and 5 cm from the left glass edge lie within the usable span of 1 cm to 6 cm (7 cm width minus 1 cm margins). The 3 cm mast is 3 cm from the left glass edge and 4 cm from the right glass edge; the 5 cm mast is 5 cm from the left glass edge and 2 cm from the right glass edge.
Why: The body width is 7 cm, so positions from 1 cm to 6 cm are inside the margin. Both 3 cm and 5 cm fall within that range.
Check: Subtract the margins from the body width (7 minus 1 minus 1 equals 5 cm usable width) and confirm both mast positions lie within the usable span.
Exercise 3
Draw a bottle with a body 14 cm tall and 8 cm wide. Place a hull with a deck line 5 cm above the bottom and three masts at 2 cm, 4 cm, and 6 cm from the left glass edge. Add two rigging lines per mast and a short interior reflection stroke that crosses one rigging line near the shoulder. Describe the overlap.
Show answer and check
Keep the bottle contour at its outer boundary. Draw a short light reflection stroke inside the bottle across one rigging line near the shoulder, then break the rigging line at that stroke. Leave the other rigging lines visible through the glass.
Why: A separate interior reflection can pass in front of a rigging line; the bottle’s outer contour does not cross the ship inside the bottle.
Check: Trace the bottle boundary and confirm it stays outside the ship. Then check the separate reflection crosses one rigging line and that the rigging is broken only at that point.
Exercise 4
A drawing shows a bottle body 9 cm tall and 5 cm wide, a hull with a 1 cm margin, and highlights drawn as five long strokes crossing the entire body. Identify one improvement and state how you would check it.
Show answer and check
Shorten the highlights to three to five short parallel strokes following the body curve on one side, then check that each stroke follows the curve and stays on one side.
Why: Long strokes crossing the whole body suggest solid material rather than transparent glass. Short, curved, one-sided highlights read as reflections.
Check: Count the highlight strokes and confirm each is short, parallel, and follows the body curve on the same side.
Common mistakes
- Drawing the ship larger than the bottle body and letting masts cross the glass edge. Reserve a margin inside the glass (for example, about 1 cm on a 20 cm sheet) and shorten masts so their tops stay below the shoulder curve.
- Making the bottle mouth a circle instead of an ellipse. Draw a shallow ellipse about twice as wide as it is tall to show the angled opening.
- Outlining the entire bottle with heavy lines, making it look solid. Use a thin double line for the glass edge and add only a few short highlight strokes.
- Treating the outer bottle contour as a foreground line across the ship. Keep the outer contour at the bottle boundary. Use a separate interior reflection stroke to show a foreground overlap, and break the ship line only where that reflection crosses it.
Self-check rubric
- Bottle silhouette is smooth and continuous, with an elliptical mouth and a neck narrower than the body.
- Ship hull and masts fit inside the bottle body with a visible margin and remain visible through the glass.
- The bottle outline stays at the glass boundary; a separate light reflection can pass in front of ship lines and break them at the overlap.
- Highlights are sparse, parallel, and follow the body curve on one side.
- Line convention is consistent and readable; valid alternative styles are accepted if overlap and transparency cues remain clear.
Questions and answers
Do I need to draw every rigging line?
No. Three to five thin rigging lines per mast are enough to suggest rigging without clutter.
How do I show the glass is transparent?
Keep the glass edge thin, let the ship show through, and add sparse highlights following the body curve.
What if my bottle shape is different?
The method works for any bottle. Measure your own body height and width, then scale the ship to fit with a margin.
Can I use a different line convention?
Yes, as long as it is consistent and readable. The rubric rewards clear overlap and consistent glass cues, not one exact style.