Free original lessons
Drawing on a Shoe Outline: Map Toe Box, Side Panel and Lace Zones
Learn to decorate a side-view shoe silhouette by mapping toe box, vamp, side panel, heel counter and lace row, then placing original patterns with clear checks.
Free lesson
Four exercises
Worked answers
Object Drawing Lessons
This lesson teaches you to draw a design on a shoe outline by first mapping the shoe's surface zones, then placing decoration that respects those zones. You will work on a side-view silhouette with a toe box, vamp, side panel, heel counter and lace row. The goal is not to draw a realistic shoe from scratch but to decorate a given outline clearly and consistently. You will use a simple convention: the shoe outline is the boundary, seam lines divide zones, and the lace row is a band with crossing lines. Letter styles and pattern styles may vary; the rubric rewards clear zone mapping, deliberate placement and neat execution rather than one universal design. All measurements below are hypothetical examples unless you measure your own paper and tools.
Practice materials: Printable downloads are not available for this lesson yet. Use the instructions and four exercises below.
Reference illustration
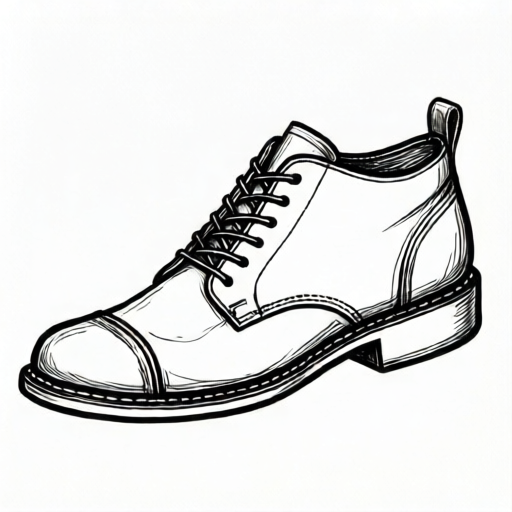
Use the stated measurements and conventions for each exercise.
Map the shoe surface before decorating
Start with a side-view shoe outline. Mark the toe box as the front rounded area, the vamp as the top area behind the toe box, the side panel as the large middle area, the heel counter as the back area, and the lace row as a band across the vamp. Use a light pencil line for each boundary so you can adjust it.
Define a convention for seam lines: a seam is a single line that separates two zones. Keep seam lines inside the outline and do not let them cross the lace row unless your design intentionally shows a lace panel. If you use a reference strip, copy the lace crossing pattern and panel seam lines exactly in shape, not necessarily in size.
- Draw or trace the side-view outline on paper; label the five zones lightly.
- Mark the lace row as a band with two parallel edges and add crossing lines to show laces.
- Check that every zone is closed and that no seam line leaves the outline.
- Erase or lighten labels before adding decoration so they do not compete with the design.
Place decoration by zone
Choose one main pattern for the side panel and a smaller repeat for the toe box. Keep the heel counter simpler so the design has a clear focus. The lace row should remain readable: do not cover every lace crossing with heavy pattern. A useful convention is that decoration may cross a seam only if it is a deliberate motif, such as a stripe that continues from the side panel to the heel counter.
Use consistent units for spacing. For example, if your side panel is about 60 mm wide on paper, a hypothetical repeat of 10 mm gives six repeats. Measure your actual outline and label your chosen numbers as examples. Keep line weight consistent: outline heavier than seam lines, seam lines heavier than decoration lines.
- Sketch two or three pattern ideas lightly inside the side panel.
- Select one idea and repeat it with even spacing measured from the seam lines.
- Add a smaller motif in the toe box that echoes the side panel shape.
- Leave the lace row mostly clear and add only small accents between crossings.
Refine contrast and readability
Check readability by viewing the drawing from about one metre away. If the zones blur together, increase contrast between the outline and the decoration. If the lace row disappears, darken the lace crossing lines slightly. Keep the heel counter from becoming visually heavier than the side panel unless that is your intended focus.
Valid alternatives are allowed. A geometric repeat, a floral motif or a simple stripe system can all meet the rubric if zone mapping is clear and placement is deliberate. The rubric does not require a specific style; it requires that the toe box, side panel, heel counter and lace row are identifiable and that the decoration respects the convention you set.
- Compare outline, seam and decoration line weights; adjust so the hierarchy is clear.
- Check that the toe box motif does not spill into the vamp unless intended.
- Confirm the lace row still shows at least three crossing lines.
- Make a final pass to erase stray marks and tighten spacing.
Worked example
A side-view outline is 120 mm long. The side panel is 60 mm wide. You choose a hypothetical repeat of 10 mm. How many repeats fit, and where do you place the first repeat?
Worked answer
Six repeats fit because 60 divided by 10 equals 6. Place the first repeat 5 mm from the front seam of the side panel, then continue every 10 mm. Check by measuring the last repeat: it should end about 5 mm from the back seam, leaving even margins.
Four practice exercises
Exercise 1
On a side-view outline, mark the toe box, vamp, side panel, heel counter and lace row. Use a convention where the lace row is a band with three crossing lines. Describe where each zone sits relative to the others.
Show answer and check
The toe box is the front rounded area; the vamp is the top area behind it; the side panel is the large middle area; the heel counter is the back area; the lace row is a band across the vamp with three crossing lines. Seams separate each zone and stay inside the outline.
Why: Mapping zones first prevents decoration from blurring boundaries. The lace row is defined as a band so lacing remains readable.
Check: Confirm five labeled zones, three crossing lines in the lace row, and no seam line leaving the outline.
Exercise 2
A side panel is 48 mm wide. You choose a hypothetical repeat of 8 mm. How many repeats fit, and what even margin remains on each side if the repeats are centered?
Show answer and check
Six repeats fit because 48 divided by 8 equals 6. If centered with no extra margin, the repeats fill the panel exactly, so the margin is 0 mm on each side. If you want a 4 mm margin on each side, the usable width is 40 mm, giving five repeats.
Why: Division gives the number of repeats. Subtracting margins before dividing gives a centered layout with even edges.
Check: Multiply repeats by repeat size and add margins; the total should equal the panel width.
Exercise 3
You want a stripe motif to continue from the side panel to the heel counter. Describe how to cross the seam deliberately and how to check that the lace row stays readable.
Show answer and check
Draw the stripe as one continuous motif that crosses the seam at a clear angle, and state in your convention that this crossing is intentional. Keep the lace row clear by stopping the stripe before the lace band or by reducing its weight inside the band. Check that at least three lace crossings remain visible.
Why: Intentional crossings are allowed if they are deliberate and do not obscure key zones. The lace row must remain readable.
Check: Trace the stripe across the seam and confirm it is one motif, then count visible lace crossings.
Exercise 4
Your drawing looks flat from one metre away. List two adjustments that improve contrast without changing the pattern style, and explain how to verify the result.
Show answer and check
Darken the outline and seam lines slightly, and lighten the decoration lines. Alternatively, increase the size of the main side-panel motif while keeping the same shape. Verify by viewing from one metre and checking that zones separate clearly and the lace row remains visible.
Why: Contrast comes from line weight and scale, not from changing style. A clear hierarchy makes zones readable at a distance.
Check: Compare outline, seam and decoration weights; confirm the outline is heaviest and the lace row still shows three crossings.
Common mistakes
- Decorating before mapping zones, so the toe box and side panel merge. Lightly label and separate the five zones first, then decorate inside the boundaries.
- Covering the lace row with heavy pattern so laces are unreadable. Keep the lace row mostly clear and add only small accents between crossings.
- Using the same line weight for outline, seams and decoration. Set a clear hierarchy: heaviest outline, medium seams, lightest decoration.
- Spacing repeats by eye so the side panel looks uneven. Measure the panel width and divide by a chosen repeat; label numbers as examples.
Self-check rubric
- All five zones are identifiable: toe box, vamp, side panel, heel counter and lace row.
- Seam lines stay inside the outline and follow the stated convention.
- Decoration is placed deliberately within zones and respects seam boundaries unless a motif intentionally crosses.
- Lace row shows at least three readable crossing lines.
- Line weight hierarchy is clear: outline heaviest, seams medium, decoration lightest.
- Spacing is even and measured, with any numerical values labeled as examples.
- Valid alternative styles are accepted if zone mapping and placement are clear.
Questions and answers
Do I need to draw a realistic shoe?
No. The task is to decorate a given side-view outline. Focus on zone mapping and placement, not on shoe construction or foot anatomy.
Can I use any pattern style?
Yes. Geometric, floral or stripe systems are valid if the zones remain identifiable and the decoration follows your stated convention.
How many lace crossings should show?
Show at least three crossing lines in the lace row so the lacing pattern is readable. More is acceptable if the row stays clear.
What if my paper size differs from the example?
Measure your actual outline and choose your own repeat size. Treat any numbers in this lesson as hypothetical examples, not standards.