Free original lessons
Draw an Audience Crowd: Seating Rows and Varied Poses
Learn to draw a seated audience in rows with varied poses, clear overlaps, and depth cues using a simple grid and silhouette convention.
Free lesson
Four exercises
Worked answers
Object Drawing Lessons
Drawing an audience is not about perfect faces or detailed clothing. It is about arranging seated figures in rows so the crowd reads as a group with depth and variety. This lesson teaches a repeatable method: set a seating grid, place simplified seated silhouettes, vary poses, and manage overlaps between front and back rows. You will use a defined convention for figure height and posture so your results are checkable, while allowing valid stylistic alternatives. All measurements are hypothetical examples; measure your own paper and tools before drawing.
Practice materials: Printable downloads are not available for this lesson yet. Use the instructions and four exercises below.
Reference illustration
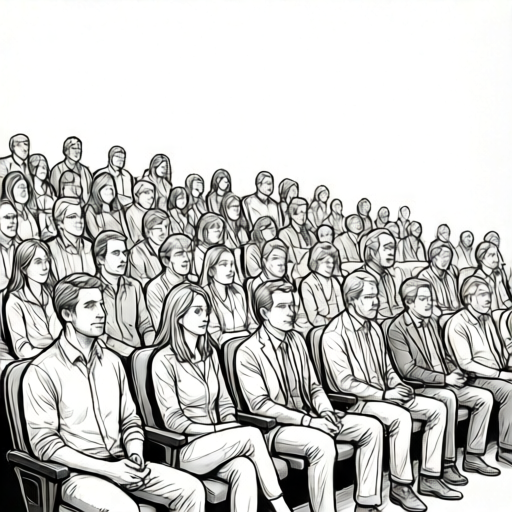
Use the stated measurements and conventions for each exercise.
Set a seating grid and a figure convention
Begin by drawing a light horizontal baseline for each row. Space rows evenly; for example, on a 20 cm tall paper with four rows, place baselines 4 cm apart at 4 cm, 8 cm, 12 cm, and 16 cm from the bottom. These four baselines span 12 cm (three 4 cm intervals), leaving margins above and below; the numbers are hypothetical, so adjust to your paper. Mark seat positions along each baseline with small ticks, spacing them about 2 cm apart. This grid is your seating plan.
Define a simple convention: the torso is a rounded rectangle from the row baseline up to the row midline; the head is an oval resting on top of the torso, with its bottom touching the midline and its top above the midline. Legs are two short lines from the baseline down to the seat edge, and feet are small ovals. This convention makes height and overlap easy to check: the midline marks the head/torso junction, and the baseline marks the seat. You may change proportions, but keep the convention consistent within one drawing so overlaps remain readable.
- Draw four evenly spaced horizontal baselines.
- Mark seat ticks along each baseline at equal intervals.
- Draw one seated silhouette using the torso-rectangle and head-oval-above-midline convention.
- Label the midline and baseline on your grid for reference.
Vary poses without losing the row structure
Variety makes a crowd believable. Change arm positions, head tilt, and shoulder angle while keeping each figure seated on its baseline. For example, one figure leans left with one arm raised, another sits upright with hands in the lap, and a third turns slightly toward a neighbor. Vary the head oval's tilt by up to 15 degrees; this is a hypothetical limit that keeps the figure readable. Keep feet near the seat edge so the seated posture remains clear.
Use three pose templates as starting points: upright, leaning forward, and turned sideways. Copy each template once, then modify one feature per copy. This produces varied silhouettes without redrawing from scratch. Check that every figure's torso bottom touches its row baseline; feet may extend slightly below the baseline toward the seat edge, but the torso must sit on the row line so the row structure stays clear.
- Draw three pose templates: upright, leaning forward, turned sideways.
- Copy each template along a row and change one feature per copy.
- Keep head tilt within 15 degrees of vertical for readability.
- Verify each figure's torso bottom touches the row baseline; feet may extend slightly below toward the seat edge.
Manage overlap and depth between rows
Overlap tells the viewer which row is in front. Draw back rows first, then front rows over them. A front figure should cover part of the figure behind it, but not so much that the back figure becomes unrecognizable. As a checkable rule, the front figure's silhouette may cover no more than half the vertical height of the back figure's torso rectangle, measured from the back figure's baseline to its midline. Use a small gap or a change in line weight to separate overlapping silhouettes.
Depth cues include size and placement. Figures in front rows can be slightly larger; for example, make front-row heads 10 percent taller than back-row heads. This is a hypothetical proportion; measure and adjust. Also, back-row figures sit higher on the page, which naturally suggests distance. Keep the grid consistent so the crowd reads as rows, not a random scatter.
- Draw the farthest row first using the smallest head size.
- Draw nearer rows over it, increasing head size slightly per row.
- Limit front-figure overlap to half of the back figure's torso.
- Add a small gap or line-weight change at overlap edges.
Check the crowd as a whole
Step back and check three things: row alignment, pose variety, and overlap clarity. Every figure should sit on a baseline; poses should differ by at least one feature; overlaps should clearly indicate front and back. Use the rubric below to score your drawing. Remember that figure proportions and poses vary, so valid alternatives exist as long as the convention is consistent and the crowd reads clearly.
- Confirm all figures touch their row baselines.
- Count distinct poses; aim for at least two distinct poses per row and at least three across the crowd.
- Check that each overlap shows a clear front-back relationship.
- Score the drawing using the rubric criteria.
Worked example
On a 20 cm tall paper, draw three rows with baselines at 4 cm, 9 cm, and 14 cm from the bottom (5 cm spacing, a different hypothetical example from the 4 cm spacing in Section 1). Place four seated figures per row using the head-oval convention. Vary poses so each row has at least two different poses. Draw back rows first and limit front-row overlap to half of the back figure's torso.
Worked answer
A completed drawing shows three evenly spaced rows. Each row has four figures with torsos touching its baseline and heads resting on the midline. Poses include upright, leaning, and turned variations. Back-row figures are slightly smaller; front-row figures overlap back figures by no more than half a torso, with small gaps at overlap edges. The crowd reads as seated rows with clear depth.
Four practice exercises
Exercise 1
Draw two rows with baselines 6 cm apart. Place three figures per row. Use the head-oval convention and make one figure in each row lean forward.
Show answer and check
Two rows of three figures each, all touching their baselines, with one leaning figure per row.
Why: The baselines set row structure; the leaning pose adds variety while the convention keeps figures readable.
Check: Verify six figures total, each with its torso touching a baseline, and exactly one leaning figure per row.
Exercise 2
Draw a back row of four figures and a front row of three figures. Make front-row heads 10 percent taller than back-row heads. Limit overlap so no front figure covers more than half of a back figure's torso.
Show answer and check
A back row of four smaller figures and a front row of three slightly taller figures with limited overlap.
Why: Size change and overlap create depth; limiting overlap keeps back figures recognizable.
Check: Measure head heights (top of head to midline) to confirm the front-row heads are about 10 percent taller than the back-row heads, and check each overlap against the half-torso rule.
Exercise 3
Create a single row of five figures using three pose templates: upright, turned sideways, and leaning forward. Change one feature per copy so no two figures are identical.
Show answer and check
Five figures on one baseline with varied poses and at least one changed feature per figure.
Why: Template copying with one change produces variety efficiently while keeping the row consistent.
Check: Count five figures with torsos on the baseline and confirm each pair differs by at least one feature.
Exercise 4
Draw three rows with four figures each. Use a consistent convention and add a small gap at every overlap edge. Check that every figure touches its baseline and that each row has at least two poses.
Show answer and check
Three rows of four figures with consistent convention, visible gaps at overlaps, and pose variety.
Why: Consistent convention and gaps improve readability; pose variety makes the crowd believable.
Check: Verify twelve figures, all with torsos touching their baselines, gaps at overlaps, and at least two distinct poses per row.
Common mistakes
- Drawing figures at random heights without baselines. Draw light baselines first and place every figure's torso bottom on its row baseline; feet may extend slightly below toward the seat edge.
- Making all poses identical. Use three pose templates and change one feature per copy to create variety.
- Letting front figures completely hide back figures. Limit overlap to half of the back figure's torso and leave a small gap or line-weight change.
- Changing figure proportions mid-drawing. Choose one convention for head, torso, and legs, and apply it consistently across all rows.
Self-check rubric
- All figures have torsos touching their row baselines (0-2 points).
- At least three distinct poses appear across the crowd (0-2 points).
- Overlaps clearly show front and back rows without hiding back figures completely (0-2 points).
- Figure convention is consistent across rows (0-2 points).
- Depth cues such as size change or placement are present (0-2 points).
Questions and answers
Do I need to draw faces?
No. This lesson focuses on crowd structure, poses, and overlap. Faces are optional and can be left as simple ovals.
How many rows should I draw?
Three to five rows work well. Choose a number that fits your paper and keeps each row readable.
Can I use different figure proportions?
Yes, as long as you keep one convention consistent within the drawing so overlaps remain clear.
How do I know my overlap is correct?
Check that the front figure covers no more than half of the back figure's torso and that a small gap or line-weight change separates them.