Free original lessons
Drawing Evergreen Trees: Conical Silhouette, Layered Boughs, Needle Clusters
Learn to draw evergreen trees with a conical outline, stacked bough layers, and simple needle-cluster texture using checkable proportions and clear conventions.
Free lesson
Four exercises
Worked answers
Object Drawing Lessons
This lesson teaches a repeatable method for drawing an evergreen tree. You will build a conical silhouette from a measured triangle, add three overlapping bough layers that create depth, and texture the foliage with needle clusters. The convention is simple: draw the tree as a stack of downward-curving bough bands, each narrower than the one below, with needle clusters shown as short outward strokes grouped in threes. Letter styles and stroke directions may vary; the rubric rewards clear structure and consistent texture rather than a single perfect shape. All measurements are hypothetical examples you can scale to your paper.
Practice materials: Printable downloads are not available for this lesson yet. Use the instructions and four exercises below.
Reference illustration
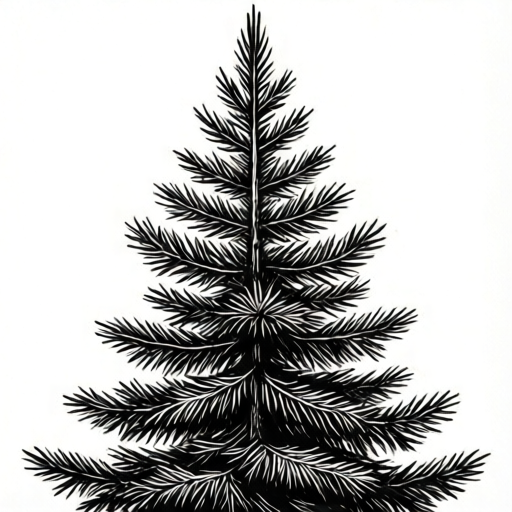
Use the stated measurements and conventions for each exercise.
Build the conical silhouette
Start with a light vertical center line. Mark the tree base and the tip. For a hypothetical example, make the tree 12 cm tall and 6 cm wide at the base, so the width-to-height ratio is 1:2. Draw two straight guide lines from the tip to the base edges to form a triangle. The conical silhouette is the outer boundary; keep it slightly irregular so the tree does not look mechanical.
Check the cone by measuring: at half the height, the width should be about half the base width. If your base is 6 cm, the midline width is about 3 cm. Adjust the guide lines before adding boughs.
- Draw a vertical center line and mark tip and base.
- Mark base width symmetrically around the center line.
- Connect tip to base edges with light guide lines.
- Measure the midline width and adjust for a 1:2 taper.
Stack three layered boughs
A bough layer is a downward-curving band that spans the tree and overlaps the layer below. Draw three layers from bottom to top. The bottom layer is widest and sits near the base; the middle layer is about two-thirds as wide; the top layer is about one-third as wide. Each layer should dip slightly in the center and rise at the edges, like a shallow arc.
Overlap creates depth: the upper layer should cover part of the lower layer. Leave small gaps between layers so the silhouette reads as separate boughs. Keep the layers inside the conical guide, but let a few needle clusters extend slightly beyond it for a natural edge.
- Draw the bottom bough as a wide shallow arc across the lower third.
- Draw the middle bough at about two-thirds width, overlapping the bottom.
- Draw the top bough at about one-third width, overlapping the middle.
- Check that each upper layer is narrower and overlaps the one below.
Add needle-cluster texture
Use a needle-cluster convention: group three short strokes fanning outward from a small point, then repeat the group along the bough edge. Strokes should be about 0.5 to 1 cm long in the hypothetical 12 cm tree. Vary direction slightly but keep each cluster attached to a bough. Do not draw individual needles everywhere; clusters suggest texture without clutter.
Texture should follow the bough direction. On the underside of a bough, clusters point downward; on the top, they point outward and slightly up. This directional texture helps the layered boughs read as three-dimensional.
- Mark small anchor points along each bough edge.
- At each anchor, draw three short outward strokes as one cluster.
- Repeat clusters with slight variation in length and angle.
- Keep clusters attached to boughs and avoid filling the whole cone.
Check proportion and depth
Before finishing, check three things: the silhouette tapers from base to tip, the three bough layers are distinct and overlapping, and the needle clusters are grouped rather than scattered. A simple arithmetic check: if the base width is 6 cm, the middle layer should be about 4 cm and the top about 2 cm. These are hypothetical values; measure your own drawing and keep the ratios consistent.
Depth comes from overlap and from leaving the lower layers slightly darker or more textured than the upper ones. You can vary stroke density, but keep the convention consistent so the tree reads as one species.
- Measure base, middle, and top layer widths.
- Confirm each upper layer overlaps the one below.
- Check that needle clusters follow bough direction.
- Adjust any layer that breaks the conical taper.
Worked example
Draw a 10 cm tall evergreen tree with a base width of 5 cm. Show three bough layers and needle clusters. Use the convention from the lesson.
Worked answer
Draw a center line 10 cm tall. Mark a 5 cm base centered on the line. Connect the tip to the base edges with light guides. At half height, the width should be about 2.5 cm. Draw the bottom bough as a shallow arc about 5 cm wide near the base. Draw the middle bough about 3.3 cm wide, overlapping the bottom. Draw the top bough about 1.7 cm wide, overlapping the middle. Add three-stroke needle clusters along each bough edge, pointing downward on undersides and outward on tops. Check that widths decrease from 5 cm to 3.3 cm to 1.7 cm and that each upper layer overlaps the lower one.
Four practice exercises
Exercise 1
A tree is 14 cm tall with a base width of 7 cm. What should the width be at half height if the taper is consistent?
Show answer and check
About 3.5 cm.
Why: The base-to-height ratio is 7:14, or 1:2. At half height, the width is half the base width: 7 divided by 2 equals 3.5 cm.
Check: Measure the drawing at half height and compare to 3.5 cm; allow small variation but keep the taper visible.
Exercise 2
You draw three bough layers with widths 8 cm, 5 cm, and 3 cm from bottom to top. Do the widths follow the lesson's decreasing pattern?
Show answer and check
Yes, the widths decrease from 8 cm to 5 cm to 3 cm.
Why: Each upper layer is narrower than the one below, which supports the conical silhouette and layered depth.
Check: List the widths in order and confirm each is smaller than the previous one.
Exercise 3
A needle cluster convention uses three strokes. If you place 6 clusters along the bottom bough and 4 along the middle bough, how many strokes are used in total?
Show answer and check
30 strokes.
Why: Six clusters times three strokes equals 18; four clusters times three equals 12; 18 plus 12 equals 30.
Check: Count clusters and multiply by three, then add the two groups.
Exercise 4
Your conical guide is 12 cm tall and 6 cm wide at the base. You notice the middle bough is 5 cm wide. Is it too wide compared with the hypothetical two-thirds guideline?
Show answer and check
Yes, it is wider than the guideline of about 4 cm.
Why: Two-thirds of 6 cm is 4 cm. A 5 cm middle bough is wider than the guideline and may weaken the taper.
Check: Multiply base width by two-thirds and compare with the measured middle bough width.
Common mistakes
- Drawing a perfect triangle with no bough separation. Break the cone into three overlapping arcs and leave small gaps between layers.
- Making upper layers wider than lower layers. Measure each layer and keep widths decreasing from bottom to top, for example 6 cm, 4 cm, 2 cm.
- Scattering individual needles across the whole cone. Use grouped three-stroke clusters attached to bough edges and repeat them selectively.
- Letting needle clusters point in random directions. Align clusters with the bough: downward on undersides, outward and slightly up on tops.
Self-check rubric
- Conical silhouette tapers from base to tip with a measurable width-to-height ratio.
- Three bough layers are distinct, overlapping, and decrease in width from bottom to top.
- Needle clusters use a consistent three-stroke grouping and follow bough direction.
- Texture is selective rather than covering the entire cone.
- Proportions are checked with simple measurements and consistent units.
- Valid alternative stroke styles are accepted if structure and grouping remain clear.
Questions and answers
Do I need to draw every needle?
No. The needle-cluster convention uses grouped strokes to suggest texture. Drawing every needle is unnecessary and can obscure the layered bough structure.
Can the tree be wider or narrower than the example?
Yes. The 1:2 width-to-height ratio is a hypothetical starting point. Keep the taper consistent and measure your own drawing to check that upper layers are narrower.
How many bough layers should I draw?
Three layers are enough to teach the method. You can add more, but each new layer should be narrower and overlap the one below.
What if my needle clusters look uneven?
Uneven clusters are acceptable if they remain grouped and attached to boughs. Vary length and angle slightly, but keep the three-stroke grouping consistent.