Free original lessons
Octopus Pencil Drawing: Arm Curl and Sucker Construction
Learn to draw an octopus in pencil by building arm curls, placing suckers, and connecting arms to the body with clear, checkable steps.
Free lesson
Four exercises
Worked answers
Object Drawing Lessons
This lesson teaches a repeatable method for drawing an octopus in pencil, focusing on three skills: shaping arm curls, placing suckers along the arm, and joining arms cleanly to the body. You will use simple geometric guides, a defined curl convention, and a small set of self-checks. All measurements are hypothetical examples; measure your own paper and pencil to set your own values. The approach works for any octopus pose because it separates silhouette, arm direction, and sucker rhythm into independent decisions.
Practice materials: Printable downloads are not available for this lesson yet. Use the instructions and four exercises below.
Reference illustration
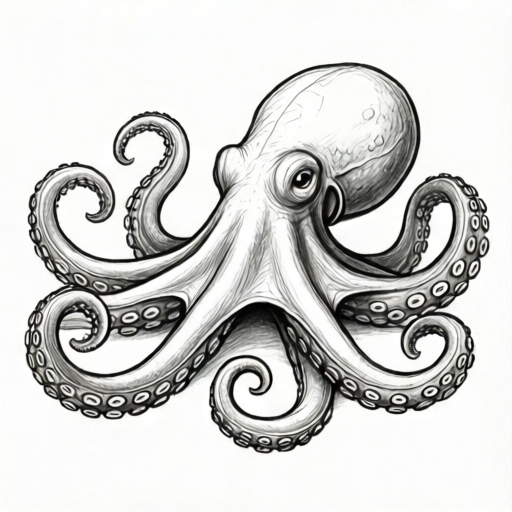
Use the stated measurements and conventions for each exercise.
Set Up the Page and Body Guide
Choose a pencil grade you can erase easily, such as a standard HB or 2B, and a soft eraser. Draw a light oval for the mantle (the head-body) and a smaller oval below it for the eye area. Keep both shapes light so they can be adjusted. The body guide should occupy roughly one third of your drawing area, leaving room for arms to spread. Mark a center line down the mantle to help keep left and right arms balanced.
Define a simple convention before drawing arms: the arm centerline is the path the arm follows, and the arm width is measured perpendicular to that centerline. Suckers sit on the inner side of each curl, meaning the side facing the curl's center. This convention lets you check placement consistently even when arm styles vary.
- Draw a light oval for the mantle, about 6 cm tall and 4 cm wide as a hypothetical example.
- Add a smaller oval for the eye area just below the mantle, about 2 cm wide.
- Mark a vertical center line through the mantle to guide symmetry.
- Lightly sketch a horizontal line where the arms will attach, near the lower third of the mantle.
Build Three Arm Curl Shapes
Arm curls are the backbone of an octopus drawing. Use three curl shapes as building blocks: the C-curl, the S-curl, and the hook-curl. The C-curl bends in one direction like a letter C. The S-curl changes direction once, creating a soft wave. The hook-curl ends with a tight turn. Draw each shape first as a single centerline, then add width on both sides. Vary curl direction across arms so the silhouette reads as balanced rather than repetitive.
When adding width, keep the arm thickness roughly constant along most of its length and taper slightly toward the tip. A hypothetical example is 1 cm width near the body tapering to 0.5 cm at the tip. Check that the inner edge of the curl stays smooth; sharp corners usually mean the centerline changed direction too abruptly.
- Draw a C-curl centerline: a smooth arc bending left, about 8 cm long.
- Draw an S-curl centerline: start right, curve left, then curve right again.
- Draw a hook-curl centerline: a gentle arc ending in a tight half-circle.
- Add width to each centerline by drawing parallel edges about 1 cm apart, tapering to 0.5 cm at the tip.
- Erase the centerline lightly and smooth any sharp corners on the inner edge.
Place Suckers Along the Inner Curl
Suckers are small circles or ovals placed along the inner side of each arm curl. Space them evenly, but let the spacing shrink slightly toward the tip. A hypothetical spacing is 1 cm between sucker centers near the body and 0.6 cm near the tip. Draw each sucker as a light circle first, then add a smaller inner circle to suggest the sucker's center. Keep sucker size proportional to arm width: about one third of the arm width is a workable starting point.
Check sucker placement by tracing the inner edge of the arm with your finger. Each sucker center should sit just inside that edge, not on the outer edge and not floating in the middle of the arm. If an arm curls in the opposite direction, the suckers move to the other side. This is the key rule: suckers follow the inner side of the curl, not a fixed left or right side of the page.
- Mark sucker centers along the inner edge of each arm, starting near the body.
- Space centers about 1 cm apart near the body and 0.6 cm apart near the tip as hypothetical values.
- Draw a light circle at each center, sized about one third of the arm width.
- Add a smaller inner circle inside each sucker to suggest depth.
- Check that every sucker sits on the inner side of its curl.
Connect Arms to the Body and Refine
Arms should emerge from the lower part of the mantle, not from the eye area. Draw a short transition zone where each arm meets the body: widen the arm slightly at the connection, then blend it into the mantle outline. Avoid drawing arms as separate tubes stuck onto the body; instead, let the body outline flow into the first segment of each arm. A hypothetical connection width is 1.2 cm at the body, narrowing to the normal arm width within 2 cm.
Refine the drawing by darkening the final outlines and erasing construction lines. Check the silhouette by looking at the drawing from a short distance: the arm curls should read clearly, and the suckers should appear on the inner sides. Adjust any arm that looks too straight or any sucker that sits on the outer edge. Keep the pencil work light until the structure is correct.
- Draw a short transition zone at each arm-body connection, widening slightly at the body.
- Blend the arm outline into the mantle outline so the connection looks continuous.
- Darken the final outlines with a slightly firmer pencil stroke.
- Erase construction lines and centerlines.
- Check the silhouette from a short distance and adjust any unclear curl or misplaced sucker.
Worked example
Draw a single octopus arm using a C-curl that bends to the left. The arm starts at the body on the right and ends at a tip on the left. Place five suckers along the inner side of the curl. Use hypothetical values: arm width 1 cm near the body tapering to 0.5 cm at the tip, sucker spacing 1 cm near the body and 0.6 cm near the tip.
Worked answer
Draw a smooth C-shaped centerline about 8 cm long, bending left. Add width: 1 cm near the body, tapering to 0.5 cm at the tip. Because the curl bends left, the inner side is the left side of the arm. Place five sucker centers along that inner edge, starting near the body and spacing them so the gaps shrink gradually from about 1 cm near the body to about 0.6 cm near the tip. Draw each sucker as a circle about one third of the arm width, with a smaller inner circle. Check that every sucker sits just inside the left edge and that the arm width tapers smoothly.
Four practice exercises
Exercise 1
Draw a single arm as an S-curl centerline about 9 cm long. Add width from 1 cm near the body to 0.5 cm at the tip. Place four suckers on the inner side of the curl. Describe where each sucker sits relative to the curl direction.
Show answer and check
An S-curl has two bends facing opposite directions. The inner side of the first bend is the edge facing that bend's center; at the inflection point the inner side switches to the opposite edge for the second bend. Place four sucker centers: the first two on the inner edge of the first bend (near the body and just before the inflection point), and the last two on the opposite edge for the second bend (just after the inflection point and near the tip). Spacing shrinks from about 1 cm to 0.6 cm as hypothetical values. Each sucker is a circle about one third of the arm width with a smaller inner circle.
Why: An S-curl has two bends facing opposite directions, so the inner side alternates: suckers sit on the edge facing the center of the first bend, then switch to the opposite edge for the second bend at the inflection point. This is why the sucker row is not a single continuous edge on an S-curl.
Check: Trace the inner edge of each bend separately. Confirm the first two suckers sit on the edge facing the first bend's center and the last two sit on the opposite edge facing the second bend's center, switching at the inflection point. Then measure spacing between centers and confirm it shrinks toward the tip.
Exercise 2
Draw a hook-curl arm that ends in a tight half-circle. The arm width is 1.2 cm near the body and 0.6 cm at the tip. Place three suckers: one near the body, one at the start of the hook, and one inside the hook. State which side of the arm each sucker is on.
Show answer and check
The hook-curl bends in one direction and then tightens. The inner side is the side facing the hook's center. The first sucker sits on the inner edge near the body, the second on the inner edge at the start of the hook, and the third inside the hook on the inner edge. All three are on the same side of the arm because the curl does not change direction.
Why: A hook-curl keeps bending the same way, so the inner side stays consistent. The tight half-circle at the end means the inner edge curves sharply, and the third sucker must sit inside that curve.
Check: Confirm all three sucker centers are on the same edge of the arm. Check that the third sucker is inside the hook's curve, not on the outer edge.
Exercise 3
Draw two arms meeting the body at the lower mantle. Arm A is a C-curl bending right; Arm B is a C-curl bending left. Each arm has three suckers. Describe the connection zone and the sucker placement for both arms.
Show answer and check
Both arms widen slightly at the body, about 1.2 cm as a hypothetical value, and blend into the mantle outline within 2 cm. Arm A bends right, so its suckers sit on the right inner edge. Arm B bends left, so its suckers sit on the left inner edge. Each arm has three suckers spaced about 1 cm apart near the body and closer near the tip.
Why: The connection zone must look continuous, so the arm outline flows into the mantle. Because the arms curl in opposite directions, their inner sides are opposite, so the suckers appear on opposite edges.
Check: Check that each arm's outline blends into the mantle without a sharp step. Trace each inner edge and confirm the suckers are on the correct side for that arm's curl direction.
Exercise 4
Draw one arm with a C-curl bending left and one arm with a C-curl bending right. Use the same arm length and width for both. Place five suckers on each arm. Compare the two arms and state one way they are similar and one way they differ.
Show answer and check
Both arms have the same length, width taper, and sucker count, so they are similar in size and rhythm. They differ in curl direction: the left-bending arm has suckers on its left inner edge, and the right-bending arm has suckers on its right inner edge. The silhouettes mirror each other.
Why: Curl direction determines which edge is the inner side. When two arms have opposite curls, their sucker placement mirrors, even though the arm dimensions are the same.
Check: Measure both arms to confirm equal length and width. Trace each inner edge and confirm the suckers are on opposite sides. Check that the silhouettes mirror each other.
Common mistakes
- Drawing arms as separate tubes attached to the body. Widen each arm slightly at the connection and blend its outline into the mantle outline so the body flows into the arm.
- Placing suckers on the outer edge of a curl. Trace the inner edge of the curl and move each sucker center just inside that edge; suckers always follow the inner side of the curl.
- Making all arm curls bend in the same direction. Vary curl direction using C-curls, S-curls, and hook-curls so the silhouette looks balanced and natural.
- Keeping arm width constant all the way to the tip. Taper the arm slightly toward the tip, for example from 1 cm to 0.5 cm as a hypothetical value.
Self-check rubric
- Arm curls read clearly as C-curls, S-curls, or hook-curls, with at least two different curl directions.
- Suckers are placed on the inner side of each curl, not on the outer edge.
- Sucker spacing shrinks gradually toward the tip and sucker size is proportional to arm width.
- Arms connect to the lower mantle with a blended transition, not as separate tubes.
- Arm width tapers slightly toward the tip and the inner edge is smooth.
- The final silhouette is balanced and the arm count is clear.
- Valid alternatives are accepted: different curl directions, different sucker counts, and different arm styles are allowed if the inner-side rule and connection rule are followed.
Questions and answers
Do suckers go on the left or right side of an arm?
They go on the inner side of the curl. If the arm curls left, the suckers are on the left side of that arm; if it curls right, they are on the right side.
How many arms should I draw?
An octopus has eight arms. You can show all eight or let some overlap, but keep the count clear in your final drawing.
Can I use a different pencil grade?
Yes. Use a grade you can erase easily for construction, then a slightly firmer grade for final outlines. Measure your own pencil and paper to set your own size values.
How do I check my sucker spacing?
Measure the distance between sucker centers along the inner edge. Spacing should shrink gradually toward the tip, for example from 1 cm to 0.6 cm as hypothetical values.