Free original lessons
Cheekbone Contour and Highlight Shading: A Plane-Based Drawing Lesson
Learn to draw cheekbones using facial-plane contour lines and highlight-shadow shading. Includes a convention, worked example, four practice tasks, and a validation plan.
Free lesson
Four exercises
Worked answers
Object Drawing Lessons
Cheekbones read clearly when you treat the face as a set of planes rather than a smooth oval. This lesson teaches a repeatable convention: locate the cheekbone ridge, mark its contour with a thin guide line, then shade a highlight zone above the ridge and a shadow zone below it. The convention is explicit so that different valid styles can still be checked. All measurements are hypothetical examples; measure your own paper and tools before relying on any number. The printable resources described here are planned, not yet produced.
Practice materials: Printable downloads are not available for this lesson yet. Use the instructions and four exercises below.
Reference illustration
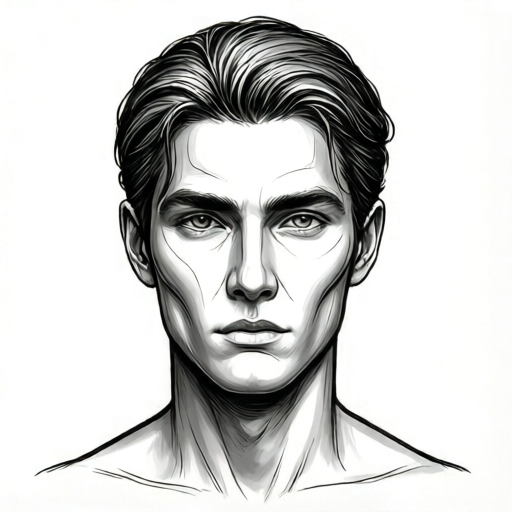
Use the stated measurements and conventions for each exercise.
Define the cheekbone plane convention
Use a face outline with the nose bridge, eye line, and jaw edge lightly marked. The cheekbone ridge runs from beside the nose toward the outer eye area, angling slightly upward. Treat the ridge as a fold between two planes: an upper plane that catches light and a lower plane that turns away.
Adopt this convention: the contour line is a thin, continuous guide drawn along the ridge; the highlight zone sits above the contour and the shadow zone below it. Letter styles and line weights vary, so the convention fixes zone placement, not a single correct stroke appearance.
- Mark the eye line and the base of the nose on your face outline.
- Draw a light diagonal guide from beside the nose to the outer eye corner on each side.
- Label the area above the guide as highlight and below it as shadow.
- Keep the guide thin so shading can overlap it without hiding the plane change.
Place highlight and shadow zones
The highlight zone is widest near the top of the cheekbone and narrows toward the temple. The shadow zone begins just under the ridge and deepens toward the jaw. Keep both zones inside the face outline and stop them before the jaw edge unless your reference shows otherwise.
Use simple checkable arithmetic for zone width. For example, if the face width on your paper is 80 mm, a hypothetical highlight band of 12 mm and shadow band of 16 mm gives a combined 28 mm, leaving 52 mm for the rest of the face width. These numbers are examples only; measure your own drawing.
- Measure the face width across the cheek area with a ruler.
- Choose a highlight band width and a shadow band width that fit inside that width.
- Add the two band widths and subtract from the face width to confirm remaining space.
- Adjust the bands until the sum is less than the face width.
Shade with graded pressure
Shade the shadow zone with short strokes that follow the plane direction, increasing pressure toward the lower edge. Leave the highlight zone mostly paper-white, adding only a faint edge where it meets the contour. A soft transition at the contour keeps the plane change readable without a hard outline.
Check consistency by comparing the two sides. If one shadow band is 16 mm and the other is 20 mm on a hypothetical 80 mm face, the difference is 4 mm; decide whether that asymmetry matches your reference before finalizing.
- Fill the shadow zone with light strokes first.
- Add a second layer near the lower edge for depth.
- Keep the highlight zone clear except for a faint boundary stroke.
- Compare both sides and note any width difference in millimetres.
Review and refine the contour
Step back and check that the contour line still reads as a plane change, not a decorative stripe. Erase or lighten any guide that competes with the shading. Valid alternatives include a broken contour, a dotted guide, or a soft blended edge, provided the highlight remains above and the shadow below.
Record your chosen band widths and the face width so the drawing can be checked later. Consistent units, such as millimetres, make the arithmetic simple and verifiable.
- Confirm highlight is above the contour and shadow below on both sides.
- Lighten any guide line that is too dark.
- Write down face width, highlight width, and shadow width.
- Verify that highlight plus shadow is less than face width.
Worked example
A face outline measures 90 mm across the cheek area. You choose a 14 mm highlight band and an 18 mm shadow band. Confirm the bands fit and state where each zone sits relative to the contour.
Worked answer
14 mm plus 18 mm equals 32 mm. 90 mm minus 32 mm leaves 58 mm, so the bands fit. The highlight band sits above the contour line and the shadow band below it, both inside the face outline.
Four practice exercises
Exercise 1
A face outline is 100 mm wide. You plan a 15 mm highlight band and a 20 mm shadow band. Do the bands fit, and what is the remaining width?
Show answer and check
Yes, they fit. 15 plus 20 equals 35 mm, and 100 minus 35 leaves 65 mm.
Why: Add the two band widths, then subtract from the face width to confirm positive remaining space.
Check: Re-add 15 and 20 to get 35, then subtract 35 from 100 to get 65.
Exercise 2
On a 70 mm face, one side has a 10 mm shadow band and the other has a 14 mm shadow band. What is the difference, and does the total shadow plus a 12 mm highlight fit?
Show answer and check
The difference is 4 mm. The larger side totals 14 plus 12 equals 26 mm, which is less than 70 mm, so it fits.
Why: Compare the two shadow widths, then check the larger side against the face width.
Check: Subtract 10 from 14 to get 4; add 14 and 12 to get 26; confirm 26 is less than 70.
Exercise 3
Describe where the highlight and shadow zones go for a cheekbone contour drawn from beside the nose to the outer eye corner, and state one valid alternative to a continuous contour line.
Show answer and check
Highlight above the contour, shadow below it, both inside the face outline. A broken or dotted contour is a valid alternative.
Why: The convention fixes zone placement, not stroke style, so alternatives are allowed when placement is correct.
Check: Verify highlight is above and shadow below on both sides, and confirm the alternative still separates the zones.
Exercise 4
A face is 85 mm wide. You want a highlight band of 11 mm and a shadow band of 19 mm. Show the arithmetic and state whether the bands fit.
Show answer and check
11 plus 19 equals 30 mm. 85 minus 30 leaves 55 mm, so the bands fit.
Why: Sum the bands and subtract from the measured face width.
Check: Recompute 11 plus 19 as 30, then 85 minus 30 as 55.
Common mistakes
- Drawing the contour as a thick outline that looks like a scar. Keep the guide thin and let shading, not line weight, show the plane change.
- Placing the highlight below the ridge and shadow above it. Recheck the convention: highlight above, shadow below, then adjust the zones.
- Shading outside the face outline. Stop strokes at the jaw edge and compare zone widths to the measured face width.
- Using mismatched units for face and band widths. Measure everything in millimetres and redo the subtraction check.
Self-check rubric
- Contour guide follows the cheekbone ridge from beside the nose toward the outer eye area.
- Highlight zone is above the contour and shadow zone below on both sides.
- Shading stays inside the face outline.
- Band widths are recorded with units and the sum is less than the measured face width.
- Valid alternatives such as broken contours or blended edges are accepted if zone placement is correct.
Questions and answers
Do I have to use a continuous contour line?
No. A broken or dotted guide is valid if the highlight stays above and the shadow below.
Are the band widths fixed?
No. The numbers are hypothetical examples; choose widths that fit your measured face width.
Can I blend the shadow edge?
Yes, as long as the plane change remains visible and the zones stay on the correct sides.
How do I check my arithmetic?
Add highlight and shadow widths, then confirm the sum is less than the measured face width.