Free original lessons
Winter Clothing Drawing: Coat Layers, Scarf Wrap, and Boot Folds
Learn to draw winter garments with clear coat layering, a wrapped scarf, and boot fold cues using simple shapes and checkable steps.
Free lesson
Four exercises
Worked answers
Object Drawing Lessons
Winter clothing drawing rewards attention to how garments overlap and bunch. This lesson teaches a repeatable sequence for a coat with visible layers, a scarf that wraps logically around the neck, and boots with fold cues at the ankle. You will use basic shapes, consistent proportions, and a simple convention for line weight. All measurements are hypothetical examples; measure your own paper and tools. The goal is clear construction, not fashion illustration.
Practice materials: Printable downloads are not available for this lesson yet. Use the instructions and four exercises below.
Reference illustration
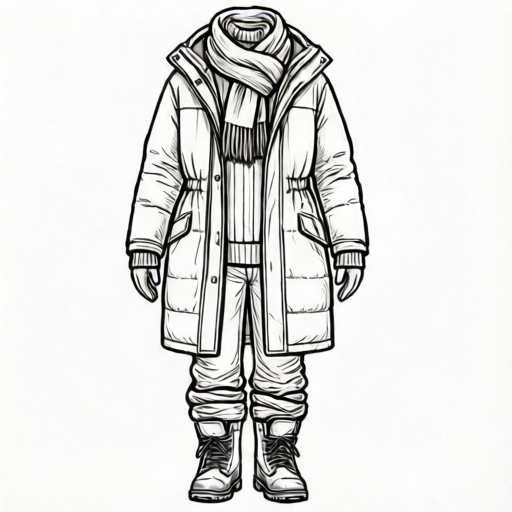
Use the stated measurements and conventions for each exercise.
Coat Layers: Build from the Body Outward
Start with a light body guide: a vertical oval for the torso and two angled lines for the shoulders. This guide is not the coat; it is the volume the coat must cover. Draw the innermost layer first, such as a sweater hem and collar, then the coat body, then the coat opening and lapels. Each layer should overlap the one beneath it by a small, consistent amount so the eye reads depth.
Use a simple convention: solid lines for outer edges, dashed lines for hidden edges, and a single short tick where a layer disappears under another. Keep line weight uniform except at overlaps, where a slightly heavier line can show the top layer. Avoid shading until construction is clear.
- Draw a torso oval about 3 units tall and 2 units wide (hypothetical units).
- Add a sweater hem as a horizontal curve across the lower third of the oval.
- Draw the coat body as a wider outline that overlaps the sweater hem by about 0.5 units.
- Add the coat opening as two vertical curves from neck to hem, leaving a gap of about 0.3 units.
- Draw lapels as angled shapes that overlap the coat opening at the chest.
- Mark hidden edges with dashed lines where the sweater disappears under the coat.
Scarf Wrap: Logical Overlap and Direction
A scarf reads as wrapped when its path is continuous and its overlaps are consistent. Decide the wrap direction first: for example, the scarf goes from the left shoulder, across the front, around the right side of the neck, and back to the left. Draw the scarf as a thick band, not a single line, so you can show front and back segments.
Use arrows only as planning marks, then remove them in the final drawing. Where the scarf crosses itself, the top segment gets a solid outline and the lower segment gets a dashed outline at the crossing. Keep the band width consistent, about 0.4 units in the hypothetical example.
- Draw a neck oval and mark the left and right shoulder points.
- Sketch the scarf path as a thick band from left shoulder across the chest.
- Wrap the band around the right side of the neck and bring it back to the left.
- At the crossing on the chest, draw the top segment solid and the lower segment dashed.
- Add a short hanging end with a slight curve to show gravity.
- Check that the band width stays consistent along the whole path.
Boot Folds: Ankle Cues and Ground Contact
Boot folds appear where the ankle bends and where the boot meets the ground. Draw the boot as a simple L-shape: a vertical shaft and a horizontal foot. Add fold cues as short curved lines at the ankle, fanning outward from the bend. Folds should be closer together near the ankle and farther apart up the shaft.
Show ground contact with a flat sole line and a small shadow shape beneath. Do not invent printer tolerances or manufacturing standards; if you use a numerical fold spacing, label it as a hypothetical example, such as folds spaced 0.3 units apart at the ankle and 0.6 units apart higher up.
- Draw the boot shaft as a vertical rectangle about 2 units tall and 1 unit wide.
- Add the foot as a horizontal shape about 1.5 units long.
- Mark the ankle bend where the shaft meets the foot.
- Draw three short curved fold lines fanning from the ankle bend.
- Space folds closer at the ankle and wider up the shaft.
- Add a flat sole line and a small shadow shape beneath the boot.
Putting the Outfit Together
Combine the coat, scarf, and boots on one figure using the same body guide. Draw the body guide first, then the innermost sweater, then the coat, then the scarf, then the boots. Check overlaps: the scarf should sit on top of the coat collar, and the coat hem should overlap the sweater hem. Boot tops should overlap the lower legs.
Use the practice strip to sketch the full outfit in three quick passes: construction, overlap check, and fold cues. Keep the drawing small enough to fit the strip, about 4 units wide and 6 units tall in the hypothetical example.
- Draw the full body guide with head, torso, and legs.
- Add the sweater hem and collar as the innermost layer.
- Draw the coat body, opening, and lapels over the sweater.
- Add the scarf path with consistent band width and clear crossings.
- Draw both boots with ankle folds and ground contact.
- Check all overlaps and remove planning arrows.
Worked example
Draw a small winter outfit on a 4 by 6 unit practice strip: a coat over a sweater, a scarf wrapped once around the neck, and one boot with ankle folds. Use the overlap convention.
Worked answer
The drawing shows a torso oval 3 units tall and 2 units wide. A sweater hem crosses the lower third. The coat outline overlaps the hem by 0.5 units and has a 0.3-unit opening. The scarf band is 0.4 units wide, goes from the left shoulder across the chest, around the right neck, and back to the left; the top segment is solid at the crossing. The boot shaft is 2 units tall and 1 unit wide, with three folds spaced 0.3 units at the ankle and 0.6 units higher up. A flat sole line and small shadow complete the boot.
Four practice exercises
Exercise 1
Draw a coat over a sweater on a 3 by 5 unit area. Show the sweater hem and collar, and overlap the coat by 0.5 units. Use dashed lines for hidden edges.
Show answer and check
A torso oval 3 units tall and 2 units wide; sweater hem across the lower third; coat outline wider than the oval and overlapping the hem by 0.5 units; coat opening 0.3 units wide; dashed lines where the sweater disappears under the coat.
Why: The inner layer must be drawn first so the coat can overlap it consistently. The 0.5-unit overlap is a hypothetical example that creates a clear depth cue without hiding too much of the sweater.
Check: Verify that the sweater hem is visible below the coat hem and that every hidden sweater edge is dashed. Measure the overlap on your paper to confirm it is about 0.5 units.
Exercise 2
Draw a scarf wrapped once around the neck, starting at the left shoulder and crossing the chest. Use a band width of 0.4 units and show one crossing with a solid top segment and dashed lower segment.
Show answer and check
A neck oval with left and right shoulder marks; a 0.4-unit band from the left shoulder across the chest, around the right neck, and back to the left; at the chest crossing, the top segment is solid and the lower segment is dashed; a short hanging end curves downward.
Why: A continuous band with a decided wrap direction reads as a scarf. The solid and dashed segments at the crossing clarify which part is on top.
Check: Trace the scarf path with your finger to confirm it is continuous. Check that the band width stays about 0.4 units and that only one segment is solid at the crossing.
Exercise 3
Draw a boot with a 2-unit shaft and a 1.5-unit foot. Add three ankle folds spaced 0.3 units apart at the ankle and 0.6 units apart higher up. Include a flat sole line and a small shadow.
Show answer and check
An L-shaped boot with a vertical shaft 2 units tall and 1 unit wide, a horizontal foot 1.5 units long, three curved folds fanning from the ankle bend, closer spacing at the ankle and wider spacing up the shaft, a flat sole line, and a small shadow shape beneath.
Why: Folds cluster where the ankle bends and spread out along the shaft, which matches how fabric or leather bunches. The spacing values are hypothetical examples for a small sketch.
Check: Confirm that the folds originate near the ankle bend and that the spacing increases upward. Check that the sole line is flat and the shadow sits beneath the boot.
Exercise 4
Combine the coat, scarf, and one boot on a 4 by 6 unit practice strip. Show the scarf on top of the coat collar and the boot top overlapping the lower leg. Use the line convention consistently.
Show answer and check
A full body guide with head, torso, and legs; sweater hem and collar; coat body, opening, and lapels overlapping the sweater; scarf band on top of the coat collar with a clear crossing; one boot with ankle folds and ground contact; consistent solid and dashed lines throughout.
Why: Drawing in order from body guide to inner layer to coat to scarf to boot ensures logical overlaps. The practice strip size keeps the sketch compact and checkable.
Check: Check that the scarf covers part of the coat collar, the boot top covers part of the lower leg, and all hidden edges are dashed. Confirm the drawing fits within 4 by 6 units.
Common mistakes
- Drawing the coat as a single outline without showing the sweater beneath. Add a sweater hem and collar first, then overlap the coat by a small consistent amount.
- Making the scarf a single line instead of a band. Draw two parallel edges for the scarf and keep the band width consistent.
- Placing boot folds randomly instead of at the ankle bend. Mark the ankle bend first, then fan short curved folds from that point.
- Using inconsistent overlap direction on the scarf. Decide the wrap direction before drawing and keep the top segment solid at every crossing.
Self-check rubric
- Coat layers are visible: at least one inner layer overlaps with the coat, and hidden edges are marked consistently.
- Scarf is drawn as a band with a continuous path and consistent overlap direction at crossings.
- Boot folds are placed at the ankle bend and spaced more widely up the shaft.
- Line convention is consistent: outer edges, hidden edges, and overlaps are distinguishable.
- Proportions are plausible for the chosen paper size, and all numerical values are labeled as hypothetical examples.
- Valid alternatives are accepted: different wrap directions, fold counts, and line styles are allowed if internally consistent.
Questions and answers
Do I need to shade the drawing to show layers?
No. Clear overlaps and dashed hidden edges are enough. Shading can be added later but is not required for construction.
How wide should the scarf band be?
Choose a width and keep it consistent. In the hypothetical example, 0.4 units works for a small sketch; measure your own paper to decide.
Can I use different line styles?
Yes, as long as the convention is clear. The rubric allows any consistent system for outer edges, hidden edges, and overlaps.
How many boot folds should I draw?
Three to five folds at the ankle is enough to read the bend. More folds can clutter a small sketch.