Free original lessons
Draw a Bicycle: Frame Geometry, Wheels, and Handlebar
Learn to draw a side-view bicycle with correct frame triangles, wheel circles, and handlebar construction using simple measured steps and a clear convention.
Free lesson
Four exercises
Worked answers
Object Drawing Lessons
This lesson teaches a reliable side-view bicycle drawing built from three geometric systems: two equal wheel circles, a frame made of connected triangles, and a handlebar assembly with stem, bar, and grips. You will use a defined drawing convention so that proportions stay checkable, and you will learn to measure your own paper and tools rather than relying on assumed tolerances. The method separates construction lines from final lines, so you can correct geometry before committing to ink or dark pencil. All numerical examples are hypothetical and should be replaced by measurements you take from your own equipment.
Practice materials: Printable downloads are not available for this lesson yet. Use the instructions and four exercises below.
Reference illustration
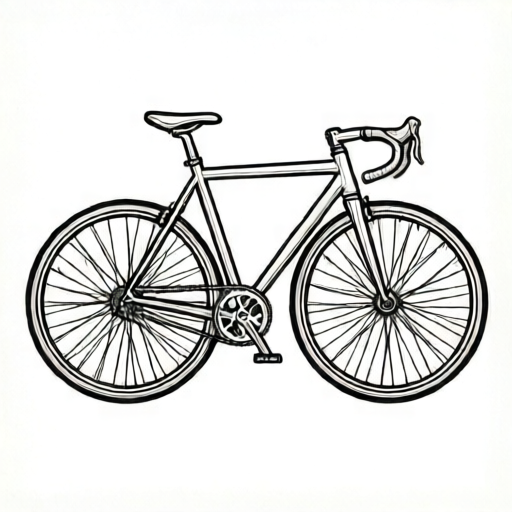
Use the stated measurements and conventions for each exercise.
Set the wheel circles and ground line
Begin by drawing a light horizontal ground line. Mark two wheel centers on it, separated by a distance you choose and label as a hypothetical example, such as 120 mm. Draw two circles of equal radius around those centers; equal radius is the key check, not a specific size. The wheelbase is the distance between centers, and the ground line should touch the bottom of both circles.
Use a compass or a traced circular object. If you trace, mark the center first so you can verify equal radii later. Keep all construction lines light so they can be erased or ignored.
- Draw a light ground line across the page.
- Mark two wheel centers on the ground line and label the distance as a chosen example.
- Draw two equal circles centered on those marks, touching the ground line.
- Check equality by measuring each radius from center to rim.
Build the frame triangle system
A side-view bicycle frame is a set of connected triangles. Place the bottom bracket (the crank center) between the wheels, slightly above the ground line. Connect it to the rear wheel center with a chainstay line, and to the seat area with a seat tube. From the seat area, draw a top tube forward to the head tube, and a down tube from the head tube down to the bottom bracket. The rear triangle closes from the seat area to the rear wheel center.
Keep joints as clear intersections rather than overlapping scribbles. The frame should read as a closed structure: rear triangle, main triangle, and front fork connecting the head tube to the front wheel center.
- Mark the bottom bracket between the wheels, above the ground line.
- Draw the chainstay from bottom bracket to rear wheel center.
- Draw the seat tube upward from the bottom bracket to the seat area.
- Draw the top tube and down tube to form the main triangle with the head tube.
- Close the rear triangle and add the front fork to the front wheel center.
Construct the handlebar and finishing details
The handlebar assembly has three parts: a stem rising from the head tube, a bar extending sideways, and grips at the ends. In side view, the bar often appears as a short forward curve or a compact shape; draw it as a clear connected form rather than a single ambiguous line. Add the saddle as a small elongated shape above the seat tube, and the crank and pedal as simple circles and lines at the bottom bracket.
Use the convention that x-height means baseline to midline for any lettering you add, such as labels. Letter styles vary, so accept any legible style that respects the baseline-to-midline convention. Do not add a cyclist figure or brand-specific details; this lesson stays with the bicycle itself.
- Draw the stem from the head tube upward.
- Add the handlebar as a connected forward shape with two grip ends.
- Place the saddle above the seat tube.
- Add crank circle and pedal line at the bottom bracket.
- Erase construction lines or leave them light, then darken final bicycle lines.
Worked example
Draw a side-view bicycle using two equal wheel circles with centers 100 mm apart (hypothetical example), a bottom bracket 20 mm above the ground line, and a closed frame with rear triangle, main triangle, and front fork. Add stem, handlebar, grips, saddle, crank, and pedal.
Worked answer
The drawing shows a ground line touching two equal circles. The rear wheel center and front wheel center are 100 mm apart. The bottom bracket sits 20 mm above the ground line. Chainstay connects bottom bracket to rear wheel center; seat tube rises to the seat area; top tube and down tube connect to the head tube; the rear triangle closes; the fork reaches the front wheel center. The stem rises from the head tube, the handlebar extends as a connected shape with two grips, and the saddle sits above the seat tube. Crank circle and pedal line appear at the bottom bracket.
Four practice exercises
Exercise 1
On a ground line, mark two wheel centers 80 mm apart (hypothetical example). Draw two equal circles with radius 25 mm each. State the wheelbase and verify equal radii.
Show answer and check
Wheelbase is 80 mm. Both radii measure 25 mm from center to rim, so the circles are equal and both touch the ground line.
Why: The wheelbase is the distance between centers. Equal radii are checked by measuring each circle from its own center to its rim.
Check: Measure center-to-center distance and each radius with a ruler; compare the two radius measurements.
Exercise 2
Place a bottom bracket 15 mm above the ground line between two wheel centers. Draw a chainstay to the rear wheel center and a seat tube upward. Describe how you check that the rear triangle can close.
Show answer and check
The chainstay runs from bottom bracket to rear wheel center. The seat tube rises from the bottom bracket. The rear triangle closes when a line from the seat area reaches the rear wheel center, forming a closed three-sided shape.
Why: A triangle needs three connected sides. The rear triangle uses chainstay, seat tube region, and the line from seat area to rear wheel center.
Check: Trace the three sides with a finger; each joint should meet at a clear intersection without gaps.
Exercise 3
Draw a main triangle using a head tube, top tube, down tube, and seat tube. Label the bottom bracket and head tube. Explain one way to verify the triangle is closed.
Show answer and check
The top tube connects seat area to head tube; the down tube connects head tube to bottom bracket; the seat tube connects bottom bracket to seat area. The triangle is closed when all three connections meet at clear points.
Why: Closing a triangle means every side shares endpoints with the other sides. Clear intersections make the structure readable.
Check: Start at the bottom bracket and follow each side to the next joint; you should return to the starting point without a gap.
Exercise 4
Add a handlebar assembly to a head tube: stem upward, bar forward, two grips. Then add a saddle above the seat tube and a crank circle with pedal line at the bottom bracket. List three checks for this detail set.
Show answer and check
Checks: stem connects head tube to bar; bar has two distinct grip ends; saddle sits above seat tube; crank circle is centered at bottom bracket; pedal line attaches to crank. Any legible labels follow baseline-to-midline x-height convention.
Why: Each detail must connect to its structural anchor: stem to head tube, saddle to seat tube, crank to bottom bracket. Separating parts prevents vague single-line shapes.
Check: Point to each anchor and its attached part; verify no part floats without a connection and no joint is ambiguous.
Common mistakes
- Drawing unequal wheel circles. Measure both radii from center to rim and adjust the smaller or larger circle before adding the frame.
- Placing the bottom bracket on the ground line. Raise the bottom bracket slightly above the ground line so the frame triangles sit above the wheels' contact points.
- Leaving the frame open at a joint. Check that chainstay, seat tube, top tube, down tube, and fork meet at clear intersections to close each triangle.
- Drawing the handlebar as a single vague line. Separate stem, bar, and grips into connected parts so the assembly reads as a constructed object.
Self-check rubric
- Two wheel circles are equal in radius and touch the ground line.
- Wheel centers are marked and the wheelbase is labeled with a chosen example value.
- Bottom bracket is above the ground line and connects to chainstay and seat tube.
- Rear triangle and main triangle are closed at clear intersections.
- Front fork connects head tube to front wheel center.
- Handlebar assembly separates stem, bar, and grips.
- Saddle, crank, and pedal are present and clearly placed.
- Construction lines are light or removed; final lines are clear.
- Any lettering follows baseline-to-midline x-height convention; alternative letter styles are accepted if legible.
- No cyclist figure or brand-specific details are included.
Questions and answers
Do the two wheels have to be exactly the same size?
For this side-view convention, yes. Equal radii make the bicycle read correctly and give you a simple check: measure both radii and compare.
What numerical values should I use?
Use values you measure on your own paper and tools. Any numbers in this lesson are hypothetical examples, not standards or tolerances.
Can I use a different lettering style for labels?
Yes. The convention is baseline to midline for x-height, but letter styles vary. Any legible style that follows that convention is acceptable.
Should I include a rider or brand logos?
No. The boundary of this lesson excludes the cyclist figure and brand-specific bikes. Focus on frame, wheels, and handlebar.