Free original lessons
Cyclist Figure Drawing: Bike Frame, Posture, and Pedal Contact
Learn to draw a side-view cyclist by building bike-frame geometry, rider posture, and pedal contact with clear checks and a practice strip.
Free lesson
Four exercises
Worked answers
Object Drawing Lessons
This lesson teaches a reliable side-view cyclist figure by separating three linked systems: the bike frame, the rider's posture, and the contact points at the pedals and handlebars. You will use simple line conventions, measure proportions against your own drawing, and check alignment with basic arithmetic. The goal is not a single perfect silhouette but a coherent figure whose parts agree with one another. All measurements below are hypothetical examples; measure your actual paper and tools before relying on any number.
Practice materials: Printable downloads are not available for this lesson yet. Use the instructions and four exercises below.
Reference illustration
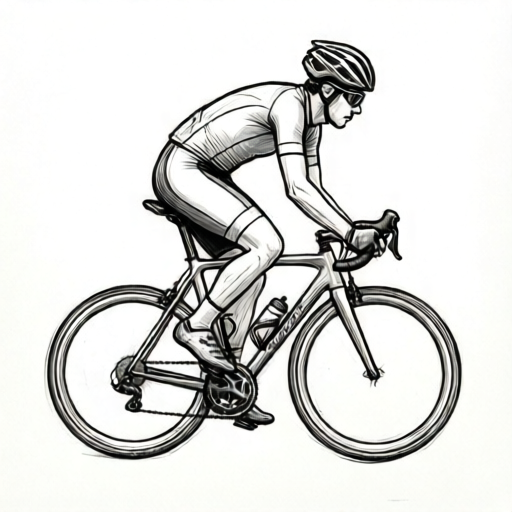
Use the stated measurements and conventions for each exercise.
Build the bike frame from fixed anchor points
Start with two wheel circles of equal radius. Mark their centers on a horizontal ground line. The distance between centers is the wheelbase. Draw a straight line between the centers and extend it slightly to set the frame's horizontal reference.
Place the bottom bracket (pedal axle) between the wheels, closer to the rear wheel. From the bottom bracket, draw the seat tube upward and slightly backward to the saddle. Draw the down tube forward and upward to the head tube. Connect the head tube to the front wheel center with the fork. Add the top tube from the saddle area to the head tube. These tubes form the main frame loop: seat tube, top tube, head tube, down tube, and the bottom-bracket connection; add the fork separately from the head tube to the front wheel center. Check that the main frame loop closes without unintended crossings.
Use a consistent line convention: solid lines for frame tubes, dashed lines for hidden or guide lines, and small crosses for anchor points. Label each anchor lightly so you can check it later.
- Draw two equal circles and mark their centers on a ground line.
- Mark the bottom bracket between the wheels, nearer the rear.
- Draw seat tube, down tube, top tube, and fork as straight lines between anchors.
- Check that no frame line crosses another except at an anchor.
Set rider posture with a spine line and joint angles
The rider's posture is defined by a spine line from hip to shoulder, a head position, and two arm lines to the handlebars. Begin with the hip at the saddle. Draw the spine line leaning forward; the lean angle is a choice, not a fixed rule. Mark the shoulder on that line, then place the head above and slightly forward of the shoulder.
Draw the upper arm from shoulder to elbow and the forearm from elbow to hand at the handlebar. Keep arm length consistent on both sides if you show both arms. For the legs, draw the thigh from hip to knee and the shin from knee to foot. The knee should sit forward of the hip when the pedal is forward, and the leg should not appear stretched beyond its natural length.
Use a posture line (a single curved guide from hip through shoulder to head) to keep the torso coherent. Letter styles and body proportions vary; the rubric rewards internal consistency, not a single universal shape.
- Mark hip at saddle and draw a spine line to the shoulder.
- Place head above and slightly forward of shoulder.
- Draw arm lines from shoulder to elbow to hand at handlebar.
- Draw thigh and shin lines from hip to knee to foot.
Resolve pedal contact and handlebar contact
Pedal contact is the most common failure point. Draw the crank arm from the bottom bracket to the pedal spindle. The foot should meet the pedal at the ball of the foot, not the toe tip or heel. If the pedal is forward, the knee is forward; if the pedal is back, the knee is back. The shin line should end at the foot, and the foot line should be roughly horizontal or slightly toe-down.
Handlebar contact: the hand should wrap the bar, so draw the hand as a small closed shape around the bar line. The wrist should not bend sharply. Check that the arm length from shoulder to hand matches the distance you drew; if it does not, adjust the shoulder position rather than stretching the arm.
Measure your actual drawing with a ruler. For example, if your wheel radius is 30 mm and your wheelbase is 100 mm, the ratio is 3.33. Any similar ratio is acceptable if you keep it consistent across the figure.
- Draw crank arm from bottom bracket to pedal spindle.
- Place foot at ball of foot on pedal.
- Align knee forward or back with pedal position.
- Draw hand as a closed shape around the handlebar.
Check the whole figure with simple arithmetic
Use three checks. First, wheel equality: measure both wheel radii; they should match within your drawing tolerance. Second, frame closure: trace the frame loop and confirm it returns to the start without gaps. Third, limb consistency: measure thigh and shin lengths; they should be similar to each other and to the arm segments if your figure uses similar proportions.
Record your measurements in a small table. If a value is off, adjust the anchor point rather than redrawing the whole figure. This keeps the construction stable and makes your corrections visible.
- Measure both wheel radii and compare.
- Trace the frame loop for gaps or crossings.
- Measure thigh, shin, and arm segments for consistency.
Worked example
A side-view cyclist drawing has wheel radius 25 mm, wheelbase 90 mm, bottom bracket 35 mm from the rear wheel center, thigh 40 mm, shin 38 mm, and arm 45 mm. The foot is drawn at the toe tip on the pedal. Identify one error and one correction.
Worked answer
Error: foot contact is at the toe tip. Correction: move the foot so the ball of the foot meets the pedal spindle, then redraw the shin line to the ankle. Check that thigh and shin lengths remain 40 mm and 38 mm after the adjustment.
Four practice exercises
Exercise 1
Draw a side-view cyclist with wheel radius 20 mm and wheelbase 80 mm. Place the bottom bracket 30 mm from the rear wheel center. Mark the frame anchors and draw the frame loop. State one check you performed.
Show answer and check
A frame loop connecting two equal 20 mm wheels, a bottom bracket 30 mm from the rear center, and closed tubes. Check: the frame loop returns to its start without gaps.
Why: The anchors set the geometry; the loop check confirms the frame is closed and the wheelbase matches the stated 80 mm.
Check: Measure both radii (should be 20 mm) and trace the frame loop for gaps or crossings.
Exercise 2
A rider has thigh 35 mm and shin 33 mm. The pedal is forward. Draw the leg so the ball of the foot meets the pedal. Where should the knee be relative to the hip?
Show answer and check
The knee should be forward of the hip when the pedal is forward. The foot meets the pedal at the ball of the foot.
Why: Pedal position drives knee position; forward pedal means forward knee. Foot contact at the ball keeps the shin line ending at the ankle.
Check: Measure thigh and shin (35 mm and 33 mm) and confirm the foot's ball touches the pedal spindle.
Exercise 3
Draw a rider whose arm from shoulder to hand is 40 mm. The handlebar is 50 mm from the shoulder anchor. What should you adjust, and why?
Show answer and check
Move the shoulder or handlebar anchor so the arm length matches the distance; do not stretch the arm to 50 mm.
Why: Stretching breaks limb consistency. Adjusting an anchor preserves the measured arm length and keeps the posture coherent.
Check: Measure the arm segments after adjustment; they should total 40 mm and the hand should wrap the bar.
Exercise 4
Using a defined line convention, draw a cyclist with one visible leg and one dashed hidden leg. State your convention and one rubric check you used.
Show answer and check
Convention: solid for visible edges, dashed for hidden leg. Check: the visible foot's ball meets the pedal spindle and the frame loop closes.
Why: A defined convention makes the drawing readable; the rubric check confirms contact and frame closure.
Check: Verify the dashed leg does not cross solid frame lines except at anchors, and measure the visible foot contact.
Common mistakes
- Drawing the foot at the toe tip on the pedal. Move the foot so the ball of the foot meets the pedal spindle; redraw the shin line to the ankle.
- Making the frame lines cross or leaving a gap in the frame loop. Re-mark the anchor points and redraw each tube as a straight line between anchors; check the loop closes.
- Stretching the arm to reach the handlebar. Move the shoulder or handlebar anchor instead of lengthening the arm; keep arm segments consistent.
- Using unequal wheel radii without intending a stylistic choice. Measure both radii and adjust one circle; if unequal is intentional, note it in your rubric check.
Self-check rubric
- Frame loop closes without unintended crossings.
- Both wheel radii are equal or the inequality is intentional and noted.
- Spine line connects hip, shoulder, and head coherently.
- Arm segments are consistent and the hand wraps the handlebar.
- Foot contact is at the ball of the foot on the pedal spindle.
- Knee position agrees with pedal position.
- Line convention is defined and used consistently.
- Measurements are recorded and checked with simple arithmetic.
Questions and answers
Do I need to show both legs?
No. A side view may show one leg clearly and the other partially. Keep the visible leg's pedal contact correct and use a dashed line for the hidden leg if you include it.
What if my rider's proportions differ from the example?
That is acceptable. The rubric checks internal consistency: limb lengths should agree with each other and with the anchors you set. Measure your own drawing rather than copying a fixed number.
How do I know the pedal contact is correct?
The ball of the foot should meet the pedal spindle, the shin should end at the ankle, and the knee should align with the pedal's forward or backward position.
Can I use a different line convention?
Yes, if you define it clearly. For example, use solid for visible edges and dotted for guides, and state this in your check notes.