Free original lessons
Faerie Figure Drawing: Wings, Pose, and Costume Layers
Learn to draw a faerie with balanced pose, clear wing shapes, and layered costume using a simple convention and checkable steps.
Free lesson
Four exercises
Worked answers
Object Drawing Lessons
This lesson teaches a repeatable method for drawing a faerie figure. You will set a balance line for the pose, choose and place wing shapes, then build costume layers in a fixed order. The convention is simple: x-height is measured from baseline to midline of lowercase letters, and letter styles vary, so use your own handwriting as the measuring guide. All numerical examples are hypothetical; measure your actual paper and tools. The goal is a clear, original faerie figure, not a single universal answer.
Practice materials: Printable downloads are not available for this lesson yet. Use the instructions and four exercises below.
Reference illustration
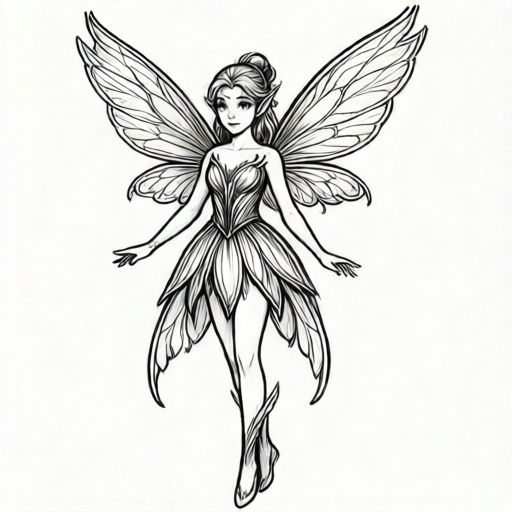
Use the stated measurements and conventions for each exercise.
Set the pose with a balance line
Start with a vertical balance line on your paper. Mark a top point for the head and a bottom point for the supporting foot. The balance line shows where weight settles; for a standing faerie, the supporting foot should sit near this line. For a flying or leaning pose, shift the line toward the weight-bearing side.
Use simple ovals for the head, ribcage, and pelvis, then connect them with a curved spine. Keep the limbs as straight or curved tubes until the pose reads clearly. Check the pose by covering the details and asking whether the figure would stand or float without falling over.
- Draw a light vertical balance line.
- Mark head top and supporting foot bottom.
- Add three ovals: head, ribcage, pelvis.
- Connect ovals with a spine curve.
- Add limb tubes and check weight balance.
Choose and place wing shapes
Wings attach at the upper back, between the shoulder blades. Choose one wing-shape family: rounded moth, pointed dragonfly, or lobed butterfly. Draw the wing root first, then the outer edge, then internal veins. Keep left and right wings mirrored but not identical; slight variation looks natural.
Wing size should relate to the body. A useful hypothetical example: if the torso is 6 cm tall, wings may extend 4 to 8 cm beyond the shoulders. Measure your own drawing and adjust. Wings should not cover the face unless the pose intentionally hides it.
- Mark the wing root between the shoulder blades.
- Draw the outer wing edge for one side.
- Mirror the shape loosely on the other side.
- Add three to five veins per wing.
- Check that wings do not obscure the face.
Layer the costume in order
Build costume from the body outward. First draw the base layer close to the body, such as a simple tunic or bodice. Second add the middle layer, such as a skirt, shorts, or leggings. Third add outer layers, such as a cape, vest, or belt. Finally add accessories like straps, pouches, or jewelry.
Each layer should follow the body's curves and the pose's balance line. Keep hems and edges clear of the wing roots so the wings read as separate. Use a consistent line weight for each layer to show order.
- Draw base layer on the body.
- Add middle layer over the base.
- Add outer layer over the middle.
- Add accessories last.
- Check that wing roots remain visible.
Check the finished figure
Review the drawing against three checks: pose balance, wing clarity, and costume order. For pose, confirm the supporting foot is near the balance line. For wings, confirm the shape family is consistent and veins are readable. For costume, confirm each layer sits over the previous one without hiding the wing roots.
Use the rubric to score each check from 1 to 3. A score of 2 or 3 on all checks means the figure is clear. Revise only the lowest-scoring area first.
- Trace the balance line and supporting foot.
- Name the wing shape family aloud.
- Point to each costume layer in order.
- Score pose, wings, and costume.
- Revise the lowest score.
Worked example
Draw a standing faerie with rounded moth wings and a two-layer costume. Use a balance line and label the wing roots.
Worked answer
A standing figure with a vertical balance line through the supporting foot, three body ovals, rounded moth wings rooted between the shoulder blades, a base tunic, and an outer vest. Wing roots are labeled and visible above the vest.
Four practice exercises
Exercise 1
Draw a faerie in a flying pose with pointed dragonfly wings and a one-layer costume. Mark the balance line and wing roots.
Show answer and check
A flying figure with a balance line shifted toward the weight-bearing side, pointed wings rooted between the shoulder blades, and a single tunic layer. Wing roots are visible.
Why: The flying pose needs a shifted balance line to show weight. Pointed wings are one consistent family. One costume layer keeps the order simple.
Check: Confirm the balance line passes near the weight-bearing limb, wings are pointed and rooted between shoulder blades, and only one costume layer is present.
Exercise 2
Draw a leaning faerie with lobed butterfly wings and a three-layer costume. Label each costume layer in order.
Show answer and check
A leaning figure with a balance line toward the supporting side, lobed wings rooted between shoulder blades, and labeled base, middle, and outer layers. Accessories are optional.
Why: Leaning poses need the balance line near the supporting limb. Lobed wings stay consistent. Three layers must be drawn base first, then middle, then outer.
Check: Check that labels appear in order base, middle, outer; wings are lobed and rooted correctly; balance line is near the supporting limb.
Exercise 3
Draw two small faerie poses on one page: one standing, one sitting. Use rounded wings for both and a two-layer costume. Keep wing roots visible.
Show answer and check
Two figures, each with a balance line, rounded wings rooted between shoulder blades, and a base plus outer layer. Wing roots are not covered by the outer layer.
Why: Two poses test balance line placement. Using one wing family keeps consistency. Two layers test order without complexity.
Check: Confirm each figure has a balance line, rounded wings, two costume layers in order, and visible wing roots.
Exercise 4
Draw a faerie with a cape as the outer layer. Use pointed wings and a standing pose. Show the cape hem clear of the wing roots.
Show answer and check
A standing figure with pointed wings rooted between shoulder blades, a base layer, and a cape drawn last with a hem that stops below the wing roots.
Why: The cape is an outer layer and must not hide wing roots. Pointed wings stay consistent. Standing pose uses a vertical balance line.
Check: Check that the cape hem is below the wing roots, wings are pointed, and the supporting foot is near the balance line.
Common mistakes
- Wings attached at the shoulders or neck. Move wing roots to the upper back between the shoulder blades.
- Costume layers drawn outside-in, hiding the body. Draw base layer first, then middle, then outer, then accessories.
- Pose leans far from the balance line with no supporting foot. Shift the supporting foot toward the balance line or add a clear weight-bearing limb.
- Left and right wings are identical copies. Mirror the shape loosely and vary vein angles slightly.
Self-check rubric
- Pose: supporting foot near balance line (1-3).
- Wings: one shape family, roots between shoulder blades, readable veins (1-3).
- Costume: base, middle, outer, accessories in order (1-3).
- Clarity: figure reads without labels (1-3).
Questions and answers
Do I need special paper or tools?
No. Use any paper and pencil you have. Measure your actual paper and tools if you set numerical sizes.
Can I use a different wing shape?
Yes. Choose one family and keep it consistent. Rounded, pointed, and lobed shapes are all valid.
How do I know the pose is balanced?
The supporting foot or weight-bearing limb should sit near the vertical balance line.
What if my costume hides the wings?
Keep hems and outer layers clear of the wing roots, or draw wings after the costume to check placement.