Free original lessons
Pencil House Drawing: Roof Shading and Wall Texture
Learn to shade a house roof in graded tones and add believable wall texture using a simple tonal sequence, with checks and practice tasks.
Free lesson
Four exercises
Worked answers
Object Drawing Lessons
This lesson teaches pencil tonal rendering of a single house exterior. You will build a roof with three clear tonal steps and give walls a texture that reads as a surface, not a pattern. Work on ordinary paper with a pencil you can control. The convention used here is simple: tone is judged by how much white paper remains visible, and texture is judged by whether marks follow the surface direction. Letter styles and handwriting vary, so the rubric rewards consistent tonal order and directional marks rather than one exact appearance. Measure your own paper and pencil before starting; any numbers below are hypothetical examples, not standards.
Practice materials: Printable downloads are not available for this lesson yet. Use the instructions and four exercises below.
Reference illustration
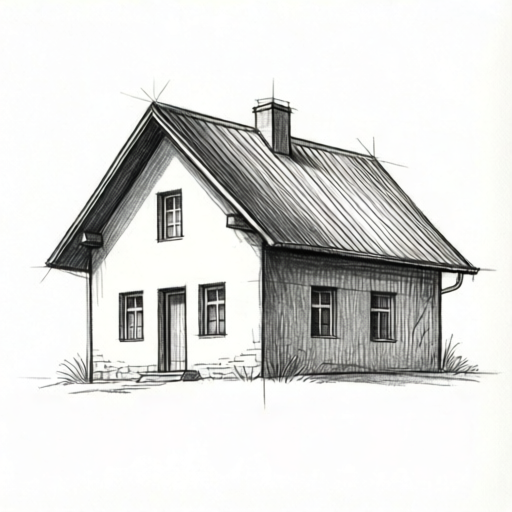
Use the stated measurements and conventions for each exercise.
Set up and define your tonal steps
Before drawing the house, make three small swatches on scrap paper: light, mid and dark. Light tone leaves plenty of white paper showing. Mid tone covers most white but still shows grain. Dark tone is dense but not glossy or smeared. Keep the pencil sharpened and use light pressure for light tone, moderate pressure for mid, and layered moderate pressure for dark rather than pressing hard once.
Decide the light direction and state it in one sentence, for example: light comes from the upper left. This single decision controls which roof plane is light, which wall areas are mid, and where dark accents belong. Write the sentence beside your drawing so your choices stay consistent.
- Make three swatches labelled light, mid and dark on scrap paper.
- Write your light-direction sentence next to the swatches.
- Check that the three swatches are clearly different when viewed at arm's length.
- Keep the scrap sheet beside your drawing paper for reference.
Shade the roof in three tonal steps
Treat the roof as a set of planes. The plane facing the light gets light tone. A plane turning away gets mid tone. Under the eaves and along the ridge line, add a narrow dark accent. Apply tone in the direction of the roof slope so the marks support the form. Build dark tone by adding a second layer over mid tone, not by pressing harder.
Keep the boundary between light and mid soft by feathering with light strokes. Keep the dark accent narrow so it reads as a shadow line rather than a black band. Step back often; if the three tones blur together, increase the difference by lightening the light area or layering the dark area.
- Outline the roof planes lightly.
- Fill the light-facing plane with light tone strokes along the slope.
- Fill the away-facing plane with mid tone strokes along the slope.
- Add a narrow dark accent under the eaves and along the ridge.
- Feather the light-to-mid boundary with light strokes.
- Step back and confirm three distinct tones.
Add wall texture that follows the surface
Wall texture should suggest material without becoming a repeating pattern. Choose one mark type: short vertical strokes for siding, small circular marks for stone, or fine crosshatch for render. Keep marks close in size and direction, and vary spacing slightly so the wall does not look printed. Leave small gaps of white paper to keep the texture from turning into flat grey.
Texture must respect tone. A light wall gets sparse marks; a mid wall gets denser marks; a dark wall area gets layered marks. Do not cover the whole wall evenly. Let texture thin near edges and thicken where the surface turns away from the light.
- Choose one mark type and state it beside the drawing.
- Test the mark on scrap paper at the intended density.
- Apply sparse marks to light wall areas.
- Increase density for mid wall areas.
- Layer marks for dark wall areas near corners and under the eaves.
- Check that marks follow the wall direction and vary slightly in spacing.
Check tonal order and texture consistency
A finished drawing should pass three checks. First, squint at the drawing: the roof should show a clear light, mid and dark order. Second, look at the wall: marks should follow one direction and density should change with tone. Third, confirm the light-direction sentence still matches the shading. If any check fails, adjust the lightest area first, then the darkest accent, then the texture density.
Record your checks in a short list beside the drawing. This makes revision deliberate rather than repetitive. Keep the scrap swatches for comparison until the drawing is complete.
- Squint check: confirm three roof tones.
- Direction check: confirm wall marks follow the surface.
- Density check: confirm texture increases as tone darkens.
- Light check: confirm shading matches the written light direction.
- Adjust lightest area, then dark accent, then texture density.
Worked example
A house outline is drawn with a roof sloping down to the right and a front wall facing the viewer. Light comes from the upper left. Describe the tonal sequence for the roof and wall, and give one check.
Worked answer
The roof plane facing upper left receives light tone with strokes along the slope. The plane turning away receives mid tone with strokes along the slope. A narrow dark accent runs under the eaves and along the ridge. The front wall receives sparse vertical marks for light tone, denser marks near the right corner for mid tone, and layered marks under the eaves for dark tone. Check by squinting: the roof should show light, mid and dark in that order, and wall marks should stay vertical with density increasing to the right.
Four practice exercises
Exercise 1
On scrap paper, make three swatches labelled light, mid and dark using one pencil. State the pressure or layering used for each. Then check them at arm's length.
Show answer and check
Light: one light pass leaving visible paper grain. Mid: one moderate pass covering most white but showing grain. Dark: two moderate layers over mid tone. At arm's length the three swatches appear clearly different.
Why: Separating tone by pressure and layering builds control before applying tone to the house. The arm's-length check confirms the steps read as distinct.
Check: Squint at the swatches. If light and mid blur, lighten the light swatch or add one layer to the mid swatch. If mid and dark blur, add one layer to the dark swatch.
Exercise 2
Draw a simple roof with two planes: one facing upper left and one turning away. Shade the light-facing plane with light tone and the away-facing plane with mid tone, strokes along the slope. Add a narrow dark accent under the eaves. Describe your light direction in one sentence.
Show answer and check
Light direction sentence: light comes from the upper left. The upper-left plane has light strokes along the slope. The away-facing plane has mid strokes along the slope. A narrow dark accent runs under the eaves, feathered at its lower edge.
Why: The roof planes are assigned tone by their orientation to the stated light. Strokes along the slope support the form, and the narrow accent creates a shadow line without becoming a black band.
Check: Squint: confirm light, mid and dark appear in that order. Check that the dark accent is narrower than the mid plane and that its lower edge blends into mid tone.
Exercise 3
Draw a rectangular wall area. Apply vertical marks for texture: sparse for light tone on the left half, denser for mid tone on the right half, and layered marks near the top edge for dark tone. Keep small white gaps. State one check you will use.
Show answer and check
Left half: sparse vertical marks with white gaps. Right half: denser vertical marks. Top edge: layered vertical marks forming a dark band. Check: marks remain vertical across the whole wall and density increases from left to right and toward the top edge.
Why: Texture density should follow tone. Keeping one mark direction prevents the wall from looking patterned, and white gaps keep the texture from flattening into grey.
Check: Look along the wall: all marks should point the same way. Compare left and right halves at arm's length; the right half should read darker. Confirm the top band is darker than the right half.
Exercise 4
Combine a two-plane roof and a textured wall into one small house drawing. Use light from the upper left. Include the three roof tones, wall texture with density change, and a written light-direction sentence. List two checks you will perform.
Show answer and check
Roof: light plane facing upper left, mid plane turning away, narrow dark accent under the eaves. Wall: sparse vertical marks on the left, denser marks on the right, layered marks under the eaves. Light-direction sentence written beside the drawing. Checks: squint check for three roof tones; direction check for vertical wall marks with density increasing to the right.
Why: Combining roof and wall tests whether tonal order and texture consistency hold together. The written sentence keeps choices deliberate, and the two checks target the most common failures: blurred tones and inconsistent marks.
Check: Squint at the roof: light, mid and dark should be distinct. Look at the wall: marks should stay vertical and density should increase to the right. If either check fails, adjust the lightest area first, then the dark accent, then texture density.
Common mistakes
- Pressing hard to make dark tone in one pass. Build dark tone with two or three moderate layers over mid tone, keeping the pencil sharpened.
- Covering the whole wall with even texture. Vary texture density with tone and leave small white gaps so the wall does not flatten.
- Making the dark accent under the eaves too wide. Keep the dark accent narrow and feather its lower edge into mid tone.
- Changing mark direction halfway across a wall. State one mark direction before starting and keep it consistent across the wall.
Self-check rubric
- Three tonal steps are clearly distinguishable on the roof when viewed at arm's length.
- Dark tone is built by layering, not by heavy pressure or smearing.
- Wall texture uses one consistent mark type that follows the surface direction.
- Texture density increases as wall tone darkens, with small white gaps retained.
- The written light-direction sentence matches the shading choices.
- Valid alternatives are accepted: different mark types, slightly different tone boundaries, and varied spacing, provided tonal order and directional consistency hold.
Questions and answers
Do I need special pencils?
No. Use the pencil you have and control tone by pressure and layering. Test on scrap paper first.
How many tones should the roof have?
Three clear steps: light, mid and dark. More tones are allowed if the three-step order remains visible.
Can I use crosshatch for walls?
Yes, if the marks follow the wall direction and density changes with tone. Any consistent mark type is acceptable.
What if my paper is small?
Measure your paper and scale the house outline to fit. Keep the three tonal swatches on scrap paper at the same scale as your drawing.