Free original lessons
Draw a Killer Whale: Dorsal Fin, Saddle Patch, Flukes and Eye Patch
Learn to lay out an orca side view with correct feature placement, then shade the dorsal fin, saddle patch, flukes and eye patch using a simple pencil convention.
Free lesson
Four exercises
Worked answers
Object Drawing Lessons
This lesson teaches a reliable side-view layout for a killer whale, often called an orca. You will place four identifying features in order: the dorsal fin on the back, the saddle patch just behind it, the flukes at the tail end, and the eye patch above and behind the eye. The method uses a simple pencil convention so you can check your own work without needing a finished reference image. All measurements are hypothetical examples; measure your own paper and tools before drawing.
Practice materials: Printable downloads are not available for this lesson yet. Use the instructions and four exercises below.
Reference illustration
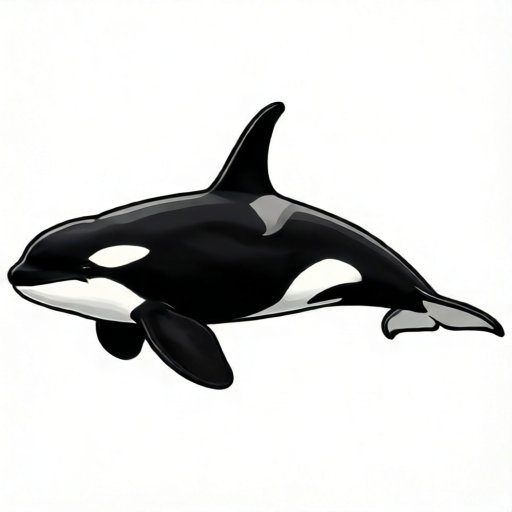
Use the stated measurements and conventions for each exercise.
Set the body axis and feature order
Begin with a single horizontal body axis line across the middle of your paper. Mark a nose point at the left end and a tail-base point at the right end. The distance between them is your body length. Divide that length into four equal parts using light marks; these marks help you place features in a consistent order rather than guessing.
Place the dorsal fin above the back at roughly the second quarter mark from the nose. Place the saddle patch immediately behind the dorsal fin, still above the back line. Place the flukes at the tail-base point, spreading above and below the axis. Place the eye low on the head slightly behind the first quarter mark, and place the eye patch above and behind the eye. Keeping this order prevents the common error of crowding the head and leaving the tail too short.
- Draw a horizontal axis and mark nose and tail-base points.
- Divide the axis into four equal parts with light marks.
- Mark the dorsal fin base at the second quarter from the nose.
- Mark the saddle patch just behind the dorsal fin base.
- Mark the flukes at the tail-base point, above and below the axis.
- Mark the eye low on the head and the eye patch above and behind it.
Shape the dorsal fin and saddle patch
The dorsal fin rises from the back line. For a simple side view, draw a tall triangle with a slightly curved leading edge and a straighter trailing edge. Its height can be about one quarter of the body length as a hypothetical example; adjust to your paper size. The base should sit flat on the back line so the fin looks attached, not floating.
The saddle patch is a lighter grey area just behind the dorsal fin. Draw it as a soft-edged oval or teardrop that touches the back line and extends slightly downward. Keep it separate from the fin base so the two features read clearly. Shade it lightly with the side of your pencil, leaving the dorsal fin darker so the patch stands out.
- Draw the fin base flat on the back line at the second quarter mark.
- Add a curved leading edge and a straighter trailing edge.
- Draw the saddle patch as a soft oval behind the fin base.
- Shade the saddle patch lightly and the fin more darkly.
Draw the flukes and eye patch
The flukes are the tail fins. At the tail-base point, draw two lobes spreading above and below the axis, like a shallow butterfly shape. Each lobe should be roughly equal in size, and the notch between them should sit on the axis. Keep the flukes wider than they are tall so they read as tail fins rather than a second dorsal fin.
The eye patch is a white or light oval above and behind the eye. Place the eye low on the head slightly behind the first quarter mark, then draw the patch as a rounded shape that does not touch the eye. Shade the body darkly around the patch so the light shape stands out. Use the same pencil convention throughout: darkest for the dorsal fin and body, medium for the saddle patch, and lightest for the eye patch.
- Draw two equal lobes at the tail-base point, above and below the axis.
- Keep the notch on the axis and make the flukes wider than tall.
- Mark the eye low on the head near the first quarter mark.
- Draw the eye patch above and behind the eye without touching it.
- Shade the body darkly around the light eye patch.
Worked example
On a 20 cm body axis, place the dorsal fin base at the second quarter mark, the saddle patch just behind it, the flukes at the tail-base point, and the eye patch above and behind the eye. Describe the placement in centimetres from the nose.
Worked answer
The four quarter marks are at 5 cm, 10 cm, 15 cm and 20 cm. The dorsal fin base sits at 10 cm. The saddle patch sits just behind 10 cm, for example from 11 cm to 14 cm. The flukes sit at 20 cm, spreading above and below the axis. The eye sits low near 5 cm, and the eye patch sits above and behind it, for example centred near 7 cm.
Four practice exercises
Exercise 1
A learner draws a 16 cm body axis and puts the dorsal fin base at 4 cm from the nose. Using the four-part rule, where should the fin base be, and how far off is the drawing?
Show answer and check
The four quarter marks are at 4 cm, 8 cm, 12 cm and 16 cm. The fin base should be at the second quarter mark, 8 cm. The drawing is 4 cm too far forward.
Why: Divide 16 cm into four equal parts of 4 cm each. The second quarter mark is 8 cm from the nose. Subtracting 4 cm from 8 cm gives a 4 cm error.
Check: Re-divide the axis into four equal parts and confirm the second mark is 8 cm. Measure the drawn fin base and compare.
Exercise 2
On a 24 cm body axis, a learner places the saddle patch from 12 cm to 15 cm and the dorsal fin base at 12 cm. What placement problem does this create, and what is a simple fix?
Show answer and check
The saddle patch starts at the same point as the fin base, so the two features overlap. A simple fix is to move the saddle patch to start just behind the fin base, for example from 13 cm to 16 cm.
Why: The fin base is at the second quarter mark, 12 cm. The saddle patch should sit behind it, not share its starting point. Shifting the patch back by 1 cm creates a clear gap.
Check: Mark 12 cm on the axis and confirm the fin base and patch do not share a starting point. Measure the gap between them.
Exercise 3
A learner draws flukes that are 6 cm tall and 4 cm wide at the tail-base point of a 20 cm body. Is this a good fluke shape for a side view, and why?
Show answer and check
No. The flukes are taller than they are wide, which makes them look like a second dorsal fin. They should be wider than tall, for example 6 cm wide and 4 cm tall.
Why: In a side view, flukes read as tail fins when they spread horizontally. A tall narrow shape competes with the dorsal fin and breaks the feature order.
Check: Measure the width and height of the drawn flukes. Confirm width is greater than height and the notch sits on the body axis.
Exercise 4
On a 20 cm body axis, the eye is at 4 cm and the eye patch is centred at 4 cm. What is wrong, and where could the patch go instead?
Show answer and check
The eye patch is centred on the eye, so it covers the eye instead of sitting above and behind it. Move the patch above and behind the eye, for example centred near 6 cm and raised above the eye level.
Why: The eye sits low on the head slightly behind the first quarter mark, at 4 cm on this axis. The patch should be above and behind that point, for example centred near 6 cm, not on the eye.
Check: Mark the eye position and the patch centre. Confirm the patch centre is behind the eye and higher than the eye, with no overlap.
Common mistakes
- Placing the dorsal fin too far forward, near the nose. Use the four-part axis and put the fin base at the second quarter mark from the nose.
- Drawing the saddle patch touching or overlapping the dorsal fin base. Leave a small gap behind the fin base and draw the patch as a separate soft oval.
- Making the flukes tall and narrow like a second dorsal fin. Draw two equal lobes wider than they are tall, with the notch on the body axis.
- Putting the eye patch directly over the eye or too far forward. Place the eye low on the head and the patch above and behind it, not touching.
Self-check rubric
- Body axis is horizontal with clear nose and tail-base points.
- Dorsal fin base sits near the second quarter mark and is attached to the back line.
- Saddle patch is behind the dorsal fin and separate from its base.
- Flukes sit at the tail-base point with two lobes wider than tall and the notch on the axis.
- Eye patch is above and behind the eye and does not touch it.
- Shading convention is consistent: darkest fin and body, medium saddle patch, lightest eye patch.
- Valid alternatives are accepted if feature order and relative placement are correct.
Questions and answers
Do I need a reference photo to complete this lesson?
No. The four-part axis and feature order give you enough structure to place each feature. A reference can help with style, but the layout method works from text alone.
How dark should each area be?
Use a simple convention: darkest for the dorsal fin and body, medium for the saddle patch, lightest for the eye patch. Any consistent shading that keeps the features distinct is acceptable.
Can I change the fin height or fluke width?
Yes. The numerical values are hypothetical examples. Keep the feature order and relative placement, then adjust proportions to fit your paper.
What if my orca looks too short?
Check that the tail-base point is at the right end of the axis and that the flukes spread beyond it. A short body often means the flukes were drawn inside the body length instead of at its end.