Free original lessons
Draw a Large Family Group: Spacing, Overlap, and Relative Heights
Plan a large family drawing by placing five to seven figures with clear spacing, intentional overlap, and believable height differences within one family.
Free lesson
Four exercises
Worked answers
Object Drawing Lessons
A large family drawing succeeds when the group reads as one connected unit without figures colliding or floating apart. This lesson focuses on composition decisions: how much space to leave between figures, where overlap helps depth, and how to vary heights so the family looks related but not identical. You will use a simple layout grid and a defined convention for height and overlap, then check your choices with arithmetic and visual tests. The goal is not portrait likeness or pose construction; it is arranging grouped figures clearly on the page.
Practice materials: Printable downloads are not available for this lesson yet. Use the instructions and four exercises below.
Reference illustration
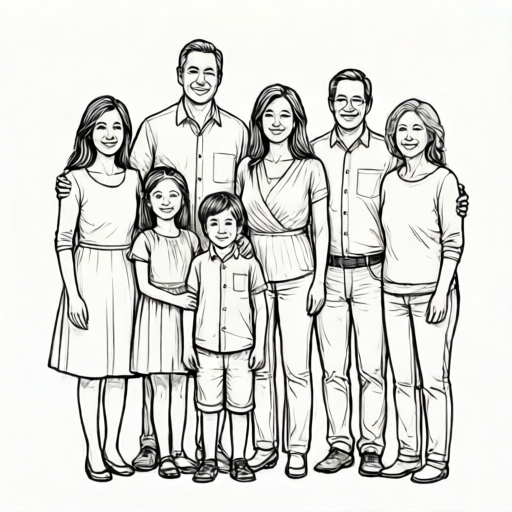
Use the stated measurements and conventions for each exercise.
Set a layout grid and a height convention
Draw a rectangle for your page area and divide it into a light grid of equal squares. A grid helps you compare spacing and height without measuring every mark. Choose a baseline near the lower third of the page for the standing figures. Define a height convention: measure each figure from the baseline to the top of the head, and record that height in grid squares. For example, an adult might be 8 squares tall, a teenager 7, a child 5, and a toddler 3. These numbers are hypothetical examples; adjust them to your family and page size.
Keep the convention consistent across the group. If one figure is drawn from baseline to midline of the head instead of the top, the comparison breaks. Write the height number beside each planned figure before drawing details. This separates composition from likeness and lets you check the group as a set of measured shapes.
- Draw a page rectangle and a light grid of equal squares.
- Mark a baseline for standing figures and a second line for seated or held figures if needed.
- Assign each family member a height in grid squares using one consistent top-of-head convention.
- Write the height number beside each planned position before drawing faces or clothing.
Choose spacing that keeps figures separate but connected
Spacing is the clear gap between the outer edges of adjacent figures at their widest point. Too much gap makes the family look like strangers; too little makes arms and shoulders collide. A practical starting rule is to leave at least one grid square of clear space between figures who do not overlap, and to let overlapping figures share no more than one-third of the narrower figure's width. These are hypothetical starting values, not universal standards.
Test spacing by tracing a light vertical line between figures. If the line passes through both figures, they overlap; if it passes through empty space, they are separate. Aim for a mix: some clear gaps and some intentional overlaps. A family group usually reads best when at least two pairs overlap and at least one clear gap remains.
- Mark the widest point of each planned figure on the grid.
- Measure the clear gap between non-overlapping neighbors in grid squares.
- For overlapping pairs, estimate the shared width as a fraction of the narrower figure.
- Adjust positions until the group has both clear gaps and intentional overlaps.
Use overlap to show depth without hiding key shapes
Overlap tells the viewer who is in front. Place a foreground figure so it covers part of a background figure, but keep the background figure's head and one shoulder visible. A common mistake is to overlap at the face or at the hands, which erases the most informative parts. Instead, overlap at the torso or lower arm.
Draw the background figure first, then the foreground figure over it. Use a light outline for the background figure so you can see what is covered. Check that each overlapped figure still has at least one clear identifying edge: a head outline, a shoulder line, or a distinct clothing shape. If an overlapped figure loses all clear edges, move it or reduce the overlap.
- Decide the front-to-back order of the group.
- Draw background figures first with light outlines.
- Place foreground figures so they cover torso or lower arm areas, not faces or hands.
- Confirm each overlapped figure keeps at least one clear identifying edge.
Vary relative heights within one family
Relative height makes a family group believable. Use your height convention to create a gradual range: for example, two adults at 8 squares, one teenager at 7, one child at 5, and one toddler at 3. Avoid making every figure the same height or making the tallest figure twice the shortest without a reason such as a seated adult.
Check the range by subtracting the shortest height from the tallest. If the difference is greater than half the tallest height, the group may look like separate age groups rather than one family; a difference equal to or less than half the tallest height is acceptable. If the difference is less than one square, the figures may look like peers. Adjust one or two heights and recheck.
- List each figure's height in grid squares.
- Find the tallest and shortest heights.
- Subtract the shortest from the tallest to get the height range.
- Adjust heights so the range is noticeable but not extreme for one family.
Worked example
Plan a five-figure family on a grid with a baseline at the lower third. Assign heights in grid squares: adult A 8, adult B 8, teenager 7, child 5, toddler 3. Place adult A and the teenager overlapping by about one-third of the teenager's width, keep a clear gap of one square between adult B and the child, and let the toddler overlap the child's lower arm. Check the height range and the overlap count.
Worked answer
Tallest height is 8 squares; shortest is 3 squares; range is 5 squares. Half the tallest height is 8 divided by 2, which equals 4 squares. Since 5 is greater than 4, the range is more than half the tallest height, so adjust one height. Choosing to raise the toddler from 3 to 4 squares gives final heights 8, 8, 7, 5, 4; the range is 8 minus 4, which equals 4 squares, equal to half the tallest height and therefore acceptable. Overlap count is two pairs (adult A with teenager, toddler with child), and there is one clear gap (adult B to child), so the mix meets the plan.
Four practice exercises
Exercise 1
A learner plans four figures with heights 9, 8, 6, and 3 grid squares. The tallest and shortest differ by 6 squares. Is this range more than half the tallest height? Show the arithmetic and state whether the range is moderate.
Show answer and check
Half the tallest height is 9 divided by 2, which equals 4.5 squares. The range is 9 minus 3, which equals 6 squares. Since 6 is greater than 4.5, the range is more than half the tallest height and is not moderate for one family. Adjust one height, for example raise the shortest to 5 squares, giving a range of 4 squares.
Why: The check compares the height range to half the tallest height using simple subtraction and division. A range greater than half the tallest height suggests the group may look like separate age groups rather than one family.
Check: Recalculate half the tallest height and the range. Confirm that the adjusted range is less than or equal to half the tallest height.
Exercise 2
Two adjacent figures are planned with widths 4 and 6 grid squares. They overlap by 2 squares. Is the overlap no more than one-third of the narrower figure's width? Show the arithmetic.
Show answer and check
One-third of the narrower width is 4 divided by 3, which equals about 1.33 squares. The overlap is 2 squares, which is greater than 1.33 squares. The overlap exceeds the one-third guideline, so reduce it to 1 square or less, or move the figures apart.
Why: The narrower figure's width sets the limit because it is the smaller shape being covered. Dividing by 3 gives the one-third threshold, and comparing the actual overlap shows whether the guideline is met.
Check: Recompute one-third of the narrower width and compare it to the planned overlap. Confirm the overlap is less than or equal to that value.
Exercise 3
A group has five figures. Planned overlaps are: pair 1 overlaps by 1 square, pair 2 overlaps by 2 squares, and the remaining adjacent pairs have clear gaps of 1 square each. Count the overlapping pairs and the clear gaps. Does the plan meet the mix of at least two overlaps and at least one clear gap?
Show answer and check
There are two overlapping pairs and two clear gaps. The plan meets the mix because it has at least two overlaps and at least one clear gap. No adjustment is needed for the mix.
Why: Counting pairs separately from gaps prevents confusing an overlap with a gap. The requirement is a minimum, so two overlaps and two gaps satisfy it.
Check: List each adjacent pair and label it overlap or gap. Count the labels and compare to the minimums of two overlaps and one gap.
Exercise 4
A foreground figure overlaps a background figure by 3 squares at the torso. The background figure's head is fully visible, but its left shoulder is covered. Does the background figure keep at least one clear identifying edge? Name the edge and state whether the overlap placement is acceptable.
Show answer and check
Yes. The fully visible head is a clear identifying edge. The overlap at the torso is acceptable because it does not cover the face or hands, and the head remains visible. The covered shoulder is not a problem as long as the head edge stays clear.
Why: The identifying-edge check asks whether at least one informative outline remains visible. A full head outline qualifies, while a covered shoulder alone would not.
Check: Trace the background figure's visible outlines and confirm at least one complete identifying edge, such as the head, remains uncovered.
Common mistakes
- Using different height conventions for different figures, such as measuring one to the top of the head and another to the chin. Write one convention at the top of the page and measure every figure from the baseline to the same top-of-head point.
- Overlapping figures at the face or hands, hiding the most identifying shapes. Move the foreground figure so overlap occurs at the torso or lower arm, leaving the background figure's head and one shoulder visible.
- Leaving equal gaps between every figure, which makes the group look like a row of separate objects. Plan at least two intentional overlaps and at least one clear gap, then check the mix on the grid.
- Making all figures the same height or making the height range too extreme for one family. Assign heights in grid squares and check that the tallest minus shortest is a moderate range, adjusting one or two figures.
Self-check rubric
- Five to seven figures are placed on the page with a consistent height convention recorded in grid squares.
- At least two pairs overlap intentionally, and at least one clear gap remains between non-overlapping figures.
- Overlaps occur at torso or lower arm areas, leaving each overlapped figure with at least one clear identifying edge.
- Relative heights vary within a moderate range, and the tallest-minus-shortest difference is checked arithmetically.
- The group reads as one connected family unit rather than separate figures or a crowd.
Questions and answers
How many figures should a large family group include?
Five to seven figures is a practical range for this composition task. Fewer may not read as a large group; more can make spacing and overlap hard to check on one page.
Do I need to draw realistic faces to complete this lesson?
No. The lesson assesses spacing, overlap, and relative heights. Simple head shapes and clothing outlines are enough; portrait likeness is outside this task.
What if my family has two adults of similar height?
Similar heights are valid. Use small differences, such as half a grid square, and rely on spacing and overlap to distinguish the figures.
Can I use a seated figure?
Yes, but mark a separate baseline for seated figures and record height from that baseline to the top of the head. Keep the convention consistent for all seated figures.