Free original lessons
Draw a Parakeet: Body Oval, Wing Shape, and Tail Length
Learn to construct a parakeet using a body oval, a tapered wing shape, and a measured tail guide, with clear checks and practice tasks.
Free lesson
Four exercises
Worked answers
Object Drawing Lessons
This lesson teaches a repeatable construction for a parakeet drawing focused on three structural decisions: the body oval, the wing shape, and the tail length. You will use simple measured guides rather than copying a finished picture. The convention is explicit: the body is an oval whose long axis tilts slightly upward toward the head; the wing is a tapered leaf-like shape attached along the upper back; the tail is a narrow extension whose length is set as a multiple of the body oval's long axis. Letter styles and plumage are excluded. All numerical values below are hypothetical examples chosen for practice; measure your own paper and tools and label any values you adopt. The method is checkable with a ruler and a pencil, and valid alternatives are allowed when proportions remain consistent.
Practice materials: Printable downloads are not available for this lesson yet. Use the instructions and four exercises below.
Reference illustration
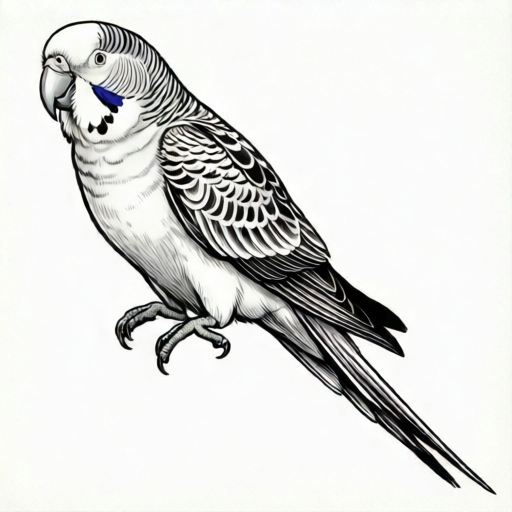
Use the stated measurements and conventions for each exercise.
Set the body oval and its axis
Begin by drawing a light oval for the body. Decide the long axis first: it runs from the lower belly to the upper back where the neck begins. A practical hypothetical example is a long axis of 8 cm and a short axis of 5 cm, giving a ratio of 1.6 to 1. Mark the long axis with two faint points and draw the oval around it.
Tilt the long axis upward toward the head by a small angle, for example 15 degrees from horizontal. This tilt separates a parakeet layout from a generic bird blob. Keep the oval smooth and symmetrical about its long axis; asymmetry here makes the wing and tail checks unreliable.
- Mark two points 8 cm apart for the long axis, tilted 15 degrees upward toward the head.
- Mark the short axis midpoint and set half-width to 2.5 cm on each side.
- Draw a light oval through the four axis endpoints.
- Label the head end and tail end of the oval so later steps stay oriented.
Construct the wing shape
The wing is a tapered shape, not a second oval. Attach it along the upper back, starting near the shoulder point about one-third of the way from the head end of the body oval. The wing's leading edge follows the body curve; its trailing edge tapers to a rounded point toward the tail end.
A hypothetical example: wing length 6 cm along its centerline, maximum width 2.5 cm near the shoulder, tapering to 0.8 cm at the tip. The wing tip should end before the body oval's tail end, leaving a visible gap. Draw the wing as a closed shape with a smooth leading edge and a slightly concave trailing edge.
- Mark the shoulder point one-third from the head end along the upper body edge.
- Draw the wing centerline 6 cm toward the tail end, angled slightly downward.
- Set maximum wing width 2.5 cm near the shoulder and taper to 0.8 cm at the tip.
- Close the wing shape with a smooth leading edge and a slightly concave trailing edge.
- Check that the wing tip stops before the body oval's tail end.
Set tail length with a ratio guide
Tail length is the most variable feature in parakeet drawings, so define it by ratio rather than a fixed number. Use the body oval's long axis as the unit. A hypothetical example is a tail length of 1.25 times the long axis, so an 8 cm body gives a 10 cm tail. Draw the tail as a narrow tapered extension from the tail end of the body oval, centered on the long axis.
Keep the tail width at the base about one-fifth of the body short axis, tapering to a rounded tip. The tail may angle slightly downward, but its centerline should continue the body's long axis direction within about 10 degrees. This keeps the construction coherent when you change scale.
- Measure the body long axis and multiply by your chosen ratio, for example 1.25.
- Mark the tail base at the tail end of the body oval, centered on the long axis.
- Draw the tail centerline to the measured length, angling no more than 10 degrees from the body axis.
- Set base width to one-fifth of the body short axis and taper to a rounded tip.
- Check the tail length against the body long axis with a ruler.
Check proportions and refine
Before adding any detail, run three checks: the wing tip must stop before the body tail end; the tail length must equal your chosen ratio times the body long axis; and the wing maximum width must be about half the body short axis. These checks catch the most common layout errors without requiring a finished illustration.
Valid alternatives are allowed. You may change the tilt angle, the wing taper, or the tail ratio, provided you state the values you used and the checks still pass. Record your chosen values beside the drawing so the construction can be repeated at another scale.
- Measure wing tip to body tail end and confirm a visible gap.
- Divide tail length by body long axis and compare with your stated ratio.
- Divide wing maximum width by body short axis and confirm it is near 0.5.
- Erase construction marks only after all three checks pass.
Worked example
A learner draws a body oval with a long axis of 10 cm and a short axis of 6 cm, tilted 15 degrees. They choose a tail ratio of 1.2 and a wing length of 7 cm with maximum width 3 cm. Check whether the layout passes the three proportion checks.
Worked answer
Tail length should be 1.2 times 10 cm, which is 12 cm. Wing maximum width divided by body short axis is 3 divided by 6, which equals 0.5, so the width check passes. The wing length of 7 cm is less than the body long axis of 10 cm, so the wing tip can stop before the body tail end if placed correctly. The layout passes all three checks when the tail is drawn to 12 cm and the wing tip leaves a visible gap.
Four practice exercises
Exercise 1
A body oval has a long axis of 9 cm and a short axis of 5 cm. The learner chooses a tail ratio of 1.4. Calculate the tail length and state one check that confirms the tail is proportional.
Show answer and check
Tail length is 1.4 times 9 cm, which equals 12.6 cm. Check: divide 12.6 cm by 9 cm to get 1.4, matching the chosen ratio.
Why: The tail ratio multiplies the body long axis. Multiplying 9 by 1.4 gives 12.6. Dividing the drawn tail length by the body long axis returns the ratio, so the check is arithmetic and repeatable.
Check: Use a ruler to measure the drawn tail and body long axis, then divide tail length by body long axis and compare with 1.4.
Exercise 2
A wing has maximum width 2.4 cm and the body short axis is 6 cm. Does the wing width pass the check that maximum width is about half the body short axis? Show the arithmetic.
Show answer and check
Half of 6 cm is 3 cm. The wing width is 2.4 cm, which is less than 3 cm but within a reasonable range if the learner states a target near 0.4 to 0.5 of the short axis. The arithmetic is 2.4 divided by 6 equals 0.4.
Why: The check compares wing maximum width to half the body short axis. Dividing 2.4 by 6 gives 0.4, which is close to but below 0.5. A learner may accept this if they state the target ratio and the drawing remains coherent.
Check: Measure wing maximum width and body short axis, divide, and compare with the stated target ratio.
Exercise 3
A learner draws a body oval with long axis 8 cm and a wing centerline of 9 cm starting at the shoulder. Explain why the wing tip may pass the body tail end and give one fix using the stated values.
Show answer and check
The wing centerline of 9 cm is longer than the body long axis of 8 cm, so the wing tip can reach or pass the body tail end. Fix: shorten the wing centerline to 6 cm, which is less than 8 cm, and recheck that a visible gap remains.
Why: The wing starts near the shoulder, which is already partway along the body. A wing longer than the body long axis is likely to overshoot the tail end. Shortening the wing to a value below the body long axis restores the gap check.
Check: Measure from the wing tip to the body tail end and confirm a visible gap after shortening the wing.
Exercise 4
A drawing uses a body long axis of 7 cm, a tail length of 8.4 cm, and a tail centerline angled 8 degrees from the body axis. Check the tail ratio and the angle limit, showing both calculations or comparisons.
Show answer and check
Tail ratio is 8.4 divided by 7, which equals 1.2. The angle of 8 degrees is within the 10-degree limit. Both checks pass.
Why: The tail ratio is found by division. The angle limit is a direct comparison. Since 1.2 is a valid stated ratio and 8 is less than 10, the tail layout is consistent with the convention.
Check: Measure tail length and body long axis, divide to confirm 1.2, and use a protractor or angle guide to confirm the tail centerline is within 10 degrees of the body axis.
Common mistakes
- Drawing the wing as a second oval overlapping the body. Use a tapered closed shape with a leading edge that follows the body curve and a trailing edge that narrows to a rounded tip.
- Making the tail longer than the body without stating a ratio. Measure the body long axis, choose a ratio such as 1.25, and mark the tail length before drawing.
- Letting the wing tip pass the body oval's tail end. Shorten the wing centerline or move the shoulder point forward until a visible gap remains.
- Tilting the tail far from the body axis. Keep the tail centerline within about 10 degrees of the body long axis direction.
Self-check rubric
- Body oval has a stated long axis, short axis, and tilt angle, and is symmetrical about the long axis.
- Wing is a tapered closed shape attached along the upper back, with a stated length and maximum width.
- Wing tip stops before the body oval's tail end, leaving a visible gap.
- Tail length is stated as a ratio of the body long axis and matches the measured drawing.
- Tail centerline stays within about 10 degrees of the body long axis direction.
- Chosen numerical values are labeled as hypothetical examples and recorded beside the drawing.
- Valid alternatives are accepted when the stated checks pass and values are recorded.
Questions and answers
Do I need to use the exact numbers in this lesson?
No. The numbers are hypothetical examples. Measure your own paper and choose values you can check with a ruler, then state them beside the drawing.
Can the wing be on either side of the body?
Yes. The construction works for a side view with one visible wing. If you show two wings, apply the same taper and width checks to each.
How do I know the tail length is correct?
Divide the drawn tail length by the body long axis. The result should match the ratio you chose, within a small measuring error.
What if my body oval is not perfectly symmetrical?
Redraw the oval using the four axis endpoints. Symmetry about the long axis makes the wing and tail checks reliable.