Free original lessons
Draw a Person Sitting in a Chair: Contact Points and Posture
Learn to draw a seated figure by fixing three contact points—seat, back, feet—then aligning the spine, hips, and head for believable posture.
Free lesson
Four exercises
Worked answers
Object Drawing Lessons
A convincing seated figure depends less on rendering and more on structure: where the body touches the chair and how the skeleton stacks above those contacts. This lesson defines a simple convention for contact points and posture alignment, then gives you a repeatable sequence to draw any seated pose. You will work from a blank chair-and-figure frame, mark contacts first, and build the body around them. All measurements are hypothetical examples; measure your own paper and reference photos.
Practice materials: Printable downloads are not available for this lesson yet. Use the instructions and four exercises below.
Reference illustration
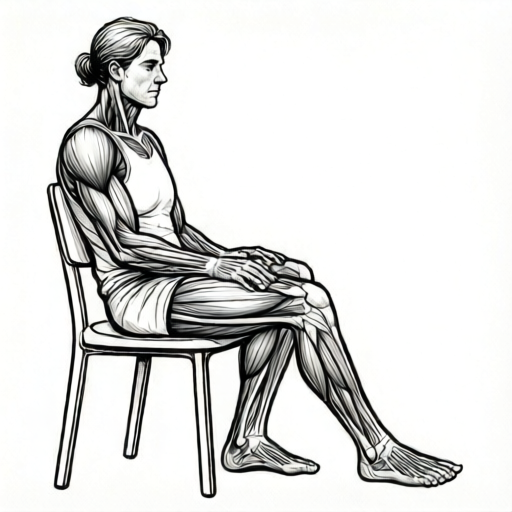
Use the stated measurements and conventions for each exercise.
Define the contact convention before drawing
Use three labeled contact zones: seat contact (the area where the thighs and buttocks meet the seat), back contact (the point where the upper back or shoulder blades touch the backrest), and foot contact (the soles or heels on the floor). Mark each with a small cross and a letter S, B, or F. This convention is a teaching aid, not a universal truth; a person leaning forward may have no back contact, and a person on a stool may have only seat and foot contact.
Posture alignment is described as a chain: foot contact supports the lower leg, seat contact supports the pelvis, back contact stabilizes the torso, and the head sits above the ribcage. Draw a faint vertical guide from the head through the ribcage to the pelvis; it may tilt, but it should be a single readable line. X-height convention: for any lettering on the plate, the baseline is the bottom of the letter and the midline is the top of the lowercase x; letter styles vary, so accept any legible style that respects this baseline-to-midline band.
- Draw the chair frame first: seat rectangle, backrest rectangle, and four legs.
- Mark S where the thighs meet the seat, B where the back meets the backrest, and F under each foot.
- Draw a faint vertical posture guide from the head position down to the pelvis.
- Check that each contact mark touches the chair or floor line exactly once.
Build the figure from contacts upward
Start with the pelvis as an oval resting on the seat contact. Add the thigh as a tapered shape from pelvis to knee, then the lower leg from knee to foot contact. The foot should sit flat or angled according to your reference; do not force a right angle. Next, draw the ribcage as a rounded box above the pelvis, then the head as an oval above the ribcage. Finally, add arms: the upper arm hangs from the shoulder, and the forearm rests on the thigh or armrest if one is present.
Keep proportions simple and checkable. A hypothetical example: if the seated figure's head is 3 units tall, the torso from seat to shoulder is about 6 units, and the thigh from seat to knee is about 4 units. These are example ratios, not standards. Measure your own reference and label your chosen values as hypothetical.
- Place the pelvis oval so its bottom edge overlaps the seat contact mark.
- Draw thighs to the knees, then lower legs to the foot contacts.
- Stack the ribcage above the pelvis and the head above the ribcage.
- Add arms last, checking that the shoulder line is roughly parallel to the seat line unless the pose leans.
Check posture alignment and contact logic
A seated figure reads as believable when the contact points explain the posture. If the back contact is high on the backrest, the torso will appear upright; if the back contact is low or absent, the torso will lean forward. Check that the vertical posture guide passes near the ear, shoulder, and hip on the same side. Small deviations are fine and often more natural.
Use a simple arithmetic check: count the number of contact marks and compare with the number of body parts touching the chair or floor. In a standard seated pose with both feet down and back against the backrest, expect four required marks (two feet, one seat, one back) plus any optional hand contacts; if both hands rest on the thighs, that adds two optional marks. If your count differs, decide whether the difference is intentional and note it.
- Trace the posture guide and confirm it connects head, ribcage, and pelvis.
- Verify each contact mark corresponds to a body part that visibly touches the chair or floor.
- Adjust the lean by moving the back contact mark up or down, not by redrawing the whole figure.
Worked example
A figure sits upright on a chair with both feet flat, back against the backrest, and hands on thighs. Mark contacts and describe the posture guide.
Worked answer
Contacts: S at the seat under the pelvis, B at mid-backrest, F under each foot (two marks), and two optional hand contacts on the thighs. Posture guide: a near-vertical line from the head through the ribcage to the pelvis, tilting slightly back so the back contact is explained. Count: four required marks plus two optional hand marks.
Four practice exercises
Exercise 1
A figure sits on a stool with both feet on the floor and no backrest. Mark contacts and state the posture guide.
Show answer and check
Contacts: S under the pelvis and F under each foot (three marks). No B mark. Posture guide: a vertical line from head through ribcage to pelvis, with the pelvis centered over the stool seat.
Why: A stool has no backrest, so back contact is absent; the feet and seat carry the posture.
Check: Count three marks and confirm the posture guide passes near ear, shoulder, and hip on one side.
Exercise 2
A figure leans forward with elbows on knees and feet flat. Mark contacts and explain why the back contact is absent.
Show answer and check
Contacts: S under the pelvis, F under each foot, and two elbow contacts on the knees. No B mark because the back is off the backrest. Posture guide tilts forward from head to pelvis.
Why: Forward lean removes back contact and transfers support to seat, feet, and elbows.
Check: Verify the posture guide tilts in the same direction as the lean and that elbow marks touch the knees once.
Exercise 3
A figure sits with one foot flat and one foot lifted slightly off the floor. Mark contacts and note the contact count.
Show answer and check
Contacts: S under the pelvis, B at the backrest, F under the flat foot, and no mark under the lifted foot. Count is three required marks.
Why: A lifted foot has no floor contact, so it receives no F mark; the back contact explains the upright torso.
Check: Confirm the lifted foot is visibly above the floor line and that the count matches the marks drawn.
Exercise 4
A figure sits upright but the back contact is low on the backrest. Describe how to adjust the posture guide and contact mark to show a slight forward lean.
Show answer and check
Move the B mark lower or remove it, and tilt the posture guide forward by a small amount from head to pelvis. Keep S and both F marks unchanged.
Why: Lower or absent back contact corresponds to less support behind the torso, which reads as a forward lean.
Check: Check that the guide tilts forward and that the B mark, if kept, sits lower than mid-backrest.
Common mistakes
- Drawing the figure first and adding the chair afterward, so the body floats or intersects the seat. Draw the chair frame and contact marks first, then build the body around those fixed points.
- Forcing both feet to point straight forward and sit at identical angles. Allow each foot to find its own contact angle; check that the sole or heel touches the floor line once.
- Making the back contact a single point in the middle of the backrest regardless of lean. Move the back contact mark up for upright posture and down or off the backrest for a forward lean.
- Using a rigid vertical line for the spine even when the figure leans. Tilt the posture guide as a single readable line from head to pelvis; keep it continuous rather than segmented.
Self-check rubric
- Chair frame is drawn before the figure and remains visible.
- Contact marks S, B, and F are labeled and each touches the chair or floor line once.
- Posture guide is a single continuous line connecting head, ribcage, and pelvis.
- Contact count matches the pose and any intentional differences are noted.
- Lettering, if used, sits between baseline and midline in any legible style.
- Proportions are internally consistent and any numerical values are labeled hypothetical.
Questions and answers
Do I always need three contact points?
No. Use as many as the pose requires. A stool pose may have only seat and foot contacts; a leaning pose may have no back contact. Label what you use.
How do I know if the posture looks right?
Check that the posture guide connects head, ribcage, and pelvis in one readable line, and that each contact mark explains the lean.
Can I use different letter styles on the plate?
Yes. The convention only requires that lettering sits between baseline and midline; any legible style is acceptable.
What if my proportions differ from the example ratios?
That is expected. The ratios are hypothetical examples; measure your own reference and label your values as hypothetical.