Free original lessons
Realistic Rabbit Drawing: Fur Direction and Body Proportion
Learn to draw a realistic rabbit with correct fur flow and body proportions using a simple plate, arrows, and a blank outline for practice.
Free lesson
Four exercises
Worked answers
Object Drawing Lessons
This lesson teaches you to draw a realistic rabbit by focusing on two things that make fur look believable and the body look right: fur direction and proportion. You will use a planned printable plate that shows fur-direction arrows and labeled proportion guides for the head, body, and ears, plus a blank rabbit outline. The convention for fur is simple: draw short strokes that follow the arrow direction, starting at the base and tapering toward the tip. X-height for lettering is baseline to midline, but for fur strokes, length and taper matter more than a single correct style. Letter styles vary, so treat the arrows as guides, not rigid rules. You will measure your own equipment if you print the plate, and any numbers here are hypothetical examples. The goal is a rabbit that reads as a real animal, not a cartoon bunny.
Practice materials: Printable downloads are not available for this lesson yet. Use the instructions and four exercises below.
Reference illustration
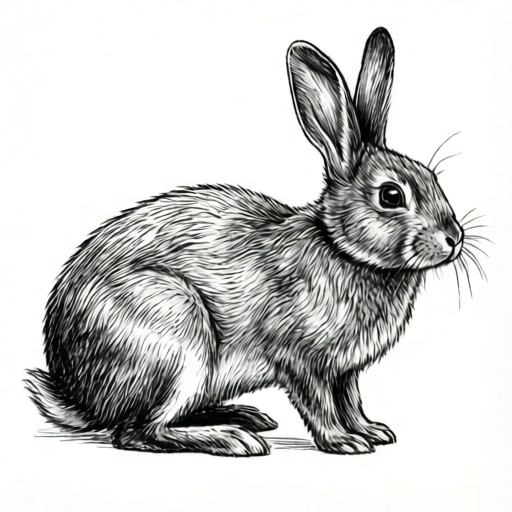
Use the stated measurements and conventions for each exercise.
Why Fur Direction Matters
Fur direction tells the eye how the animal's coat lies. On a rabbit, fur flows from the head toward the tail along the back, outward from the spine, and downward on the sides. On the ears, fur usually runs from base to tip on the outer edge and is shorter inside. If strokes cross randomly, the rabbit looks fuzzy or flat. If strokes follow the body's form, the rabbit looks rounded and real.
Use short, tapered strokes. Start each stroke where the fur begins and lift as you reach the tip. Overlap strokes in rows, like shingles. Keep stroke length consistent within a region: longer on the back, shorter on the face and paws. The planned plate will show arrows for these regions, but you can also observe a real rabbit or a photo to confirm flow.
- Lightly sketch the rabbit's outline using the proportion guides.
- Mark fur-flow arrows on your sketch: head to tail on the back, outward from the spine, downward on the sides.
- Draw short tapered strokes following each arrow, starting at the base and lifting at the tip.
- Overlap rows of strokes like shingles, keeping length consistent within each region.
- Check that no strokes cross against the flow unless you intend a tuft or cowlick.
Setting Body Proportions
A realistic rabbit has a compact body, a rounded head, and ears roughly as long as the head. A simple proportion guide uses head length as the unit. For a hypothetical example, if the head is 3 cm long, the body from chest to rump might be about 2.5 head lengths, and each ear about 1 head length. These numbers are examples only; measure your own printed plate if you use one.
Place the head slightly higher than the body's center. The back curves gently from shoulders to rump. The hind legs are larger and folded, while the front legs are shorter and straighter. Keep the belly line close to the ground. Check proportions by comparing distances with your pencil or a small ruler.
- Draw a head oval and mark its length as one unit.
- Measure 2.5 units for the body length and sketch a rounded body shape.
- Add ears about one head length, angled slightly back.
- Place hind legs as larger folded shapes and front legs as shorter straight shapes.
- Compare head, body, and ear lengths with a ruler or pencil mark and adjust.
Combining Fur and Form
Fur should wrap around the body's curves. On the back, strokes run toward the tail. On the sides, they angle downward. On the chest, they flow downward and slightly outward. On the face, keep strokes very short and follow the muzzle's shape. The ears need fine strokes from base to tip on the outer edge and shorter strokes inside.
Use a softer pencil for dark areas and a harder pencil for light areas. Build density by adding rows rather than pressing hard. Leave small gaps to suggest individual hairs. The planned blank outline lets you practice fur direction without redrawing the body each time.
- Draw fur on the back first, following the head-to-tail arrow.
- Add side fur in downward rows, overlapping like shingles.
- Draw chest fur downward and slightly outward.
- Use very short strokes on the face and fine strokes on the ears.
- Step back and check that fur follows the body's curves.
Checking Your Drawing
A good check is to compare your drawing to the proportion guide and fur arrows. Measure head, body, and ear lengths. Look for strokes that cross against the flow. Check that the hind legs are larger than the front legs and that the belly line is close to the ground. If something looks off, adjust lightly before adding more fur.
Remember that letter styles vary and fur styles vary too. There is no single correct stroke pattern. Use the rubric to judge whether your choices are consistent and follow the body's form. Valid alternatives include slightly different stroke lengths or densities, as long as the flow and proportions read correctly.
- Measure head, body, and ear lengths and compare to your chosen guide.
- Scan for strokes that cross against the arrows.
- Check hind leg size versus front leg size.
- Confirm the belly line is close to the ground.
- Adjust lightly, then add final fur rows.
Worked example
A learner sketches a rabbit with a 3 cm head, a 7.5 cm body, and 3 cm ears. They draw back fur from tail to head and side fur upward. Check the proportions and fur direction.
Worked answer
Proportions are correct: body is 2.5 head lengths (7.5 ÷ 3 = 2.5) and ears are 1 head length. Fur direction is wrong: back fur should run head to tail, and side fur should flow downward, not upward. Fix by reversing the back strokes and redrawing side strokes downward.
Four practice exercises
Exercise 1
A rabbit sketch has a 4 cm head, a 10 cm body, and 4 cm ears. Are the proportions correct using the 2.5-body and 1-ear guide? Show the arithmetic.
Show answer and check
Yes. Body should be 2.5 × 4 = 10 cm, and ears should be 1 × 4 = 4 cm. Both match.
Why: Multiply head length by 2.5 for body and by 1 for ears, then compare to the sketch.
Check: Recompute 2.5 × 4 and 1 × 4, and confirm the sketch measurements match.
Exercise 2
A learner draws back fur from tail to head and side fur upward. Describe the correction using the fur-direction convention.
Show answer and check
Reverse back fur to run head to tail. Redraw side fur to flow downward and outward from the spine.
Why: The convention is head-to-tail on the back and downward on the sides. Upward or reversed strokes break the flow.
Check: Scan the drawing and confirm every back stroke points toward the tail and every side stroke points downward.
Exercise 3
A rabbit has a 5 cm head. Using the hypothetical guide, what body and ear lengths should you expect? Show the arithmetic.
Show answer and check
Body: 2.5 × 5 = 12.5 cm. Ears: 1 × 5 = 5 cm.
Why: Apply the same multipliers to the new head length.
Check: Multiply 2.5 by 5 and 1 by 5, and compare to your sketch.
Exercise 4
A sketch shows hind legs the same size as front legs and the belly line high off the ground. Name two fixes.
Show answer and check
Enlarge the hind legs and fold them; lower the belly line closer to the ground.
Why: Realistic rabbits have larger folded hind legs and a belly close to the ground.
Check: Compare leg sizes and measure the gap between belly and ground line; adjust until hind legs are larger and the gap is small.
Common mistakes
- Drawing fur strokes in random directions. Follow the arrows: head to tail on the back, outward from the spine, downward on the sides.
- Making the ears too short or too long. Use one head length as a guide and measure with a ruler or pencil mark.
- Making the hind legs the same size as the front legs. Draw hind legs larger and folded, front legs shorter and straighter.
- Pressing hard to make fur look dense. Add more overlapping rows of light strokes instead of pressing hard.
Self-check rubric
- Head, body, and ear lengths match the chosen proportion guide within a small margin.
- Back fur flows from head toward tail.
- Side fur flows downward and outward from the spine.
- Ear fur runs from base to tip on the outer edge.
- Hind legs are larger than front legs.
- Belly line is close to the ground.
- Strokes are tapered and overlap like shingles.
- Valid alternatives are accepted if flow and proportions read correctly.
Questions and answers
Do I need the printable plate to do this lesson?
No. The plate is planned but not yet built. You can use the steps and your own sketch. If you print a plate later, measure it with your own ruler.
How long should fur strokes be?
Longer on the back, shorter on the face and paws. Keep length consistent within a region. There is no single correct length.
What if my rabbit looks like a cartoon?
Check proportions first: head, body, and ear lengths. Then check fur flow. Realistic rabbits have compact bodies and fur that follows the form.
Can I use different stroke styles?
Yes. Letter styles vary and fur styles vary. Use the rubric to check consistency and flow, not a single universal pattern.