Free original lessons
Draw a Profile Mouth with Protruding Tongue: Four-Step Construction
Learn to draw a mouth with a protruding tongue using four labeled profile construction steps, a worked example, and four self-contained practice tasks.
Free lesson
Four exercises
Worked answers
Object Drawing Lessons
This lesson teaches a repeatable four-step method for drawing a mouth in profile with the tongue sticking out. You will build the shape from simple guide lines rather than copying a finished picture. The method separates the lip contour, the jaw line, and the visible tongue form so each part can be checked before adding detail. All measurements are hypothetical examples; measure your own paper and tools. The convention for judging proportions is stated in the rubric, and valid stylistic alternatives are allowed.
Practice materials: Printable downloads are not available for this lesson yet. Use the instructions and four exercises below.
Reference illustration
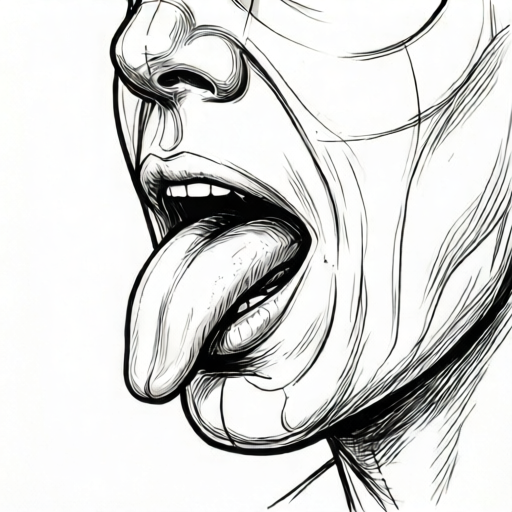
Use the stated measurements and conventions for each exercise.
Step 1: Set the profile guide and lip contour
Begin with a light horizontal line for the mouth opening and a short vertical line marking the front of the face. These are guides, not final edges. Place the upper lip line so it curves gently forward, then bring the lower lip line back toward the jaw. Keep the gap between the lips narrow at the corners and wider at the front.
Use a soft pencil and keep pressure light. The lip contour should read as two separate curves that meet at the corners. Check that the upper lip sits slightly ahead of the lower lip in profile, which is common in a relaxed mouth.
- Draw a horizontal guide about 6 cm long (hypothetical example).
- Mark the front of the face with a short vertical guide crossing the horizontal line.
- Sketch the upper lip curve from the front mark back toward the corner.
- Sketch the lower lip curve below it, leaving a narrow opening.
- Check that both curves meet cleanly at the corner without crossing.
Step 2: Add the jaw line and mouth opening
The jaw line gives the mouth a place to sit. Draw a shallow curve from below the ear area toward the chin, passing under the lower lip. This line should not touch the lip contour; it sits behind and below it. Next, open the mouth by widening the gap between the lip curves at the front while keeping the corners closed.
The opening should be widest near the front and taper toward the corners. This taper is what makes the mouth read as a mouth rather than a slot. Keep the jaw line simple and continuous.
- Draw a shallow jaw curve from the back of the mouth area toward the chin.
- Widen the lip gap at the front by about 4 mm (hypothetical example).
- Keep the corners closed so the opening tapers.
- Check that the jaw line stays below the lower lip curve.
- Erase any guide lines that cross the final lip edges.
Step 3: Construct the protruding tongue shape
The tongue is drawn as a rounded form that emerges from the mouth opening and extends forward and slightly down. Start with a curved center line from inside the mouth to the tip. Then build the tongue's width by drawing two side curves that follow the center line and meet at a rounded tip. The tongue should overlap the lower lip slightly, because it protrudes.
Keep the tongue narrower than the mouth opening at its base and wider near the middle. The tip should be rounded, not pointed. A small shadow line under the tongue helps separate it from the lower lip.
- Draw a curved center line from inside the mouth to the tongue tip.
- Add a left side curve and a right side curve following the center line.
- Round the tip where the side curves meet.
- Let the tongue overlap the lower lip by about 2 mm (hypothetical example).
- Add a short shadow line under the tongue to show separation.
Step 4: Refine edges and check proportions
Refine the lip edges so they are smooth and continuous. Darken the final contour lines and erase the construction guides. Check the tongue's length against the mouth width: in this method the tongue extends forward by roughly half the mouth width, but that is a stylistic choice, not a rule. Valid alternatives include a shorter or wider tongue as long as the overlap and taper remain readable.
Use the rubric to judge your drawing. The rubric allows different letter styles and line weights; it checks structure, not a single correct appearance.
- Smooth the upper and lower lip edges.
- Darken the final tongue outline and the jaw line.
- Erase construction guides.
- Compare tongue length to mouth width and adjust if needed.
- Apply the rubric checks before calling the drawing finished.
Worked example
A learner draws a profile mouth on a 10 cm wide area. The mouth opening is 5 cm wide at the front and closes at the corners. The tongue extends 2.5 cm forward from the lip line and overlaps the lower lip by 2 mm. The jaw line sits 1 cm below the lower lip. Check the proportions using the stated convention.
Worked answer
The tongue length is half the mouth width (2.5 cm is half of 5 cm), which matches the hypothetical example. The overlap is 2 mm, which is visible but small. The jaw line is 1 cm below the lower lip, so it does not touch the lip contour. The drawing passes the structural checks: tapered opening, rounded tongue tip, and clear overlap.
Four practice exercises
Exercise 1
On a 12 cm wide area, draw a profile mouth with a 6 cm wide opening at the front. Make the tongue extend 3 cm forward and overlap the lower lip by 2 mm. Place the jaw line 1 cm below the lower lip. Use the four-step method.
Show answer and check
A correct drawing shows a tapered mouth opening 6 cm wide at the front, a tongue 3 cm long with a rounded tip, a 2 mm overlap over the lower lip, and a jaw line 1 cm below the lower lip without touching it.
Why: The tongue length is half the mouth width (3 cm is half of 6 cm), matching the hypothetical convention. The overlap and jaw spacing are checkable distances. The tapered opening and rounded tip satisfy the structural rubric.
Check: Measure the mouth width at the front and the tongue length from the lip line. Confirm the tongue is about half the mouth width. Check that the jaw line is about 1 cm below the lower lip and does not touch it. Confirm the tongue tip is rounded and the opening tapers to closed corners.
Exercise 2
Draw a profile mouth where the mouth opening is 4 cm wide at the front. The tongue extends 1.5 cm forward and overlaps the lower lip by 3 mm. The jaw line is 8 mm below the lower lip. Check whether the tongue length follows the half-width convention and state any adjustment.
Show answer and check
The half-width convention would give 2 cm, but the tongue is 1.5 cm. This is a valid alternative because the tongue still overlaps the lip and has a rounded tip. No adjustment is required if the structure reads clearly; if the tongue looks too short, extend it toward 2 cm.
Why: The convention is a guide, not a rule. The rubric allows alternative lengths when the tongue emerges clearly and overlaps the lower lip. The 3 mm overlap and 8 mm jaw spacing are checkable.
Check: Measure mouth width (4 cm) and tongue length (1.5 cm). Compare to the half-width value (2 cm). Confirm the overlap is about 3 mm and the jaw line is about 8 mm below the lower lip. Check that the tongue tip is rounded and the mouth opening tapers.
Exercise 3
A learner draws a profile mouth with a 5 cm opening, a tongue 2.5 cm long, and a jaw line that touches the lower lip. Identify the structural mistake and describe the fix using the four-step method.
Show answer and check
The mistake is that the jaw line touches the lower lip. The fix is to move the jaw curve below and behind the lower lip, leaving a clear gap. Keep the tongue length at 2.5 cm and the overlap at about 2 mm.
Why: The jaw line should sit below the lower lip so the lip contour remains readable. Touching the lip blurs the separation between jaw and mouth. The tongue proportions are already consistent with the half-width convention.
Check: Check that the jaw line is separate from the lower lip by a visible gap. Measure the tongue length against the mouth width (2.5 cm is half of 5 cm). Confirm the tongue overlaps the lower lip and has a rounded tip.
Exercise 4
Draw a profile mouth with a 7 cm opening at the front. Choose a tongue length that is not half the mouth width, state the length, and explain why it still passes the rubric. Include a 2 mm overlap and a jaw line 1 cm below the lower lip.
Show answer and check
One valid choice is a 2 cm tongue, which is shorter than the half-width value of 3.5 cm. It passes because the tongue still emerges from the mouth, overlaps the lower lip by 2 mm, and has a rounded tip. The jaw line is 1 cm below the lower lip and does not touch it.
Why: The rubric accepts alternative tongue lengths when the structural checks pass. The chosen length is stated and checkable. The overlap and jaw spacing are simple measurements.
Check: Measure the mouth width (7 cm) and the stated tongue length (2 cm). Confirm the tongue overlaps the lower lip by about 2 mm and the jaw line is about 1 cm below the lower lip. Check that the mouth opening tapers and the tongue tip is rounded.
Common mistakes
- Drawing the tongue as a flat rectangle. Use a curved center line and two side curves that meet at a rounded tip.
- Letting the jaw line touch the lower lip. Keep the jaw curve below and behind the lip contour.
- Making the mouth opening the same width at the corners and front. Taper the opening so it is widest at the front and closed at the corners.
- Skipping the overlap between tongue and lower lip. Let the tongue cross slightly over the lower lip to show protrusion.
Self-check rubric
- Lip contour: upper and lower lip curves meet at the corners without crossing.
- Mouth opening: widest at the front and tapering to closed corners.
- Jaw line: continuous, below the lower lip, and not touching the lip contour.
- Tongue shape: curved center line, two side curves, rounded tip.
- Protrusion: tongue overlaps the lower lip slightly and reads as emerging from the mouth.
- Proportion check: tongue length compared to mouth width using a stated convention; alternative lengths allowed if structure remains readable.
- Line quality: final contour lines are clear; construction guides are removed or faint.
- Valid alternatives: different letter styles, line weights, and tongue lengths are accepted if the structural checks pass.
Questions and answers
Do I need a reference photo?
No. The four steps are self-contained and use simple guides. A reference can help, but the method works from the written steps alone.
How long should the tongue be?
A common choice is about half the mouth width forward from the lip line. This is a hypothetical example, not a fixed rule; adjust to your style.
Can I use a pen instead of a pencil?
Yes, but keep construction lines light. If you use pen, plan the guides carefully because they cannot be erased.
What if my tongue looks too wide?
Narrow the side curves near the base and keep the tip rounded. Check that the tongue base is narrower than the mouth opening.