Free original lessons
Drawing the Mayflower: Hull and Rigging Construction
Learn to draw the Mayflower's hull and rigging with clear steps, a convention for lettering, and practice tasks that build accuracy and confidence.
Free lesson
Four exercises
Worked answers
Object Drawing Lessons
This lesson teaches a reliable way to draw the Mayflower as a ship outline with hull and rigging construction. You will use a simple convention: x-height is measured from the baseline to the midline of lowercase letters, and letter styles may vary, so the rubric accepts valid alternatives. The goal is a clear, proportionate ship outline with masts and rigging placed logically. All measurements are hypothetical examples; measure your own paper and tools. Work on plain paper with a pencil, eraser, and ruler. Keep units consistent, use centimeters for paper and millimeters for small offsets, and label any chosen values as examples. The method separates hull shape from rigging so each part can be checked before adding detail.
Practice materials: Printable downloads are not available for this lesson yet. Use the instructions and four exercises below.
Reference illustration
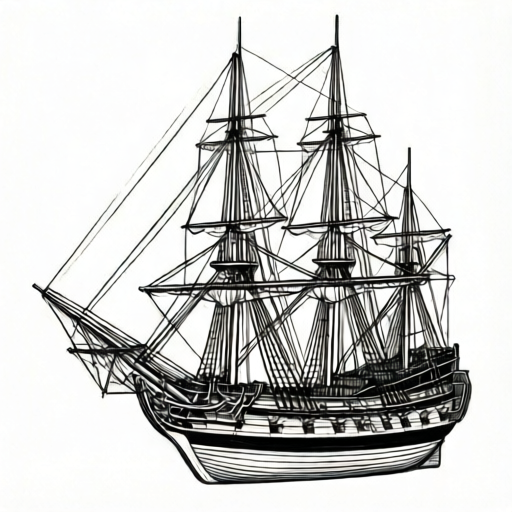
Use the stated measurements and conventions for each exercise.
Set the page and hull outline
Place the paper in portrait orientation. Mark a light baseline near the lower third for the waterline. Decide a hull length as a hypothetical example, such as 18 cm, and a hull height of 6 cm. These are chosen values, not standards. Draw a horizontal waterline and a deck line above it; keep the deck line roughly parallel to the waterline, with a slight upward curve at the ends. The hull outline is a curved trapezoid: a rounded bow on the left, a slightly higher stern on the right, and a bottom curve that meets the waterline.
Use light pencil strokes and check symmetry by folding or measuring. The bow curve should be smooth, and the stern should be a gentle vertical curve. Keep the deck line slightly curved upward at the ends. Mark the mast positions before adding rigging: a foremast near the bow third, a mainmast near the center, and a mizzenmast near the stern. Space them proportionally using your chosen hull length, for example near the bow third, center, and stern third.
- Draw the waterline and deck line as light horizontals.
- Sketch the bow curve, stern curve, and bottom curve to form the hull outline.
- Mark three mast positions along the deck line with small crosses.
- Erase construction marks only after the outline looks balanced.
Masts, yards, and rigging placement
Draw each mast as a vertical line from the deck line upward. As a hypothetical example, make the mainmast 14 cm tall, the foremast 12 cm, and the mizzenmast 10 cm. Add a short horizontal yard near the top of each mast. Rigging lines connect mast tops to the hull and to each other. Use a ruler for straight lines and keep line weight light so mistakes are easy to correct.
A simple rigging plan: from each mast top, draw two shrouds down to the hull sides, one forward and one aft. Add a forestay from the foremast top to the bow, and a backstay from the mizzenmast top to the stern. Add a few yard lines across the masts. Do not overcrowd; the outline should remain readable. Check that each shroud attaches at a hull side and that no rigging line crosses the hull interior except where it attaches.
- Draw the three masts and their yards.
- Add two shrouds per mast to the hull sides.
- Add forestay and backstay lines.
- Check attachments and erase stray lines.
Refine and label the construction
Refine the hull with a second pass: darken the outline, add a simple deck rail, and mark the waterline clearly. Keep the rigging lines thin and straight. If you add a small flag or a bowsprit, keep it within the ship outline boundary and do not add a historical scene. Label the parts lightly: hull, waterline, foremast, mainmast, mizzenmast, shrouds, forestay, backstay. Use the x-height convention for any lowercase labels: measure from the baseline to the midline, and accept different letter styles as long as the label is readable.
Final check: the hull should look like a single closed shape, the masts should stand on the deck line, and the rigging should connect logically. Measure a few distances with a ruler to confirm consistency. If a line looks wrong, erase and redraw rather than darkening over it.
- Darken the hull outline and deck rail.
- Add labels using the x-height convention.
- Measure two or three key distances for consistency.
- Erase construction lines and review the whole drawing.
Worked example
Draw a Mayflower outline on paper 21 cm by 29.7 cm. Use a hypothetical hull length of 16 cm and height of 5 cm. Place three masts at 4 cm, 8 cm, and 12 cm from the bow along the deck line. Add two shrouds per mast and a forestay and backstay. Label the hull and waterline.
Worked answer
The hull is a closed curved trapezoid with a waterline near the lower third and a deck line above it. The three masts stand vertically on the deck line at the marked positions. Each mast has two shrouds to the hull sides, and the forestay and backstay connect the outer masts to the bow and stern. Labels are readable and use the x-height convention. All values are hypothetical examples.
Four practice exercises
Exercise 1
On paper 20 cm by 25 cm, draw a hull outline with a hypothetical length of 14 cm and height of 4 cm. Mark a waterline and deck line. Place three mast positions at 3 cm, 7 cm, and 11 cm from the bow. Do not add rigging yet.
Show answer and check
A closed curved trapezoid hull with a waterline near the lower third and a deck line above it. Three crosses on the deck line at the stated distances.
Why: Separating hull and mast placement makes proportion checkable before rigging.
Check: Measure the hull length and height with a ruler and confirm the three mast marks are on the deck line.
Exercise 2
Using the hull from the first exercise, draw three masts as vertical lines. Make the mainmast 12 cm, foremast 10 cm, and mizzenmast 8 cm as hypothetical examples. Add one yard near the top of each mast.
Show answer and check
Three vertical masts of the stated heights with short horizontal yards near their tops.
Why: Vertical masts and yards establish the rigging frame.
Check: Check that each mast starts on the deck line and that yard lines are horizontal.
Exercise 3
Add rigging to the previous drawing: two shrouds per mast to the hull sides, a forestay from the foremast top to the bow, and a backstay from the mizzenmast top to the stern. Keep lines straight.
Show answer and check
Six shroud lines, one forestay, and one backstay, all attached at logical points without crossing the hull outline except at attachments.
Why: A limited rigging plan keeps the outline readable and checkable.
Check: Trace each line from mast top to attachment and confirm each shroud attaches at a hull side and does not cross the hull interior except at its attachment.
Exercise 4
Label the hull, waterline, foremast, mainmast, mizzenmast, shrouds, forestay, and backstay. Use the x-height convention and keep labels readable. Then erase construction lines.
Show answer and check
Readable labels placed near the correct parts, with lowercase letters measured from baseline to midline. Construction lines are erased.
Why: Labels test understanding of parts and the convention allows valid letter-style alternatives.
Check: Confirm each label points to the correct part and that lowercase x-height is consistent from baseline to midline.
Common mistakes
- Making the hull too tall relative to its length. Use a hypothetical ratio such as length 18 cm to height 6 cm, then adjust after measuring your paper.
- Placing masts without checking the deck line. Mark mast positions on the deck line first, then draw verticals upward.
- Rigging lines crossing the hull outline. Attach shrouds only at the hull sides and check each line endpoint.
- Overcrowding the rigging so the outline is unclear. Limit to two shrouds per mast plus forestay and backstay.
Self-check rubric
- Hull outline is a single closed shape with a clear waterline and deck line.
- Three masts stand on the deck line at logical spacing.
- Rigging includes two shrouds per mast attached to the hull sides, plus a forestay to the bow and a backstay to the stern.
- Labels are readable and follow the x-height convention; valid letter-style alternatives are accepted.
- Construction lines are erased and the drawing is clear without overcrowding.
Questions and answers
Do I need exact historical measurements?
No. Use hypothetical example values and measure your own paper. The lesson focuses on construction and proportion, not historical accuracy.
How do I use the x-height convention?
Measure from the baseline to the midline of lowercase letters. Letter styles may vary, so the rubric accepts readable alternatives.
Can I add other details?
Keep within the ship outline boundary. Small flags or a bowsprit are fine if they do not turn the drawing into a scene.
What if my rigging looks uneven?
Check attachments with a ruler and redraw one line at a time. Light pencil strokes make corrections easier.