Free original lessons
Pencil Fire Drawing: Flame Shapes and Tonal Layering
Learn to draw fire in pencil using flame-shape construction and ordered tonal layering, with a worked example, practice tasks, and a fair rubric.
Free lesson
Four exercises
Worked answers
Object Drawing Lessons
This lesson teaches a repeatable pencil method for rendering fire as a standalone subject. You will build flame shapes from simple tapering forms, then layer graphite from light to dark to suggest glow, edge, and depth. The approach is deliberately flexible: flame silhouettes vary, and pencil styles vary, so the rubric rewards clear shape logic and controlled tonal order rather than one exact drawing. All measurements are hypothetical examples; measure your own paper and tools before relying on any number.
Practice materials: Printable downloads are not available for this lesson yet. Use the instructions and four exercises below.
Reference illustration
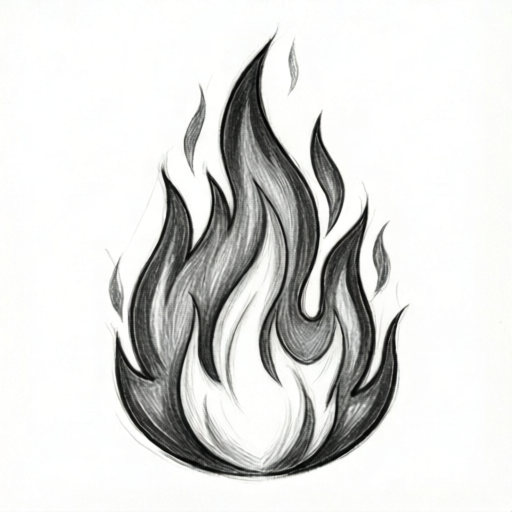
Use the stated measurements and conventions for each exercise.
Constructing Flame Shapes
Begin by deciding the overall flame envelope: a tall teardrop, a leaning tongue, or a clustered trio. Draw the envelope lightly with a 2H pencil using long, relaxed strokes. Inside it, place two or three tapering inner shapes that narrow toward the top. Keep the base wider and the tips pointed but not needle-thin; a slightly blunted tip reads more naturally in pencil.
Vary the silhouette deliberately. A single symmetrical flame can look static, so offset the inner shapes and let one tip lean. Use a baseline to anchor the flame and a midline to judge height. X-height conventions do not apply here; instead, treat the baseline as the flame base and the midline as a visual midpoint for proportion checks.
- Draw a light envelope with a 2H pencil, keeping strokes loose.
- Add two or three inner tapering shapes, offsetting their tips.
- Check height against width using a midline mark.
- Erase construction lines gently before tonal work.
Tonal Layering Order
Work from light to dark. First, establish a pale overall tone inside the flame with the side of a 2H pencil, leaving the brightest core untouched. Second, add mid tones with an HB pencil along the outer edges and between inner shapes. Third, deepen selected edges with a 2B pencil, but keep some soft transitions so the fire does not look outlined.
Reserve the whitest paper for the hottest-looking core near the base. Darker graphite belongs at the outer silhouette and in the gaps between flame tongues. Blend sparingly with a paper stump or fingertip only if you want softer gradation; otherwise, let directional pencil strokes suggest movement. Keep the background light so the flame reads clearly.
- Apply a pale 2H tone inside the flame, leaving the core white.
- Add HB mid tones along edges and between inner shapes.
- Deepen selected outer edges with 2B, preserving soft transitions.
- Check value order: core lightest, mid tones next, edges darkest.
Edge Control and Finish
Fire edges are rarely uniformly sharp. Alternate crisp edges where flame tongues overlap with soft, fading edges where the flame meets air. Use a light touch at the tips and slightly firmer pressure near the base. If an edge becomes too dark, lift graphite with a kneaded eraser rather than adding more pencil.
Finish by checking the whole drawing at arm's length. Confirm that the brightest area is still paper-white, that at least two distinct flame shapes are visible, and that the darkest marks sit at the outer boundary or in gaps. Sign and date the sheet if desired, and note the pencil grades used for future reference.
- Alternate crisp and soft edges along the silhouette.
- Lift excess graphite with a kneaded eraser if needed.
- Review at arm's length for value order and shape clarity.
- Record pencil grades and any hypothetical measurements used.
Worked example
On a 15 cm by 20 cm sheet, draw a single leaning flame about 12 cm tall using a 2H envelope, two inner shapes, and light-to-dark layering with 2H, HB, and 2B pencils. Leave the core white and darken the outer edge.
Worked answer
A completed pencil drawing showing a leaning flame with a wide base, two offset inner tongues, a paper-white core near the base, HB mid tones along the edges, and 2B accents at the outer silhouette and in the gap between tongues. Construction lines are erased, and the background remains light.
Four practice exercises
Exercise 1
Draw a single upright flame 10 cm tall on a 15 cm by 20 cm sheet. Use a 2H envelope, one inner tapering shape, and leave the core white. Add HB mid tones along the outer edge only.
Show answer and check
A pencil flame with a clear tapering silhouette, a white core, and HB tone confined to the outer edge; construction lines faint or erased.
Why: The task isolates envelope construction and a single tonal layer, so the learner practices shape clarity before adding darker values.
Check: Measure the flame height against the 10 cm target with a ruler; confirm the core is paper-white and the outer edge shows HB tone.
Exercise 2
Draw two offset flame tongues about 8 cm tall. Use 2H for the pale base tone, HB for mid tones between the tongues, and 2B for the outer silhouette. Keep at least one tip slightly blunted.
Show answer and check
Two distinguishable flame tongues with offset tips, a pale base tone, HB mid tones in the gap, and 2B accents on the outer edge; one tip blunted.
Why: Offset tongues and a gap test shape variation and tonal separation between adjacent forms.
Check: Verify two separate tongues are visible, the gap contains HB tone, the outer edge is darker than the gap, and one tip is not needle-sharp.
Exercise 3
Draw a leaning flame 12 cm tall with a crisp edge on one side and a soft fading edge on the other. Use 2H, HB, and 2B in light-to-dark order and leave the brightest core untouched.
Show answer and check
A leaning flame with one crisp silhouette edge, one soft fading edge, a white core, and a clear light-to-dark tonal progression.
Why: Alternating edge quality prevents a uniform outline and tests controlled pressure at the tips.
Check: Compare the two edges: one should be visibly sharper, the other softer; confirm the core remains lightest and the darkest marks sit at the crisp edge.
Exercise 4
Draw a clustered flame group of three tongues within a 12 cm by 15 cm area. Use a 2H envelope for the group, HB mid tones between tongues, and 2B only at the outer boundary. Record the pencil grades used and one hypothetical measurement you checked.
Show answer and check
A three-tongue flame cluster with a shared envelope, HB separation between tongues, 2B accents at the outer boundary, and a short note listing pencil grades and one checked measurement.
Why: Clustering tests envelope planning and tonal separation across multiple shapes while requiring a simple record of process.
Check: Count three tongues, confirm the outer boundary is darkest, verify the note lists grades and a measurement, and check the group fits the stated area.
Common mistakes
- Outlining the flame with a hard, uniform line. Soften or break the outline and let tonal contrast define the edge instead.
- Darkening the core instead of leaving it light. Reserve paper-white for the hottest core and deepen only outer edges and gaps.
- Making every flame tip needle-sharp. Blunt some tips slightly and vary tip angles to read more naturally.
- Applying dark graphite before establishing pale tone. Follow the light-to-dark order: 2H base, HB mid tones, then 2B accents.
Self-check rubric
- Flame silhouette is clear and includes at least two distinguishable flame shapes or one well-defined tapering form.
- Tonal order is light to dark: core lightest, mid tones next, outer edges or gaps darkest.
- Edges vary between crisp and soft rather than forming a uniform outline.
- Construction lines are removed or faint enough not to distract.
- Valid alternatives are accepted: different flame counts, lean directions, and pencil grades are allowed if shape logic and tonal order remain clear.
Questions and answers
Do I need colored pencils?
No. This lesson uses graphite only; color is outside the brief.
How many flame shapes should I draw?
Two or three inner shapes usually read well, but a single well-shaped flame is acceptable if the silhouette is clear.
Can I blend with my finger?
Yes, sparingly. Blending softens gradation but can dull directional strokes, so test on scrap paper first.
What if my flame looks like a leaf?
Offset the inner tips and add a gap or notch between flame tongues to break the leaf-like symmetry.