Free original lessons
Pencil Owl Drawing: Graphite Layering and Feather Stroke Practice
Learn to draw a full pencil owl using graphite layering, directional feather strokes, and tonal control, with a printable plate and blank outline planned.
Free lesson
Four exercises
Worked answers
Object Drawing Lessons
This lesson teaches a complete pencil owl drawing through graphite layering and feather stroke practice. You will build tone in ordered passes, direct strokes along feather flow, and check values against a simple scale. The method suits a perched owl with folded wings and a rounded body. Work on smooth paper with a 2H, HB, 2B, and 4B pencil, a kneaded eraser, and a soft brush. Keep the pencil sharp for fine feather lines and slightly blunt for broad shading. The planned printable includes a reference plate showing layering order, stroke direction, and tonal steps, plus a blank owl outline for practice; these resources are proposed, not yet produced. All numerical values below are hypothetical examples for measurement and checking.
Practice materials: Printable downloads are not available for this lesson yet. Use the instructions and four exercises below.
Reference illustration
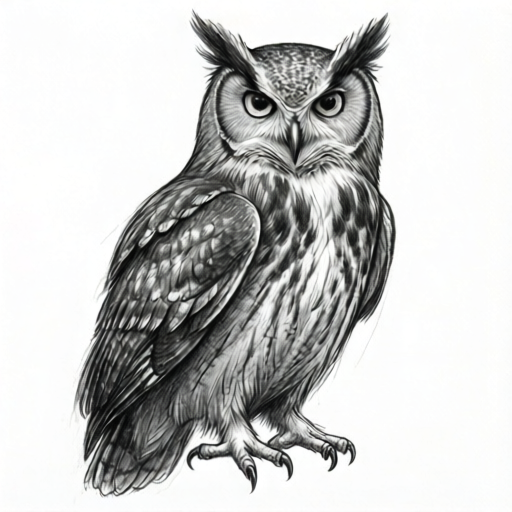
Use the stated measurements and conventions for each exercise.
Set up the drawing and define your convention
Place the paper so the owl fills about two thirds of the sheet. Mark a light vertical axis and a horizontal line for the perch. Block the body as an egg shape, the head as a circle overlapping the top, and the wings as two curved shields at the sides. Keep these guide lines very light with a 2H pencil.
Define a simple convention for this lesson: x-height means the distance from the baseline to the midline of lowercase letters in your own handwriting. Use it only to compare stroke spacing and feather band widths, not to standardize letter style. Letter styles vary, so treat x-height as a personal measuring unit. For example, if your x-height measures 4 mm, make the finest feather strokes about 1 mm apart and broader tone bands about 4 mm wide. Measure your actual pencil and paper; label any chosen numbers as hypothetical.
- Measure your x-height on scrap paper and record it in millimetres.
- Draw the body, head, wing, and perch guides with a 2H pencil.
- Check that the head circle overlaps the body by about one quarter of its diameter.
- Erase excess guide lines with a kneaded eraser before shading.
Build graphite layers in order
Graphite layering means applying tone in thin, ordered passes rather than pressing hard once. Start with 2H for the lightest overall tone, then HB for middle values, then 2B for darker areas, and reserve 4B for the deepest shadows. Let each pass settle before adding the next. Keep strokes close and even, and avoid smudging with your fingers; use a soft brush to clear graphite dust.
Divide the owl into tonal zones: pale face, mid-tone body, darker wing edges, and deep shadows under the wing and behind the perch. In the first pass, cover the mid-tone body with light 2H strokes. In the second pass, add HB to the wing edges and the shadow under the head. In the third pass, use 2B for the darkest feather gaps and the perch shadow. Use 4B only for small accents such as the pupil edge and the deepest under-wing crease.
- Apply a 2H pass over the body, keeping strokes parallel to the feather flow.
- Add an HB pass to wing edges and the head shadow.
- Add a 2B pass to feather gaps and the perch shadow.
- Add small 4B accents at the pupil edge and under-wing crease.
- Check the value range against a five-step scale from white to dark.
Practice feather strokes and direction
Feather strokes should follow the direction the feather grows. On the body, strokes curve gently downward and outward from the center. On the wings, strokes run from the shoulder toward the tip. On the face, short strokes radiate around the eyes. Keep the wrist relaxed and lift the pencil at the end of each stroke to make a tapered line.
Practice on a spare sheet before drawing on the owl. Make rows of short strokes at different spacings: fine strokes about 1 mm apart, medium strokes about 2 mm apart, and broad strokes about 4 mm apart, using your measured x-height as a guide. Then draw overlapping rows to simulate layered feathers. Vary stroke length and pressure to suggest soft down and firmer flight feathers. Valid alternatives include stippling or short dashes if they follow the same direction and tonal order.
- Draw three practice rows with fine, medium, and broad spacing.
- Draw overlapping rows to imitate layered feathers.
- Test tapered strokes by lifting the pencil at the end.
- Apply the practiced strokes to the wing and body in the same direction.
Refine edges, eyes, and final checks
Refine the owl by cleaning edges with a kneaded eraser and sharpening key contours. The eye should have a clear pupil, a light catchlight, and a ring of short radiating strokes. The beak is a small curved wedge with a shadow beneath. The perch needs a simple cylindrical shadow that matches the light direction.
Finish with a value check. Squint at the drawing to see whether the dark wing edges and the pale face separate clearly. Compare the darkest accent with the white paper and the mid-tone body with a five-step scale. If the drawing looks flat, add one more HB pass to the mid-tones rather than pressing harder with 4B. Keep the feather direction consistent and erase any stray guide lines.
- Clean edges and lift excess graphite with a kneaded eraser.
- Sharpen the eye, beak, and perch contours.
- Squint test for value separation.
- Add a final HB pass to mid-tones if needed.
- Erase remaining guide lines and sign the sheet.
Worked example
Draw a perched owl with a pale face, mid-tone body, dark wing edges, and a shadowed perch. Use four graphite passes and feather strokes that follow the body and wing direction. Measure your x-height and use it to set stroke spacing.
Worked answer
Block the owl with 2H guides. Measure x-height at 4 mm. Apply a 2H pass over the body with strokes 4 mm apart. Add HB to wing edges and head shadow with strokes 2 mm apart. Add 2B to feather gaps and perch shadow with strokes 1 mm apart. Add 4B only at the pupil edge and under-wing crease. Keep the face pale by leaving paper white. Check with a squint test: the wing edges should read darker than the body, and the face should read lightest. Erase guides and refine the eye with a catchlight.
Four practice exercises
Exercise 1
On a spare sheet, draw three rows of feather strokes with spacings of 1 mm, 2 mm, and 4 mm. Use a 2H pencil and keep strokes tapered. State your measured x-height and explain how it guided the spacing.
Show answer and check
Three rows with fine, medium, and broad spacing; strokes taper and follow one direction. Example: x-height 4 mm, so fine row 1 mm, medium 2 mm, broad 4 mm.
Why: Spacing practice builds control and connects measurement to stroke width. Tapering improves feather realism.
Check: Measure row spacings with a ruler and confirm they match the stated values within 1 mm. Check that strokes lift at the end.
Exercise 2
Draw a simple wing shape about 8 cm long. Apply a 2H pass, then an HB pass on the outer edge, then a 2B pass in the feather gaps. Describe the direction of your strokes and the order of passes.
Show answer and check
Wing shape with three passes in order; strokes run from shoulder to tip. Outer edge is darker than the inner wing, and gaps are darkest.
Why: Ordered layering creates depth without pressing hard. Directional strokes describe feather growth.
Check: Squint at the wing: the outer edge should read darker than the inner area, and the gaps should be darkest. Confirm pass order in your notes.
Exercise 3
Draw an owl eye about 3 cm wide with a pupil, catchlight, and a ring of short radiating strokes. Use 2B for the pupil edge and 4B only for a small accent. Explain where you placed the catchlight.
Show answer and check
Eye with clear pupil, small white catchlight, and radiating strokes around the iris. Catchlight placed at the upper left of the pupil.
Why: A catchlight gives life and prevents a flat dark eye. Radiating strokes suggest facial feathers.
Check: Check that the catchlight is unpainted paper and that the pupil edge is sharp. Confirm 4B is limited to a small accent.
Exercise 4
Draw a perched owl outline and add a cylindrical perch shadow. Use a 2H pass for the body, HB for the wing edges, and 2B for the perch shadow. Measure your x-height and use it to set one stroke spacing. List the pass order and one value check.
Show answer and check
Owl outline with body in 2H, wing edges in HB, perch shadow in 2B. Example x-height 4 mm, body strokes 4 mm apart. Pass order: 2H, HB, 2B. Value check: squint test shows wing edges darker than body and perch shadow darkest.
Why: The exercise combines blocking, layering, and shadow placement. The x-height gives a personal spacing guide.
Check: Verify pass order in your notes, measure one stroke spacing against your x-height, and confirm the squint test separates the three tonal zones.
Common mistakes
- Pressing hard with a soft pencil in the first pass. Start with 2H and build tone in thin layers; reserve 4B for small accents.
- Drawing feather strokes in random directions. Direct strokes along the feather flow: downward and outward on the body, shoulder to tip on the wings.
- Smudging graphite with fingers. Rest your hand on scrap paper and clear dust with a soft brush.
- Making the eye too dark without a catchlight. Leave a small white catchlight and keep the pupil edge sharp with 4B.
Self-check rubric
- Tonal order is visible: 2H, HB, 2B, then small 4B accents.
- Feather strokes follow body and wing direction consistently.
- Value separation is clear between face, body, wing edges, and perch shadow.
- Eye has a pupil, catchlight, and radiating strokes.
- Guide lines are erased and edges are clean.
- Valid alternatives such as dashes or stippling are accepted if direction and tonal order are maintained.
Questions and answers
Do I need special pencils?
No. A 2H, HB, 2B, and 4B cover the range. Use what you have and adjust pressure.
How do I know if my layers are too dark?
Compare with a five-step scale. If the mid-tone matches the darkest step, lift graphite with a kneaded eraser and restart with 2H.
Can I use a different stroke style?
Yes. Short dashes or stippling are valid if they follow the feather direction and the same tonal order.
What does x-height mean here?
It is the baseline-to-midline distance of your lowercase letters, used only as a personal spacing guide. Letter styles vary.