Free original lessons
Draw Angel Wings: Layered Feather Rows and Curved Silhouette
Learn to draw angel wings with a curved silhouette and three layered feather rows. Includes a worked example, four practice tasks, a rubric, and a resource plan.
Free lesson
Four exercises
Worked answers
Object Drawing Lessons
This lesson teaches a repeatable method for drawing angel wings as a decorative motif. You will establish a curved silhouette, divide it into three feather rows, and draw feathers from the back row forward so each layer overlaps the one behind it. The method uses simple geometry and pencil shading to suggest volume without requiring anatomical study. All measurements are hypothetical examples; measure your own paper and tools before drawing. The convention for feather direction is explicit: each feather points outward and slightly downward from the wing root, and the tip of every feather in a row lies on or near the row's guide curve. Letter styles and handwriting vary, so the rubric rewards consistent layering and a readable silhouette rather than a single exact shape.
Practice materials: Printable downloads are not available for this lesson yet. Use the instructions and four exercises below.
Reference illustration
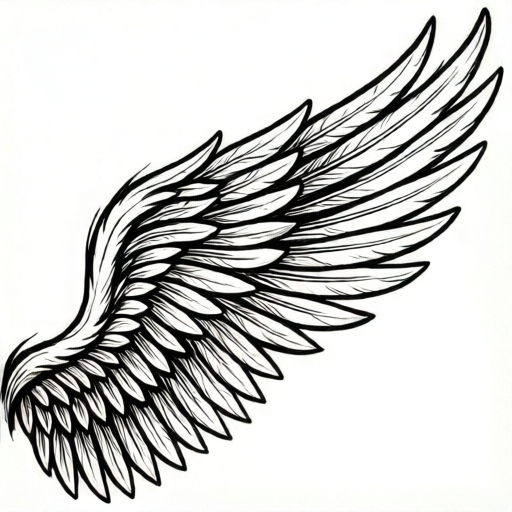
Use the stated measurements and conventions for each exercise.
Set the curved silhouette
Begin with a single curved guide that defines the wing's outer edge. For a right-facing wing, draw a smooth arc from the shoulder point down to the lower tip, then return along a shallower inner curve to close a leaf-like shape. Keep the outer curve convex and the inner curve slightly concave so the wing reads as a curved silhouette rather than a flat triangle.
Mark three horizontal guide lines across the wing shape to separate the feather rows. The top row is shortest, the middle row is medium, and the bottom row is longest. These guides are construction lines and will be erased or left faint.
- Draw a shoulder point and a lower tip point about 12 cm apart on your paper (hypothetical example; adjust to your page).
- Connect them with a smooth outer arc that bulges away from the wing root.
- Return with a shallower inner arc to close the silhouette.
- Draw three evenly spaced guide lines across the shape for the feather rows.
Draw the back feather row first
The back row sits closest to the wing root and is drawn first because later rows overlap it. Draw short, rounded feathers along the top guide, each pointing outward and slightly downward. Space them evenly and let their tips touch the outer silhouette curve. Because this row is partly hidden, its feathers can be simple teardrops.
Use a light pencil for this row so the front rows can be drawn darker and appear closer to the viewer.
- Start at the shoulder and draw five to seven short feathers along the top guide.
- Point each feather outward and slightly downward, with its tip near the outer curve.
- Keep spacing even and feather lengths similar within the row.
- Leave the row light; do not shade yet.
Add the middle and front rows
The middle row overlaps the back row and is drawn next. Its feathers are longer and slightly wider. Begin each feather where the previous row's feather ends, so the new row covers the base of the one behind. The front row is longest and overlaps the middle row in the same way.
This back-to-front order creates the layered feather effect. Keep the outer tips aligned to the silhouette curve so the wing edge stays smooth and readable.
- Draw the middle row along the second guide, overlapping the back row by about one third of each feather's length.
- Draw the front row along the bottom guide, overlapping the middle row similarly.
- Check that every feather tip lies on or near the outer silhouette curve.
- Erase construction guides or leave them faint.
Shade for volume and finish
Shade each feather with a soft pencil, darkening the base and leaving the tip lighter. Add a narrow shadow under each overlapping feather to separate the layers. Keep the light source consistent, for example from the upper left, so shadows fall to the lower right.
Finally, strengthen the outer silhouette line and soften the inner construction lines. The wing should read as a curved, layered shape even at a small size.
- Shade from feather base toward tip, pressing harder at the base.
- Add a thin shadow line under each overlapping feather edge.
- Keep the light direction consistent across all rows.
- Darken the outer silhouette and lighten or erase inner guides.
Worked example
A right-facing wing has a shoulder point at (0, 0) and a lower tip at (12, 0) in centimetres on paper. The outer arc bulges 4 cm above the line between them. Three rows are planned. Describe the construction and check the row lengths if the back row is 2 cm, the middle row is 3 cm, and the front row is 4 cm.
Worked answer
Draw the shoulder and tip 12 cm apart. Draw the outer arc through a point 4 cm above the midpoint, then close with a shallower inner arc. Mark three guides across the shape. Draw the back row first with 2 cm feathers, then the middle row with 3 cm feathers overlapping the back row, then the front row with 4 cm feathers overlapping the middle row. Check: total planned feather length is 2 + 3 + 4 = 9 cm, and each row is longer than the one behind, so layering reads correctly. Keep all tips near the outer arc.
Four practice exercises
Exercise 1
Plan a right-facing wing with shoulder at (0, 0) and tip at (10, 0) cm. The outer arc bulges 3 cm above the midpoint. You will use three rows with feather lengths 1.5 cm, 2.5 cm, and 3.5 cm. State the drawing order and the total planned feather length.
Show answer and check
Draw back row (1.5 cm) first, then middle row (2.5 cm), then front row (3.5 cm). Total planned feather length is 1.5 + 2.5 + 3.5 = 7.5 cm.
Why: Back-to-front order lets each row overlap the one behind. Adding the three row lengths gives the total planned feather length.
Check: Confirm the order is back, middle, front and that 1.5 + 2.5 + 3.5 = 7.5 cm.
Exercise 2
A wing silhouette has an outer arc that bulges 5 cm from a 14 cm shoulder-to-tip line. You draw six feathers in the back row, each 2 cm long, and eight feathers in the middle row, each 3 cm long. What is the combined feather length of these two rows, and which row should be drawn first?
Show answer and check
Combined length is (6 × 2) + (8 × 3) = 12 + 24 = 36 cm. The back row is drawn first.
Why: Multiply feather count by length for each row, then add. The back row is drawn first so the middle row can overlap it.
Check: Recompute 6 × 2 = 12 and 8 × 3 = 24, then 12 + 24 = 36 cm; confirm back row first.
Exercise 3
You are drawing a left-facing wing. The shoulder is at (0, 0) and the tip at (−9, 0) cm. The outer arc bulges 3 cm above the midpoint. Describe where the feathers point and which row is drawn first.
Show answer and check
Feathers point outward and slightly downward to the left, toward the outer arc. The back row is drawn first, then middle, then front.
Why: Mirroring the right-facing method keeps the outer arc convex and the layering order unchanged.
Check: Check that feather tips trend left and downward and that the drawing order is back, middle, front.
Exercise 4
A front row has 7 feathers of 4 cm each. A middle row has 9 feathers of 3 cm each. A back row has 11 feathers of 2 cm each. Compute each row's total length and the grand total. State one check that the layering is correct.
Show answer and check
Front: 7 × 4 = 28 cm. Middle: 9 × 3 = 27 cm. Back: 11 × 2 = 22 cm. Grand total: 28 + 27 + 22 = 77 cm. Layering check: each front feather overlaps the middle row and each middle feather overlaps the back row, with tips near the outer curve.
Why: Multiply count by length per row, then sum. Layering is correct when rows are drawn back to front and overlaps are visible.
Check: Verify 28 + 27 + 22 = 77 cm and inspect that front overlaps middle and middle overlaps back.
Common mistakes
- Drawing the front row first, so later rows cannot overlap it. Draw back row, then middle, then front, always overlapping the row behind.
- Making the outer edge jagged by letting feather tips stray far from the silhouette curve. Keep every feather tip on or near the outer guide curve and check the edge after each row.
- Using equal feather lengths in all rows, which flattens the layering. Make the back row shortest, middle medium, and front longest.
- Shading every feather the same darkness, so layers merge. Darken feather bases and add a shadow under each overlapping edge.
Self-check rubric
- Curved silhouette is smooth and readable, with a convex outer edge and a shallower inner edge.
- Three feather rows are present and drawn back to front, each overlapping the row behind.
- Feather lengths increase from back row to front row.
- Feather tips stay on or near the outer silhouette curve.
- Shading darkens feather bases and adds shadow under overlapping edges with a consistent light direction.
- Valid alternatives are accepted: feather count, exact curvature, and feather shape may vary if layering and silhouette remain clear.
Questions and answers
Do I need to draw a full angel figure?
No. This lesson covers the wing motif only, as a decorative shape with layered feather rows.
How many feather rows should I use?
Three rows are enough to show layering clearly. More rows can work if spacing stays even and each row overlaps the one behind.
Can I draw a left-facing wing?
Yes. Mirror the method: the outer arc bulges to the left and feathers point outward and slightly downward to the left.
What if my feather shapes differ from the example?
That is acceptable. The rubric rewards consistent layering, a smooth silhouette, and readable overlap, not one exact feather shape.