Free original lessons
Draw Babylon: City Walls and Tower Construction
Plan and draw a Babylon scene with layered city walls and a stepped tower under construction, using clear layout steps and a checkable rubric.
Free lesson
Four exercises
Worked answers
Object Drawing Lessons
This lesson teaches a repeatable way to draw a Babylon scene that clearly shows two required features: city walls and a tower being built. You will work from a simple layout plan to a finished line drawing. The method uses a defined drawing convention so that valid alternatives are accepted: x-height means the distance from the baseline to the midline of lowercase letters, and letter styles may vary. All measurements are hypothetical examples unless you measure your own paper and tools. The goal is a readable scene, not a single universal answer.
Practice materials: Printable downloads are not available for this lesson yet. Use the instructions and four exercises below.
Reference illustration
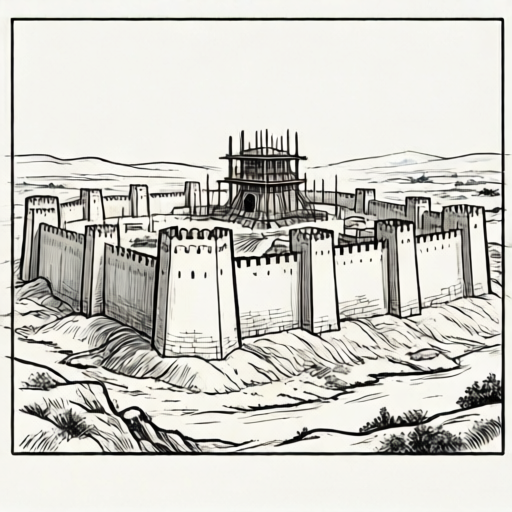
Use the stated measurements and conventions for each exercise.
Set the scene frame and horizon
Begin with a rectangular scene frame. A hypothetical example is a 20 cm by 15 cm frame on plain paper. Mark a horizon line about one third from the bottom. This separates ground from sky and keeps the walls and tower in a believable relationship.
Decide the viewing direction. A slight diagonal view shows both the wall face and the tower depth. Keep the horizon level and avoid tilting the frame.
- Draw the frame lightly with a pencil.
- Mark the horizon at about one third from the bottom.
- Add a faint vertical center guide for tower placement.
- Label the ground area and sky area in pencil so you can erase labels later.
Lay out the city walls
The walls should read as a continuous boundary. Draw a low horizontal band across the middle ground, then add a second band slightly higher and behind it to suggest depth. Use simple rectangles for wall segments and small squares for towers at intervals.
Keep wall height consistent. A hypothetical example is a wall band 2 cm high on the 20 cm by 15 cm frame. Mark gate openings as gaps in the band, not as separate buildings.
- Draw the front wall band from left to right.
- Add a rear wall band offset upward and to one side.
- Place three or four small wall towers evenly along the front band.
- Cut one gate gap in the front band and show a path leading to it.
Place the tower under construction
The tower must look unfinished. Draw a stepped base, then show only two or three completed tiers. Above the top tier, add scaffolding lines and a few loose blocks to signal construction. Keep the tower centered or slightly off-center so it does not hide the gate.
Use the same line weight for tower edges as for wall edges so the scene reads as one drawing. Construction details should be simple: vertical posts, horizontal planks, and a small ramp.
- Draw the tower footprint as a rectangle on the ground.
- Add two or three stepped tiers, each smaller than the one below.
- Attach scaffolding posts to the top tier.
- Draw a short ramp and two loose blocks beside the base.
Layer the scene and finish
Work from background to foreground: sky, distant wall, tower, front wall, ground details. This layering prevents confusion. Add a few palm shapes or simple trees outside the walls only if they do not obscure the gate or tower.
Finish by checking that walls and tower are both clearly visible. Erase guide labels and strengthen final lines. The drawing convention allows different letter styles and x-height choices, so do not force a single style.
- Draw sky lines or leave sky blank.
- Draw distant wall band first.
- Draw tower and scaffolding next.
- Draw front wall and gate last.
- Add ground path and a few simple plants.
- Erase guides and darken final lines.
Worked example
On a 20 cm by 15 cm frame, place a horizon at 5 cm from the bottom. Draw a front wall band 2 cm high across the middle, a rear wall band 2 cm high and 1 cm higher, and a tower with two tiers centered at 10 cm from the left. Show scaffolding on the top tier.
Worked answer
The frame is 20 cm wide and 15 cm high. The horizon sits at 5 cm from the bottom, leaving 10 cm above. The front wall band runs from 6 cm to 8 cm above the bottom. The rear wall band runs from 7 cm to 9 cm above the bottom and is offset 2 cm to the right. The tower footprint is 4 cm wide centered at 10 cm from the left, so it spans 8 cm to 12 cm. Two tiers rise 3 cm and 2 cm above the ground. Scaffolding posts extend 2 cm above the top tier. The gate gap is 2 cm wide at 4 cm from the left. All units are centimeters and values are hypothetical examples.
Four practice exercises
Exercise 1
A frame is 24 cm wide and 18 cm high. The horizon is 6 cm from the bottom. A front wall band is 3 cm high starting 7 cm from the bottom. What is the top edge of the front wall band measured from the bottom?
Show answer and check
10 cm from the bottom.
Why: Start at 7 cm and add the 3 cm band height: 7 + 3 = 10 cm.
Check: Measure the band on your drawing with a ruler; the top edge should be 10 cm above the bottom edge of the frame.
Exercise 2
A tower footprint is 5 cm wide and centered at 12 cm from the left on a 24 cm wide frame. What are the left and right edges of the footprint?
Show answer and check
Left edge 9.5 cm, right edge 14.5 cm.
Why: Half of 5 cm is 2.5 cm. Subtract from the center for the left edge: 12 - 2.5 = 9.5 cm. Add for the right edge: 12 + 2.5 = 14.5 cm.
Check: Measure from the left frame edge to each side of the tower footprint; the distance between them should be 5 cm.
Exercise 3
A rear wall band is 2 cm high and its bottom edge is 1.5 cm above the front wall band top edge. If the front wall band top edge is 10 cm from the bottom, what is the rear wall band top edge from the bottom?
Show answer and check
13.5 cm from the bottom.
Why: Rear bottom edge = 10 + 1.5 = 11.5 cm. Add the 2 cm band height: 11.5 + 2 = 13.5 cm.
Check: Measure upward from the front wall top edge by 1.5 cm, then add 2 cm for the rear band height; confirm the total is 13.5 cm above the bottom.
Exercise 4
A tower has three tiers. The bottom tier is 4 cm high, the middle tier is 3 cm high, and the top tier is 2 cm high. Scaffolding extends 1.5 cm above the top tier. What is the total height from the ground to the top of the scaffolding?
Show answer and check
10.5 cm.
Why: Add tier heights: 4 + 3 + 2 = 9 cm. Add scaffolding: 9 + 1.5 = 10.5 cm.
Check: Measure each tier and the scaffolding separately on your drawing, then add the values and compare with 10.5 cm.
Common mistakes
- Making the tower look finished with a closed top. Leave the top tier open and add scaffolding and loose blocks to show construction.
- Drawing walls as separate disconnected boxes. Connect wall segments into a continuous band with clear gate gaps.
- Placing the tower directly over the gate so both features merge. Offset the tower slightly and keep the gate gap visible.
- Using inconsistent wall heights. Measure one wall band height and repeat it along the front wall.
Self-check rubric
- Walls form a continuous boundary with at least one clear gate gap.
- Tower is visibly under construction with an open top or scaffolding.
- Tower and walls do not obscure each other.
- Scene layering is readable from background to foreground.
- Line weights are consistent enough for a clear line drawing.
- Valid alternative styles and letter forms are accepted if the scene reads correctly.
Questions and answers
Do I need to draw every brick?
No. A few brick lines are enough. The scene must read as walls and a tower under construction, not as a brick-by-brick study.
How large should the tower be?
Use a hypothetical example: tower width about one quarter of the frame width. Adjust after measuring your own paper.
Can I use different letter styles for labels?
Yes. The convention defines x-height as baseline to midline, and letter styles may vary. Labels are optional and should be erased in the final drawing.
What if my wall looks too flat?
Add a second wall band behind the first and offset it upward. This simple depth cue is enough for this scene.