Free original lessons
Draw an Upside-Down Bat: Grip, Hang Angle, and Folded Wings
Learn to draw a bat hanging upside down with a believable foot grip, body hang angle, and folded-wing silhouette using a simple construction guide.
Free lesson
Four exercises
Worked answers
Object Drawing Lessons
This lesson teaches a single, specific drawing problem: a bat at rest, hanging head-down from a roost bar. The pose depends on three linked decisions: where the feet grip, how the body hangs from that grip, and how the folded wings read as a compact silhouette rather than a spread wing. Work on plain paper with a pencil and eraser. Keep all measurements in the same unit, such as centimeters, and treat any numbers here as hypothetical examples you can scale to your page. The convention for this lesson is that the roost bar is a horizontal line, the grip point is where the toes curl over that line, and the body hangs below it along a gentle curve. Letter styles and small surface details may vary; the rubric rewards a readable pose, not a single universal rendering.
Practice materials: Printable downloads are not available for this lesson yet. Use the instructions and four exercises below.
Reference illustration
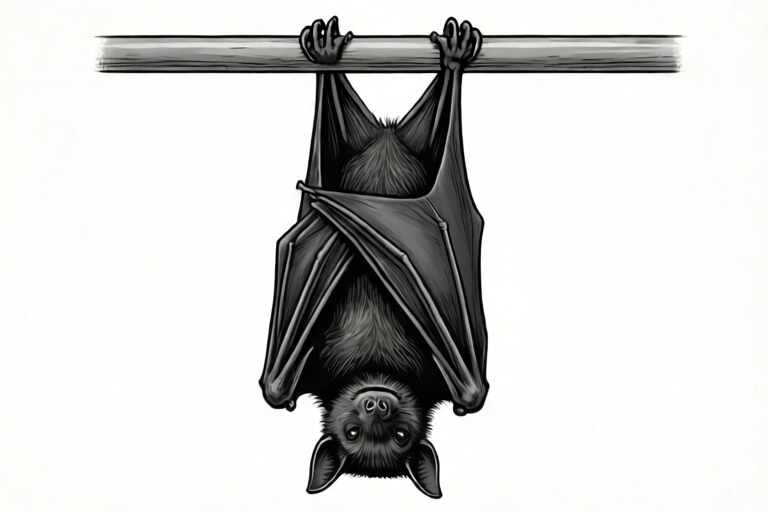
Use the stated measurements and conventions for each exercise.
Set the roost bar and the grip point
Begin with a horizontal roost bar drawn lightly across the upper third of the page. Mark one grip point on the bar. The feet will curl over this point, so the toes should wrap the bar rather than float beside it.
Draw two small foot shapes at the grip: a short ankle line coming up from below, then toes that hook over the top of the bar and point slightly down the far side. The grip reads as contact when the toe tips cross the bar line.
- Draw a horizontal roost bar about 12 cm long as a hypothetical page example.
- Mark a grip point near the center of the bar.
- Add two small ankle lines rising to the bar from below.
- Hook the toes over the bar so the tips cross the line.
Hang the body from the grip
The body hangs below the grip along a gentle curve, not a rigid vertical line. Let the torso drop from the ankles, then curve slightly so the head is lower than the hips. This inverted hang angle is what makes the pose read as hanging rather than standing on its head.
Keep the body compact. A hanging bat at rest pulls its form together, so avoid stretching the torso long. The head sits at the bottom of the hang, with the ears pointing down or slightly outward.
- From the ankles, draw a curved line downward for the back.
- Add a second curve for the belly, keeping the torso short.
- Place the head at the lowest point of the hang.
- Check that the head is lower than the hips.
Fold the wings into a compact silhouette
Folded wings are the hardest part because they must look closed without becoming a shapeless blob. Draw each wing as a narrow, layered shape tucked along the body. The wing membrane folds back on itself, so show two or three soft creases rather than a single outline.
Compare your folded wing to a partially open wing: the folded version stays close to the torso and shows crease lines, while the open version spreads outward. For this lesson, keep both wings folded and tucked.
- Draw a narrow wing shape along one side of the torso.
- Add two or three crease lines inside the wing shape.
- Repeat on the other side, keeping the silhouette compact.
- Erase any line that makes the wing look spread.
Refine the silhouette and check the pose
Step back and check three things: the toes cross the bar, the head hangs below the hips, and the wings stay tucked. If any of these fail, adjust before adding surface detail.
Keep detail minimal. Small ear shapes and a simple face are enough; the lesson excludes cartoon faces and spread-wing anatomy.
- Trace the outer silhouette with a darker line.
- Confirm the toe tips cross the roost bar.
- Confirm the head is the lowest major shape.
- Erase construction lines that confuse the folded-wing outline.
Worked example
A bat hangs from a roost bar. The grip point is at the center of a 12 cm bar. The body hangs 6 cm below the bar, and the head sits 2 cm lower than the hips. Describe the drawing order and the key check.
Worked answer
Draw the 12 cm bar, mark the center grip, hook the toes over the bar, curve the body down 6 cm, place the head 2 cm below the hips, then tuck both wings with two or three creases. Check that the toe tips cross the bar and the head is the lowest shape.
Four practice exercises
Exercise 1
A bat grips a bar at a point 5 cm from the left end of a 14 cm bar. The body hangs 7 cm below the bar. Where is the head if it sits 3 cm lower than the hips?
Show answer and check
The head is 10 cm below the bar.
Why: Hips are 7 cm below the bar; the head is 3 cm lower than the hips, so 7 + 3 = 10 cm below the bar.
Check: Add the hang distance and the head offset, then confirm the total is greater than the hip distance.
Exercise 2
You draw two folded wings, each with 3 crease lines. How many crease lines appear in total, and what should the wing silhouette avoid?
Show answer and check
Six crease lines total; the silhouette should avoid spreading outward.
Why: Two wings times three creases equals six. Folded wings stay narrow and tucked.
Check: Count creases per wing and multiply by two; confirm each wing outline stays close to the torso.
Exercise 3
A roost bar is 16 cm long. The grip point is 6 cm from the left end. How far is the grip point from the right end?
Show answer and check
10 cm from the right end.
Why: Subtract the left distance from the total length: 16 - 6 = 10 cm.
Check: Add the two distances: 6 + 10 = 16 cm, matching the bar length.
Exercise 4
A bat's body hangs 8 cm below the bar. The head is drawn 2 cm above the hips. Does the pose read as correctly inverted, and what should change?
Show answer and check
No; the head must be lower than the hips, so move it below the hip line.
Why: An inverted hang requires the head to sit lower than the hips; 2 cm above the hips breaks the pose.
Check: Compare head and hip heights against the bar; the head distance below the bar must be larger.
Common mistakes
- Drawing the toes beside the bar instead of over it. Hook the toe tips across the bar line so contact is visible.
- Making the body a straight vertical line. Curve the torso gently so the head sits lower than the hips.
- Drawing wings that spread outward. Keep the wing shapes narrow and add crease lines to show folding.
- Stretching the torso too long. Shorten the body so the hanging pose stays compact.
Self-check rubric
- Toe tips visibly cross the roost bar, showing grip.
- Body hangs below the grip with the head lower than the hips.
- Wings read as folded and tucked, with crease lines rather than a spread outline.
- Silhouette is compact and the pose is readable at a glance.
- Valid alternatives are accepted: ear shape, face detail, and crease count may vary.
Questions and answers
How do I show the feet actually gripping?
Make the toe tips cross the roost bar line. Contact reads when the toes wrap over the bar rather than stopping beside it.
Should the head point straight down?
It can point down or slightly outward, but it must sit lower than the hips to keep the inverted hang clear.
How many creases should a folded wing show?
Two or three soft creases are enough to suggest folding without turning the wing into a spread shape.
Can I change the proportions?
Yes. The rubric checks the pose logic, not exact sizes, so scale the body and bar to fit your page.