Free original lessons
Bluegill Fish Drawing: Body Shape, Fin Placement, and Scale-Row Counting
Learn to draw a bluegill side view with correct fin positions and a countable scale-row grid. Includes a worked example, four practice tasks, and a validation plan.
Free lesson
Four exercises
Worked answers
Object Drawing Lessons
This lesson teaches a repeatable method for drawing a bluegill side view. You will establish body proportions, place the five fin groups, and count scale rows using a simple grid convention. The goal is structural accuracy, not color rendering. All measurements are hypothetical examples; measure your own paper and tools before drawing. A printable construction plate is planned but not yet built, so every task here is self-contained and solvable from the text.
Practice materials: Printable downloads are not available for this lesson yet. Use the instructions and four exercises below.
Reference illustration
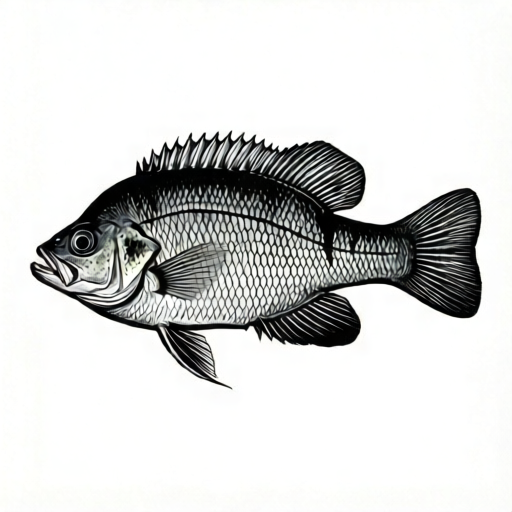
Use the stated measurements and conventions for each exercise.
Body Shape and Proportion
A bluegill side view is deep and laterally compressed. Draw a horizontal midline and a vertical midline crossing at the body center. The body depth is roughly half the body length from snout tip to caudal-fin base. Mark the snout tip, the top of the back, the belly bottom, and the caudal-fin base before adding any fin.
Use a light construction outline: an oval that is taller than long, flattened at the belly and slightly pointed at the snout. Keep the dorsal profile gently arched and the ventral profile fuller behind the pectoral fins. These proportions are a teaching convention, not a species measurement.
- Draw a horizontal midline and a vertical midline crossing at the body center.
- Mark snout tip, back top, belly bottom, and caudal-fin base.
- Sketch a tall oval body outline through those marks.
- Check that body depth is about half the snout-to-caudal-base length.
Fin Placement Map
Place fins relative to body landmarks, not by eye alone. The dorsal fin sits on the back between the vertical midline and the caudal-fin base, with a spiny front section and a softer rear section. The anal fin sits on the belly below the rear dorsal section. The caudal fin attaches at the caudal-fin base and fans backward.
The pectoral fin attaches just behind the gill cover on the side, angled slightly downward. The pelvic fin sits on the belly below and slightly behind the pectoral fin. Label each fin on your drawing before adding detail so placement errors are caught early.
- Mark the dorsal fin span from the vertical midline to near the caudal-fin base.
- Mark the anal fin below the rear dorsal span.
- Attach the caudal fin at the caudal-fin base and fan it backward.
- Place the pectoral fin behind the gill cover, angled down.
- Place the pelvic fin on the belly below and slightly behind the pectoral fin.
- Label all five fin groups before adding fin rays.
Scale-Row Counting Convention
Use an explicit convention: a scale row is a line of scale outlines running from the back toward the belly, counted along the flank between the pectoral fin and the caudal-fin base. Draw a light grid of parallel curved lines across the flank, spaced evenly, and count the lines rather than individual scales. This makes the count checkable and repeatable.
Letter styles and handwriting vary, so the rubric accepts any legible labeling and any consistent row spacing. The count is what matters, not a single universal drawing. Record your row count beside the drawing and state the convention you used.
- Draw a light grid of parallel curved lines across the flank.
- Space lines evenly between the pectoral fin and caudal-fin base.
- Count the grid lines and record the number beside the drawing.
- State the counting convention in one sentence under the drawing.
Checking and Labeling
Before finishing, verify each fin against its landmark and confirm the scale-row count matches the recorded number. Use a simple arithmetic check: if you drew 12 grid lines and 2 are outside the counted flank zone, the recorded count should be 10. Label fins with clear text and keep labels outside the body outline.
The rubric rewards correct placement, a consistent counting convention, and legible labels. Valid alternatives include different fin-ray detail and different handwriting styles, provided the structure and count remain checkable.
- Verify each fin against its landmark.
- Recount grid lines inside the counted flank zone.
- Confirm recorded count equals drawn lines minus excluded lines.
- Keep labels outside the body outline and legible.
Worked example
Draw a bluegill side view on paper 20 cm wide. Use body length 16 cm and body depth 8 cm. Place all five fin groups and draw a scale-row grid with 12 lines, excluding 2 lines outside the counted flank zone. Record the count.
Worked answer
Body outline: 16 cm snout-to-caudal-base, 8 cm depth. Dorsal fin from vertical midline to near caudal-fin base; anal fin below rear dorsal; caudal fin at base; pectoral fin behind gill cover angled down; pelvic fin below and slightly behind pectoral. Grid: 12 lines drawn, 2 excluded, recorded count 10. Labels placed outside the outline.
Four practice exercises
Exercise 1
On paper 18 cm wide, draw a bluegill side view with body length 14 cm and body depth 7 cm. Place all five fin groups and draw a scale-row grid with 10 lines, excluding 1 line outside the counted flank zone. Record the count.
Show answer and check
Body 14 cm by 7 cm. Dorsal from vertical midline to near caudal-fin base; anal below rear dorsal; caudal at base; pectoral behind gill cover angled down; pelvic below and slightly behind pectoral. Grid 10 lines minus 1 excluded equals recorded count 9.
Why: Depth is half the length, matching the convention. Each fin is placed by landmark. The count follows the stated convention.
Check: Measure depth and length with a ruler; verify each fin against its landmark; recount grid lines inside the counted zone and confirm 10 minus 1 equals 9.
Exercise 2
Draw a bluegill side view with body length 12 cm and body depth 6 cm. Draw a scale-row grid with 8 lines and exclude 0 lines. Label all five fin groups. State the counting convention in one sentence.
Show answer and check
Body 12 cm by 6 cm. Five fin groups placed by landmark. Grid 8 lines, 0 excluded, recorded count 8. Convention sentence: scale rows are counted as parallel grid lines across the flank between pectoral fin and caudal-fin base.
Why: The convention sentence makes the count checkable. Zero excluded lines means the recorded count equals the drawn lines.
Check: Confirm depth is half the length; verify labels are outside the outline; check that 8 minus 0 equals 8 and the convention sentence names the counted zone.
Exercise 3
Draw a bluegill side view with body length 10 cm and body depth 5 cm. Draw a scale-row grid with 14 lines and exclude 3 lines outside the counted flank zone. Record the count and explain the arithmetic in one line.
Show answer and check
Body 10 cm by 5 cm. Five fin groups placed by landmark. Grid 14 lines, 3 excluded, recorded count 11. Arithmetic line: 14 minus 3 equals 11.
Why: The arithmetic line makes the count transparent. Excluded lines are outside the counted flank zone, so they are subtracted.
Check: Measure length and depth; verify each fin landmark; recount lines inside the zone and confirm 14 minus 3 equals 11.
Exercise 4
Draw a bluegill side view with body length 16 cm and body depth 8 cm. Draw a scale-row grid with 12 lines and exclude 2 lines. Then draw a second grid with 12 lines and exclude 4 lines. Record both counts and state which grid has fewer counted rows.
Show answer and check
Body 16 cm by 8 cm. Five fin groups placed by landmark. First grid: 12 minus 2 equals 10. Second grid: 12 minus 4 equals 8. The second grid has fewer counted rows.
Why: Both grids use the same convention; only the excluded lines differ. Comparing counts requires consistent arithmetic.
Check: Confirm both grids have 12 drawn lines; verify 12 minus 2 equals 10 and 12 minus 4 equals 8; check that 8 is less than 10.
Common mistakes
- Placing the dorsal fin entirely behind the vertical midline. Start the dorsal fin at the vertical midline and extend it toward the caudal-fin base.
- Attaching the pectoral fin on the belly instead of the side. Attach it just behind the gill cover on the flank, angled slightly downward.
- Counting individual scales instead of grid lines. Use the stated convention: count parallel grid lines across the flank and record that number.
- Recording a scale-row count that does not match the drawn lines. Recount lines inside the counted zone and subtract any excluded lines before recording.
Self-check rubric
- Body depth is about half the snout-to-caudal-base length.
- Dorsal fin spans from the vertical midline toward the caudal-fin base.
- Anal fin sits below the rear dorsal span.
- Caudal fin attaches at the caudal-fin base and fans backward.
- Pectoral fin is on the flank behind the gill cover, angled down.
- Pelvic fin is on the belly below and slightly behind the pectoral fin.
- Scale-row grid lines are evenly spaced and the counting convention is stated.
- Recorded count equals drawn lines minus excluded lines.
- All five fin groups are labeled legibly outside the body outline.
- Valid alternatives in fin-ray detail and handwriting are accepted.
Questions and answers
Do I need the printable construction plate to complete the tasks?
No. The plate is planned but not yet built. Every task is solvable from the text using your own paper and a ruler.
Are the proportions exact bluegill measurements?
No. They are a teaching convention. Measure your own paper and label any chosen numerical values as hypothetical examples.
Can I use a different scale-row spacing?
Yes, provided spacing is even and the counting convention is stated and checkable.
What if my handwriting differs from the example?
Any legible labeling is accepted. The rubric checks placement, count consistency, and clarity, not a single letter style.