Free original lessons
Draw a Woman Portrait: Facial Proportion Guides and Hair Flow
Learn to construct a female portrait using facial proportion guides, feature placement, and flowing hair strokes. Includes a worked example, practice tasks, and a self-check rubric.
Free lesson
Four exercises
Worked answers
Object Drawing Lessons
This lesson teaches a reliable method for drawing a woman's portrait by building facial proportion guides first, then placing features, then adding hair flow. You will use a simple construction plate concept: a rectangle for the head, a vertical midline, horizontal division lines, and a hair flow map. The goal is not a single correct face but a coherent, checkable structure that allows many valid styles. All measurements are relative to the head height you choose; any numerical examples are hypothetical and should be replaced by measurements of your own paper and reference. Work in pencil so guides can be lightened or erased.
Practice materials: Printable downloads are not available for this lesson yet. Use the instructions and four exercises below.
Reference illustration
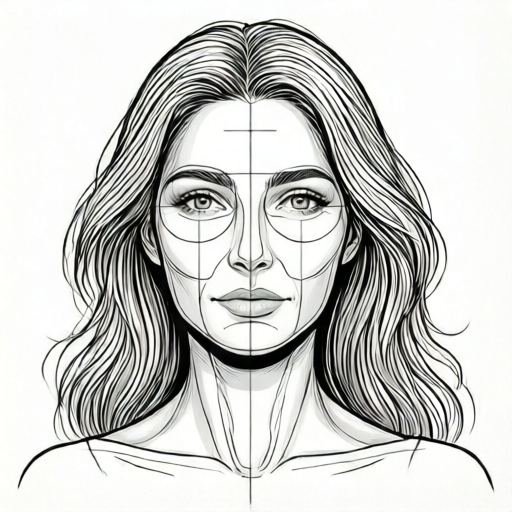
Use the stated measurements and conventions for each exercise.
Building the facial proportion grid
Start with a head rectangle whose height is your chosen unit. A common construction divides the head height into halves and quarters: the eye line sits near the vertical midpoint, the nose base near the three-quarter line from the top, and the chin at the bottom. The hairline sits roughly one-quarter down from the top. These are guides, not laws; adjust for the face you are drawing.
Draw a light vertical midline and a horizontal eye line. Add two horizontal lines: one for the hairline and one for the nose base. Mark the chin at the bottom edge. Keep all lines light so they can be softened later. The midline helps check symmetry of feature placement, not perfect mirroring.
- Draw a rectangle for the head; label its height H.
- Mark the vertical midline.
- Mark the eye line at about H/2 from the top.
- Mark the hairline at about H/4 from the top.
- Mark the nose base at about 3H/4 from the top.
- Mark the chin at the bottom edge.
Placing features with checkable spacing
Use the eye line to place the eyes. A workable guide is that the space between the eyes is about one eye width, and each eye sits about one eye width from the side of the head. These are relative proportions; measure them on your own drawing with a pencil or a strip of paper. The nose base aligns with the nose line, and the mouth sits roughly one-third of the way from the nose base to the chin.
Ears generally span from the eye line to the nose line, but hair often covers them. The neck can be indicated with two short lines below the chin, narrower than the head width. Check that the features sit on the guide lines rather than floating; if a feature drifts, adjust the guide rather than forcing the feature.
- Mark eye width units along the eye line: outer margin, eye, gap, eye, outer margin.
- Place the nose base on the nose line and check its width against the inner eye corners.
- Place the mouth one-third down from the nose line to the chin.
- Indicate ears between eye line and nose line if visible.
- Add a short neck indication below the chin.
Creating hair flow with directional strokes
Hair flow is drawn as a set of directional strokes that start at a crown point and follow the skull's curve. Define a crown point near the top of the head, then draw three to five flow lines that sweep outward and downward. These lines are not individual hairs; they are flow guides. Add volume by spacing the flow lines unevenly and letting some cross the face edge.
Use a convention for hair mass: draw the outer hair silhouette first, then the flow lines inside it, then a few detail strands. Keep the flow lines consistent in direction so the hair reads as moving from crown to ends. Where hair overlaps the face, let the flow lines stop at the face edge or cross it deliberately to show a lock in front.
- Mark a crown point near the top of the head.
- Draw the outer hair silhouette around the head rectangle.
- Add three to five flow lines from crown outward and downward.
- Vary spacing to suggest volume.
- Add a few detail strands following the same flow direction.
Refining and self-checking the portrait
Soften construction lines and strengthen the features you want to keep. Check the portrait against the guide lines: eye line, nose line, mouth position, and hair flow direction. A useful check is to turn the drawing upside down or view it in a mirror; proportion errors become easier to see. Remember that facial styles and drawing styles vary, so the rubric rewards consistent use of guides and clear flow, not a single ideal face.
If a feature looks misplaced, compare its distance to the midline and to the nearest guide line. Adjust the guide first, then the feature. Keep the hair flow lines readable by limiting their number and keeping their direction consistent.
- Lighten construction lines.
- Strengthen eyes, nose, mouth, and hair silhouette.
- Check feature placement against guide lines.
- Check hair flow direction from crown to ends.
- View in a mirror or upside down for a final proportion check.
Worked example
A head rectangle is 8 cm tall. Using the lesson's relative guides, mark the eye line, hairline, nose base, and mouth position. Then describe where to place three hair flow lines from a crown point.
Worked answer
Eye line at about 4 cm from the top (half of 8 cm). Hairline at about 2 cm from the top (one quarter). Nose base at about 6 cm from the top (three quarters). The mouth sits about one-third of the way from the nose base to the chin: the distance from 6 cm to 8 cm is 2 cm, so the mouth is about 0.67 cm below the nose base, near 6.67 cm from the top. Mark a crown point near the top center. Draw three flow lines: one sweeping left and down, one sweeping right and down, and one falling more centrally, all starting near the crown and following the skull curve. Keep spacing uneven for volume.
Four practice exercises
Exercise 1
A head rectangle is 10 cm tall. Mark the eye line, hairline, and nose base using the lesson's relative guides. State each distance from the top in centimetres.
Show answer and check
Eye line at about 5 cm; hairline at about 2.5 cm; nose base at about 7.5 cm.
Why: Use half for the eye line, one quarter for the hairline, and three quarters for the nose base of the 10 cm head height.
Check: Add the distances to confirm they fall within 0 to 10 cm and that the eye line is midway between hairline and nose base in this guide set.
Exercise 2
On an eye line, each eye is 2 cm wide and the gap between the eyes is one eye width. The head width is 10 cm. Describe a checkable placement of the two eyes and the outer margins.
Show answer and check
One valid placement: outer margin 1 cm, left eye 2 cm, gap 2 cm, right eye 2 cm, outer margin 1 cm, totaling 8 cm of features plus 2 cm margins within 10 cm. Another valid placement shifts the margins equally, for example 1.5 cm margins and a 1 cm gap, as long as the gap is checked against the chosen eye width.
Why: The lesson uses eye width as a relative unit. The gap should be about one eye width, and margins should be checked rather than assumed.
Check: Measure each segment with a ruler or paper strip and confirm the sum equals the head width; confirm the gap is close to one eye width or explain the chosen variation.
Exercise 3
The nose base is at 7 cm from the top and the chin is at 10 cm. Where is the mouth if it sits about one-third of the way from the nose base to the chin? Give the distance below the nose base and the distance from the top.
Show answer and check
About 1 cm below the nose base, near 8 cm from the top.
Why: The nose-to-chin distance is 3 cm. One-third of 3 cm is 1 cm, so the mouth is about 1 cm below the nose base.
Check: Subtract 7 cm from 10 cm to get 3 cm, divide by 3 to get 1 cm, and add to 7 cm to confirm 8 cm from the top.
Exercise 4
Describe a hair flow plan for a portrait with a crown point near the top centre. Include the outer silhouette, three flow lines, and one detail strand. Explain how you would check that the flow is consistent.
Show answer and check
Draw an outer hair silhouette around the head rectangle, wider at the sides and tapering below the chin line. From the crown point, draw three flow lines: one sweeping left and down, one sweeping right and down, and one falling centrally with a slight curve. Add one detail strand that follows the central flow line. Check consistency by tracing each line from crown to end and confirming they all move outward and downward without reversing direction.
Why: Hair flow is established by a small number of directional guides from a crown point, then detail strands follow those guides.
Check: Trace each flow line with a finger from crown to end; if any line reverses direction or starts away from the crown, redraw it to follow the established flow.
Common mistakes
- Placing the eyes too high or too low without checking the midline. Measure the eye line at about half the head height and adjust the guide before drawing the eyes.
- Making the gap between the eyes too wide or too narrow. Use one eye width as a relative unit and mark it along the eye line before placing the eyes.
- Drawing hair as many separate strands with no flow direction. Draw three to five flow lines from a crown point first, then add detail strands that follow those lines.
- Forcing features to fit a guide that is clearly wrong for the chosen face. Adjust the guide lines to match the reference or intended style, then re-place the features.
Self-check rubric
- Head rectangle and midline are drawn lightly and consistently.
- Eye line, hairline, nose base, and chin are marked with checkable relative spacing.
- Features sit on or near the guide lines, with eye spacing checked in eye-width units.
- Mouth position is checked as about one-third from nose base to chin.
- Hair flow uses three to five directional lines from a crown point, with consistent direction.
- Construction lines are softened and final features are readable.
- Valid alternative styles are accepted if guide relationships remain checkable and hair flow is coherent.
Questions and answers
Do I need to use exact numerical proportions?
No. The proportions are relative guides. Any numerical values in this lesson are hypothetical examples; measure your own head height and use halves, quarters, and thirds as checkable relationships.
What if my face style does not match the guide lines?
Adjust the guide lines to suit the style you want. The method is a construction aid, not a fixed standard. Keep the relationships checkable so you can verify placement.
How many hair flow lines should I draw?
Three to five flow lines are enough to establish direction. Add detail strands only after the flow is clear and consistent.
Can I use this method for any woman portrait?
Yes, for constructed portraits within this lesson's boundary. It excludes specific celebrity likenesses, full-body figure drawing, and color rendering.