Free original lessons
Draw a Wrapped Birthday Gift: Box, Ribbon Bow, and Tag
Learn to draw a wrapped birthday gift with correct box proportions, wrapping paper edges, ribbon bow loops, and tag placement using a simple construction guide.
Free lesson
Four exercises
Worked answers
Object Drawing Lessons
This lesson teaches a reliable way to draw a wrapped birthday gift. You will build the box first, then add wrapping paper edges, ribbon, a bow with loops, and a tag. The method uses simple proportions and checkable steps so you can judge your own drawing. All measurements are hypothetical examples; measure your own paper and tools if you use them. The convention for line placement is defined below: x-height means the distance from baseline to midline, and letter styles may vary. You will practice with four self-contained tasks and compare your work to a rubric that allows valid alternatives.
Practice materials: Printable downloads are not available for this lesson yet. Use the instructions and four exercises below.
Reference illustration
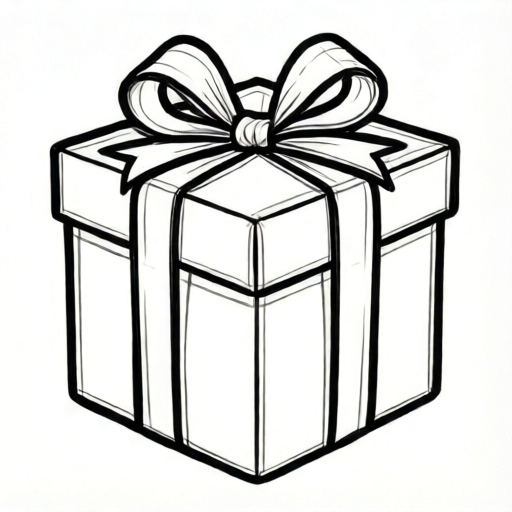
Use the stated measurements and conventions for each exercise.
Box construction and proportions
Start with a rectangular box seen slightly from above. Draw a front rectangle and a top parallelogram. A simple proportion is width to height to depth of 3:2:1. For example, if width is 9 cm on paper, height is 6 cm and depth is 3 cm. These numbers are hypothetical; use any consistent unit. Keep all measurements in the same unit throughout the drawing.
The top face should look like a flattened parallelogram. Keep opposite sides parallel. The front face is a rectangle. The side face is another parallelogram. Check that the front top edge and the back top edge are parallel.
- Draw a light front rectangle 9 cm wide and 6 cm high.
- From the top-left and top-right corners, draw depth lines 3 cm long at the same angle.
- Connect the depth lines to form the top parallelogram.
- Add the visible side face by connecting the front right edge to the back right edge.
- Check parallel pairs with a ruler or by eye.
Wrapping paper edges and ribbon placement
Wrapping paper edges show where the paper overlaps. Draw one vertical seam on the front face, offset from center, and one horizontal fold line near the top. Keep the seam straight and parallel to the box edge. The ribbon crosses the box in two bands: one around the width and one around the depth. Place the ribbon bands so they meet at the top center. A seam offset of 2 cm on a 9 cm wide front face is a hypothetical example; choose any offset that stays clearly away from the center and the edges.
Use a consistent line weight: construction lines light, final edges darker. The ribbon should sit on the surface, not float. Where the ribbon crosses an edge, bend the line to follow the box corner.
- Draw a vertical seam on the front face, 2 cm from the left edge.
- Draw a horizontal fold line 1 cm below the top front edge.
- Draw the width ribbon band across the front and top faces.
- Draw the depth ribbon band across the side and top faces.
- Check that both bands meet at the top center point.
Ribbon bow loops and tag placement
A bow has two loops, two tails, and a center knot. Draw the center knot first as a small oval. Then draw two loops as rounded triangles or teardrops, one left and one right. Keep loop sizes similar; a 2:1 ratio of loop length to knot width is a useful hypothetical guide. Define loop length as the distance from the knot edge to the loop tip, and define bow width as the total span from the left loop tip to the right loop tip. Add two tails that curve downward. For example, a 1 cm knot with loops 2 cm long (measured from the knot edge to each tip) gives a bow width of about 2 + 1 + 2 = 5 cm.
Place the tag near the bow, slightly to one side. The tag can be a small rectangle with a string. The string should connect to the knot or a loop. Keep the tag smaller than the bow; a tag about one-third the bow width is easy to read. For example, if the bow width is 6 cm, the tag is about 2 cm wide. These numbers are hypothetical; use any consistent unit.
- Draw a small oval knot at the top center.
- Draw the left loop as a rounded shape from the knot outward.
- Draw the right loop with a similar size and angle.
- Add two tails curving down from the knot.
- Draw a small tag rectangle and a string to the knot.
- Check that the bow sits on the ribbon crossing point.
Line convention and self-check
Use this convention: x-height is the distance from baseline to midline. For any lettering on the tag, keep letters between baseline and midline. Letter styles vary, so accept different handwriting as long as the tag is readable and fits the tag rectangle.
Check your drawing by measuring the box proportions, confirming parallel edges, and verifying that the ribbon bands meet at the top center. A valid alternative is a bow with three loops or a tag on the other side, as long as the construction remains consistent.
- Measure width, height, and depth; confirm the 3:2:1 ratio or your chosen ratio.
- Check that opposite box edges are parallel.
- Confirm the ribbon bands cross at the top center.
- Confirm the tag is smaller than the bow and connected by a string.
- Check that any lettering stays between baseline and midline.
Worked example
Draw a wrapped gift with a box width 9 cm, height 6 cm, depth 3 cm, one vertical seam 2 cm from the left front edge, ribbon bands meeting at top center, a two-loop bow, and a tag one-third the bow width.
Worked answer
A correct drawing shows a front rectangle 9 by 6 cm, a top parallelogram with 3 cm depth lines, a side face, a vertical seam 2 cm from the left, two ribbon bands crossing at the top center, a knot oval, two similar loops, two tails, and a small tag with a string to the knot. With a 1 cm knot and 2 cm loops, the bow width is about 5 cm, so the tag is about 1.7 cm wide. Lettering on the tag stays between baseline and midline.
Four practice exercises
Exercise 1
Draw a box with width 8 cm, height 4 cm, depth 2 cm. Add one vertical seam 1 cm from the right front edge and ribbon bands meeting at top center.
Show answer and check
Front rectangle 8 by 4 cm; top parallelogram with 2 cm depth lines; side face; seam 1 cm from the right front edge; two ribbon bands crossing at the top center.
Why: The ratio 8:4:2 simplifies to 4:2:1, so the box is wider than tall and shallow. The seam offset is measured from the right edge, and the ribbon crossing point is the top center.
Check: Measure the front rectangle (8 by 4 cm) and the depth lines (2 cm); confirm the seam is 1 cm from the right edge and both ribbon bands meet at the top center.
Exercise 2
Draw a bow with a knot oval 1 cm wide, two loops each about 2 cm long, and two tails. Add a tag one-third the bow width with a string to the knot.
Show answer and check
Knot oval 1 cm wide; left and right loops about 2 cm long; bow width about 5 cm from left loop tip to right loop tip; two tails; tag about 1.7 cm wide with a string to the knot.
Why: The loop-to-knot ratio is 2:1. Bow width is the total span from left loop tip to right loop tip: about 2 cm loop + 1 cm knot + 2 cm loop = 5 cm. The tag is one-third of the bow width, so about 1.7 cm. The string connects the tag to the knot.
Check: Compare left and right loop lengths (each about 2 cm); measure the bow width from left loop tip to right loop tip (about 5 cm); confirm the tag is about one-third of that width (about 1.7 cm) and the string reaches the knot.
Exercise 3
Draw a wrapped gift with a three-loop bow instead of two loops. Keep the box 9 by 6 by 3 cm and the ribbon bands meeting at top center.
Show answer and check
Box 9 by 6 by 3 cm; ribbon bands crossing at top center; three balanced loops around a central knot; tag optional but if added, smaller than the bow.
Why: A three-loop bow is a valid alternative. Balance the loops around the knot and keep the ribbon crossing point at the top center.
Check: Check that the three loops are similar in size and arranged around the knot; confirm the ribbon bands still meet at the top center and the box keeps the 9:6:3 ratio.
Exercise 4
Draw a gift tag with the word JOY. Keep letters between baseline and midline. Use a tag rectangle 3 cm wide and 1.5 cm high.
Show answer and check
Tag rectangle 3 by 1.5 cm; letters J, O, Y placed between baseline and midline; string to the bow knot.
Why: The convention defines x-height as baseline to midline. Letter styles vary, so any readable style is acceptable if the letters fit between baseline and midline.
Check: Measure the tag (3 by 1.5 cm); confirm each letter stays between baseline and midline and the string connects to the knot.
Common mistakes
- Drawing the top face as a rectangle instead of a parallelogram. Use depth lines at one consistent angle and connect them; check that opposite top edges are parallel.
- Making the ribbon bands cross away from the top center. Mark the top center point first, then draw both bands toward it.
- Drawing bow loops of very different sizes. Use a simple ratio such as loop length to knot width of 2:1, and compare left and right loops.
- Placing the tag larger than the bow or floating without a string. Make the tag about one-third the bow width and draw a string to the knot.
Self-check rubric
- Box proportions match the chosen ratio within a small margin.
- Top face is a parallelogram with parallel opposite edges.
- Wrapping paper seam is straight and parallel to a box edge.
- Ribbon bands meet at the top center.
- Bow has a clear knot, two or more balanced loops, and tails.
- Tag is smaller than the bow and connected by a string.
- Lettering stays between baseline and midline.
- Valid alternatives such as three loops or a tag on the other side are accepted if construction is consistent.
Questions and answers
Do I need exact measurements?
No. The numbers are hypothetical examples. Use any consistent unit and keep the proportions consistent.
Can the bow have three loops?
Yes. A three-loop bow is a valid alternative if the loops are balanced and the knot is clear.
Where should the tag go?
Near the bow, slightly to one side, connected by a string to the knot or a loop. Keep it smaller than the bow.
How do I check my wrapping paper edges?
Keep seams straight and parallel to box edges, and make sure fold lines follow the box surface.