Free original lessons
Combat Boot Drawing: Proportions, Laces, and Lug Sole
Learn to draw a high-ankle combat boot with accurate proportions, crossed laces, eyelets, and a lug sole using a simple measurement convention.
Free lesson
Four exercises
Worked answers
Object Drawing Lessons
This lesson teaches a reliable method for drawing a combat boot from a side view. You will set an ankle-to-toe proportion guide, place lace rows and eyelets, and build a lug sole with checkable measurements. The convention is simple: x-height means the vertical distance from baseline to midline in your own drawing, and letter styles vary, so treat all numerical values as hypothetical examples you can adjust after measuring your actual paper and tools. Work lightly first, then commit to darker lines once proportions check out.
Practice materials: Printable downloads are not available for this lesson yet. Use the instructions and four exercises below.
Reference illustration
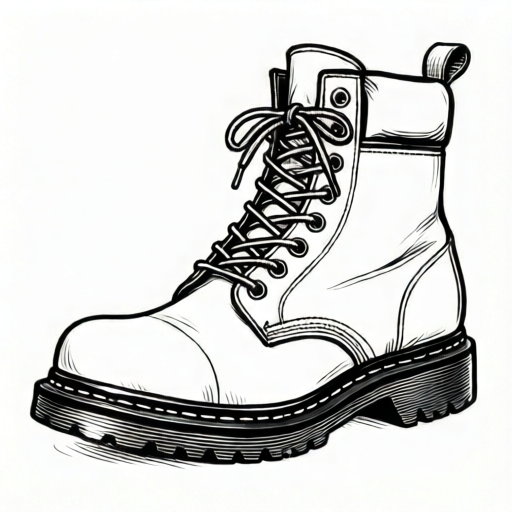
Use the stated measurements and conventions for each exercise.
Set the proportion guide
Begin with a horizontal baseline for the sole bottom and a midline for the boot's widest vertical span. Mark the heel back, the toe front, and the ankle top. A common side-view ratio is heel-to-toe length about three times the ankle height, but measure your own reference or paper to choose values. Label the ankle top, heel corner, toe tip, and sole bottom before drawing curves.
Use light pencil lines so you can adjust. Check that the toe box is lower than the ankle collar and that the heel back rises nearly vertically before curving into the ankle.
- Draw a baseline and mark heel back and toe tip.
- Mark ankle top above the heel at a chosen height.
- Add a midline and sketch the boot outline lightly.
- Measure heel-to-toe length and ankle height; adjust until the ratio looks correct.
Place eyelets and lace crossings
Combat boots typically show two parallel rows of eyelets along the instep. Space eyelets evenly and keep rows parallel. Laces cross between rows in an X pattern, with short ends at the top. Draw eyelets as small circles or ovals, then connect opposite eyelets with straight lace segments. Add slight curvature only where laces bend over the tongue.
Count your eyelets and lace crossings so the pattern is consistent. If you draw five eyelets per row, you should have four crossing pairs plus the top tie.
- Draw two parallel eyelet rows along the instep.
- Mark evenly spaced eyelet positions on each row.
- Connect opposite eyelets with crossing lace lines.
- Add a tongue shape behind the laces and a top tie.
Build the lug sole
The lug sole is a thick band below the upper with a tread pattern. Draw the sole as a rounded rectangle following the boot's bottom curve. Add lugs as repeated blocks or trapezoids along the bottom edge. Keep lug spacing even and depth consistent. A hypothetical example is a sole thickness equal to one-quarter of the ankle height; measure your drawing and adjust.
Check that the sole extends slightly beyond the upper at the toe and heel, and that lugs do not overlap the upper.
- Draw the sole band below the upper outline.
- Mark lug positions evenly along the bottom edge.
- Draw each lug as a small block with consistent depth.
- Erase guide lines and darken the final outline.
Refine and self-check
Compare your drawing to the proportion guide. The ankle should be high, the toe rounded, and the sole thick with visible lugs. Check that lace crossings alternate and eyelets are paired. Use the rubric to evaluate proportions, lace pattern, sole detail, and line clarity. Valid alternatives include different eyelet counts, lace styles, and lug shapes as long as the pattern is consistent and the boot remains a high-ankle combat boot.
- Re-measure heel-to-toe length and ankle height.
- Count eyelets and crossings for consistency.
- Check lug spacing and sole thickness.
- Darken final lines and label any measurements you used.
Worked example
Draw a side-view combat boot with heel-to-toe length 12 cm and ankle height 4 cm. Use five eyelets per row and a sole thickness of 1 cm. Describe the lace crossings and lug count.
Worked answer
Baseline 12 cm; ankle top 4 cm above heel. Two parallel eyelet rows with five eyelets each, spaced evenly. Four crossing pairs plus top tie. Sole band 1 cm thick with six evenly spaced lugs. Check: 12 divided by 4 equals 3, matching the guide ratio; five eyelets per row give four crossings.
Four practice exercises
Exercise 1
Draw a combat boot with heel-to-toe length 15 cm and ankle height 5 cm. Use six eyelets per row and a sole thickness of 1.5 cm. State the number of lace crossings.
Show answer and check
Six eyelets per row give five crossing pairs plus top tie. Ratio 15 divided by 5 equals 3.
Why: Each pair of opposite eyelets creates one crossing; six eyelets per row yield five pairs.
Check: Count eyelets and crossings; measure length and height to confirm the 3:1 ratio.
Exercise 2
A boot drawing has ankle height 6 cm and heel-to-toe length 18 cm. The sole is 2 cm thick with eight lugs. Check the ratio and lug spacing if lugs are evenly spaced.
Show answer and check
Ratio 18 divided by 6 equals 3, matching the guide. Eight lugs spaced evenly across the sole length.
Why: Divide length by height to check the proportion; even spacing means equal intervals.
Check: Measure length and height; count lugs and confirm equal gaps.
Exercise 3
Draw a boot with four eyelets per row and crossed laces. How many crossing pairs and lace segments between eyelets are needed?
Show answer and check
Three crossing pairs and six lace segments between eyelets, plus top tie.
Why: Four eyelets per row give three opposite pairs; each pair uses two segments forming an X.
Check: Count eyelets, pairs, and segments; verify each pair has two segments.
Exercise 4
Your boot drawing has sole thickness 1 cm and ankle height 5 cm. You want sole thickness equal to one-fifth of ankle height. Is the drawing correct?
Show answer and check
Yes, because 5 divided by 5 equals 1 cm.
Why: One-fifth of 5 cm is 1 cm, matching the drawn sole.
Check: Multiply ankle height by 0.2 and compare to sole thickness.
Common mistakes
- Drawing the ankle too low, making the boot look like a sneaker. Raise the ankle top and re-check the ankle-height to heel-to-toe ratio.
- Eyelet rows not parallel, causing uneven laces. Redraw two parallel guide lines before placing eyelets.
- Lug sole too thin or lugs overlapping the upper. Increase sole thickness and keep lugs below the sole band.
- Lace crossings inconsistent or missing pairs. Count eyelets and draw one crossing per pair, alternating direction.
Self-check rubric
- Proportions: ankle height and heel-to-toe length match the chosen guide within a small margin.
- Lace pattern: eyelets paired and evenly spaced; crossings consistent.
- Sole: thickness consistent and lugs evenly spaced without overlapping the upper.
- Line clarity: guide lines removed or light; final outline clear.
- Valid alternatives: different eyelet counts, lace styles, or lug shapes accepted if consistent.
Questions and answers
How many eyelets should I draw?
Any consistent number works. Five to seven per row is common; count them and keep spacing even.
Can I use different lace patterns?
Yes. Parallel lacing or crossed lacing are valid if the pattern is consistent and eyelets are paired.
What if my proportions differ from the example?
Measure your own drawing and adjust. The ratio is a guide, not a fixed rule.
How thick should the sole be?
Choose a thickness you can measure, such as one-quarter of ankle height, and keep it consistent.