Free original lessons
Draw a Hand Holding a Pencil: Grip, Knuckle Mass, and Wrist Angle
Learn to draw a hand gripping a pencil by building palm block, finger curl, knuckle arcs, and wrist angle with clear checks and practice.
Free lesson
Four exercises
Worked answers
Object Drawing Lessons
Drawing a hand holding a pencil is mostly a problem of mass and contact. The pencil is a straight shaft; the hand wraps around it with a palm block, curled fingers, and a set of knuckle arcs that show where the form turns. This lesson builds the grip from simple blocks, then refines finger placement and knuckle mass. You will use a convention for proportion and a rubric that accepts valid stylistic variation. All measurements are hypothetical examples; measure your own reference or equipment when adapting them.
Practice materials: Printable downloads are not available for this lesson yet. Use the instructions and four exercises below.
Reference illustration
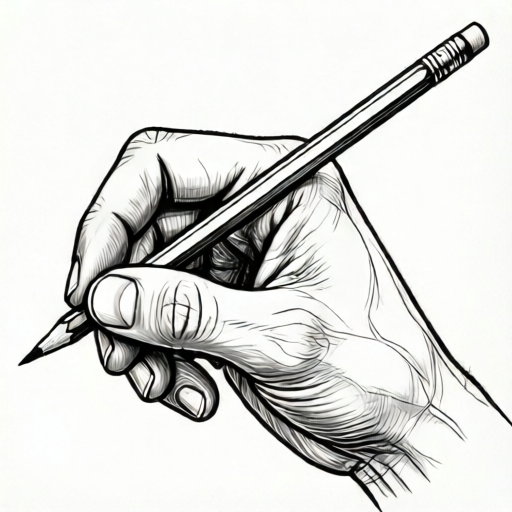
Use the stated measurements and conventions for each exercise.
Build the palm block and wrist angle first
Start with a rounded rectangular block for the palm. In a typical side view of a writing hand, the palm block is about two pencil-diameter widths tall and three widths long. These numbers are hypothetical; adjust to your reference. The wrist enters at an angle, not straight down: draw a short cylinder from the forearm into the heel of the hand, tilted about 20 to 30 degrees from vertical in a relaxed writing posture.
Place the pencil shaft as a straight line crossing the palm block. The shaft usually passes between the thumb and index finger and rests against the side of the middle finger. Mark the contact points before drawing any fingers: thumb pad, index side, middle-finger side, and the web between thumb and index.
- Draw a light rounded rectangle for the palm, about 2 by 3 pencil widths (hypothetical).
- Add a short wrist cylinder entering the heel at a 20 to 30 degree tilt.
- Draw the pencil as one straight line crossing the palm block.
- Mark four contact points: thumb pad, index side, middle-finger side, and thumb-index web.
Curl the fingers around the shaft
Each finger is a chain of three segments. For a grip, the index and middle fingers curl so their tips point back toward the palm. Draw the index finger as two visible segments wrapping the shaft, with the tip touching the pencil about one pencil width from the contact point. The middle finger supports underneath, its tip hidden or partly hidden behind the shaft.
The ring and little fingers curl more tightly and do not touch the pencil. Show them as overlapping arcs behind the middle finger. Keep the finger widths consistent: each finger is roughly half a pencil width at the middle joint in this convention. Vary length slightly for naturalism, but keep the curl direction consistent.
- Draw the index finger as two segments curling over the shaft.
- Place the index tip about one pencil width from its contact point.
- Draw the middle finger supporting under the shaft, tip partly hidden.
- Add ring and little fingers as tighter overlapping arcs behind the middle finger.
Define knuckle mass with arcs, not circles
Knuckles are not separate balls; they are the visible turning points where finger segments meet. Draw a continuous arc across the back of the hand for the main knuckle line, then smaller arcs at each joint. The main knuckle arc should sit about one pencil width behind the finger bases. The thumb has its own joint mass near the web, forming a rounded triangle.
Use line weight to show mass: heavier where the hand presses the pencil, lighter on the back of the hand. Shade the underside of the palm block and the gaps between curled fingers. Avoid outlining every finger completely; let overlaps suggest depth.
- Draw one continuous arc across the back of the hand for the main knuckle line.
- Add smaller joint arcs at each visible finger joint.
- Shape the thumb joint as a rounded triangle near the web.
- Shade under the palm and between curled fingers to show mass.
Check proportion and grip logic
A useful check is the pencil-width unit. In this convention, the palm is about 2 units tall and 3 units long; the index tip sits about 1 unit from its contact; the main knuckle arc sits about 1 unit behind the finger bases. These are hypothetical examples, not universal standards. Measure your own hand or reference and label your chosen values.
Check that the pencil remains straight and that the thumb opposes the index finger. If the thumb and index tips point in the same direction, the grip looks like a pinch, not a wrap. The wrist angle should allow the pencil to angle back toward the shoulder, not straight up.
- Measure palm height and length in pencil-width units.
- Confirm the pencil line is straight and crosses the palm block.
- Check that thumb and index oppose each other around the shaft.
- Verify the wrist tilt matches the pencil angle.
Worked example
Using the pencil-width convention, describe how to place the index finger and main knuckle arc for a side-view writing hand.
Worked answer
Draw the palm block 2 units tall and 3 units long. Place the pencil as a straight line crossing the block. Draw the index finger curling over the shaft with its tip about 1 unit from the contact point. Draw the main knuckle arc about 1 unit behind the finger bases. Check that the thumb opposes the index and the pencil stays straight.
Four practice exercises
Exercise 1
A side-view hand holds a pencil. Assume the index tip, the pencil contact point, and the main knuckle arc all lie along one line on the back of the hand. The index tip is 1 pencil-width unit beyond the contact point, and the main knuckle arc is 1 unit behind the finger bases, which coincide with the contact point. What is the distance from the index tip to the main knuckle arc along that line?
Show answer and check
2 pencil-width units.
Why: The index tip is 1 unit beyond the contact point and the knuckle arc is 1 unit behind the same contact point, on the same line, so the two offsets add: 1 + 1 = 2 units.
Check: Re-read the stated collinear assumption and the two 1-unit offsets, then add them. Confirm the result is in pencil-width units, not centimeters.
Exercise 2
A drawing shows the thumb tip and index tip pointing in the same direction, both above the pencil. Using the grip logic in this lesson, describe one change that would make the grip read as a wrap.
Show answer and check
Rotate the thumb so its pad opposes the index side of the shaft, and curl the index tip back toward the palm.
Why: A wrap requires opposing forces around the shaft. Same-direction tips read as a pinch. Opposing the thumb and curling the index creates contact on opposite sides.
Check: Trace the thumb and index contact points; confirm they sit on opposite sides of the pencil line.
Exercise 3
You draw four fingers with equal curl and equal length. The ring and little fingers touch the pencil. Identify the two grip-logic errors and state a correction for each.
Show answer and check
Error 1: ring and little fingers should not touch the pencil; curl them tighter behind the middle finger. Error 2: equal curl and length looks stiff; vary lengths slightly and keep only index and middle in contact with the shaft.
Why: In a pencil grip, the ring and little fingers support the hand, not the shaft. Equal curl removes the overlapping arcs that show mass.
Check: Check contact points: only index and middle should meet the pencil. Check that ring and little fingers overlap behind the middle finger.
Exercise 4
A palm block is drawn 2 units tall and 3 units long. The wrist cylinder enters at 25 degrees from vertical. The pencil line is drawn at 40 degrees from vertical. State whether the wrist and pencil angles are consistent with a relaxed writing posture in this lesson, and give one check.
Show answer and check
They are plausibly consistent if the pencil angles back toward the shoulder while the wrist tilts moderately. Check that the pencil line remains straight and that the wrist angle is less steep than the pencil angle.
Why: The lesson uses a hypothetical 20 to 30 degree wrist tilt and a pencil that angles back. A 25 degree wrist and 40 degree pencil fit that relationship. The values are examples, not standards.
Check: Measure both angles from vertical with the same reference line; confirm wrist is within the stated example range and pencil is straighter than the wrist.
Common mistakes
- Drawing the pencil as a curved line that bends around the fingers. Keep the pencil a single straight line; let fingers overlap it instead of bending it.
- Making knuckles as separate circles on top of the hand. Use continuous arcs across the back of the hand and smaller joint arcs, not isolated circles.
- Pointing thumb and index tips in the same direction. Oppose the thumb against the index side so the grip wraps the shaft.
- Drawing all five fingers at the same curl and length. Curl ring and little fingers tighter and vary lengths slightly; only index and middle touch the pencil.
Self-check rubric
- Pencil is drawn as a single straight shaft crossing the palm block.
- Palm block and wrist angle are established before fingers.
- Index and middle fingers curl around the shaft; ring and little fingers curl tighter behind.
- Knuckle mass is shown with continuous arcs, not isolated circles.
- Thumb opposes the index finger around the shaft.
- Proportion units are stated and used consistently; hypothetical values are labeled.
- Valid stylistic alternatives are accepted if grip logic and mass arcs remain clear.
Questions and answers
Do I need to draw every finger joint?
No. Show only the joints that turn visibly. Overlaps and shading can suggest hidden joints.
How many pencil widths should the palm be?
In this lesson the hypothetical example is 2 units tall by 3 units long. Measure your own reference and label your values.
Can the hand be drawn from a different angle?
Yes. The same block-and-arc method works from side, three-quarter, or top views; adjust contact points and wrist tilt to match.
What if my hand looks too stiff?
Vary finger lengths slightly and soften the knuckle arcs. Keep the grip logic consistent even when stylizing.