Free original lessons
Frontal Drawing: Symmetry Guides for a Front-Facing Figure
Learn to draw a front-facing figure using a vertical symmetry axis and paired feature markers. Build accurate bilateral placement with checkable steps.
Free lesson
Four exercises
Worked answers
Object Drawing Lessons
Frontal drawing places the body squarely toward the viewer, so left and right features mirror across a single vertical axis. This lesson teaches a repeatable guide system: establish the axis, mark shoulder and hip widths, then place paired features at equal distances from the center. You will use simple arithmetic and a defined convention for x-height so that checks are objective. The convention here is that x-height runs from the baseline to the midline of lowercase letters; letter styles vary, so treat the midline as a band, not a single pixel. All numerical values in examples are hypothetical and should be replaced by measurements of your actual paper and tools.
Practice materials: Printable downloads are not available for this lesson yet. Use the instructions and four exercises below.
Reference illustration
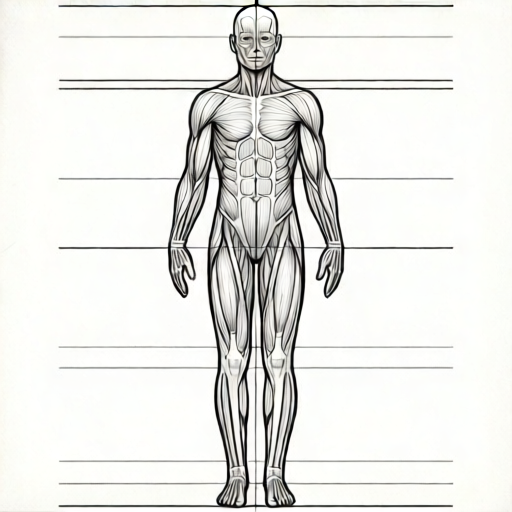
Use the stated measurements and conventions for each exercise.
Set the axis and width guides
Begin with a vertical line down the center of the page. This is the symmetry axis. Decide the total shoulder width and hip width in the same unit, such as centimeters. Mark half of each width on both sides of the axis at the chosen heights. Because frontal symmetry means equal distances, every paired marker should sit at the same distance from the axis.
Use a light grid or ruler to keep horizontal pairs level. If the shoulder width is 12 cm, each shoulder marker sits 6 cm from the axis. If the hip width is 10 cm, each hip marker sits 5 cm from the axis. These numbers are hypothetical examples; measure your own page and keep units consistent.
- Draw one vertical axis and label the top and bottom.
- Choose a shoulder height and mark it on the axis.
- Measure half the shoulder width to the left and right; mark both points.
- Repeat for hip width at a lower height.
- Check that each left marker and its right partner are the same distance from the axis.
Place paired features with equal offsets
Eyes, ears, and other bilateral features are placed as pairs. Measure from the axis outward, not from the page edge. For example, if the eye centers are 3 cm from the axis, both eyes sit 3 cm out. The nose and mouth usually sit on the axis in a strict frontal view, so their centers align with the vertical line.
Use the x-height convention to judge vertical placement of small features. X-height is the distance from the baseline to the midline of lowercase letters. Because letter styles vary, allow a band of acceptable height rather than one exact line. Mark the band lightly, then place the feature within it.
- Mark the eye height on the axis.
- Measure the same offset left and right for the eye centers.
- Place the nose and mouth centers on the axis unless your design intentionally shifts them.
- Use a light x-height band for small features and keep both sides within the band.
- Re-measure each pair from the axis to confirm equality.
Check symmetry with simple arithmetic
Symmetry checks are arithmetic. For each pair, subtract the left distance from the axis from the right distance. A perfect frontal guide gives zero difference. If the difference is small, adjust the marker. Keep all measurements in one unit, such as centimeters, and record them beside the drawing.
A second check is the midpoint test. For any horizontal pair, the midpoint between the two markers should lie on the axis. If the midpoint is off the axis, one marker is misplaced. This test works for shoulders, hips, eyes, and ears.
- List each pair and its left and right distances from the axis.
- Subtract to find the difference; aim for zero.
- Find the midpoint of each pair and confirm it lies on the axis.
- Adjust only the marker that breaks equality.
- Re-check after adjustment.
Build the figure from guides to contour
Once the paired markers are equal, connect them with light contour lines. Keep the axis visible until the contour is stable. The shoulder line and hip line should cross the axis at their marked heights. Because this lesson covers frontal symmetry only, avoid turning the figure into a three-quarter or profile view.
Use the blank symmetric grid for independent practice. The grid supports equal offsets, but the final contour should still be checked by measurement. Valid alternatives include different shoulder slopes or hair shapes, provided paired features remain equal in distance from the axis.
- Connect shoulder markers across the axis.
- Connect hip markers across the axis.
- Draw the torso contour between shoulder and hip guides.
- Add paired features at their measured offsets.
- Erase construction lines only after the midpoint and difference checks pass.
Worked example
On a page with a vertical axis, a shoulder height is marked. The shoulder width is 12 cm and the hip width is 10 cm. Place shoulder and hip markers, then check symmetry.
Worked answer
Shoulder markers sit 6 cm left and 6 cm right of the axis. Hip markers sit 5 cm left and 5 cm right. Difference for shoulders is 6 minus 6 equals 0; for hips, 5 minus 5 equals 0. The midpoint of each pair lies on the axis.
Four practice exercises
Exercise 1
A frontal guide has a shoulder width of 14 cm. Mark both shoulder points from the axis and state their offsets.
Show answer and check
Each shoulder point is 7 cm from the axis: 7 cm left and 7 cm right.
Why: Half of 14 cm is 7 cm. Frontal symmetry requires equal offsets on both sides.
Check: Subtract the left offset from the right offset: 7 minus 7 equals 0. Confirm the midpoint lies on the axis.
Exercise 2
Eye centers are placed 4 cm left and 5 cm right of the axis. Identify the error and give corrected offsets for a 4 cm target.
Show answer and check
The right eye is misplaced. Correct offsets are 4 cm left and 4 cm right.
Why: Paired features must have equal distances from the axis. The difference is 5 minus 4 equals 1 cm.
Check: Re-measure both eyes from the axis and confirm the difference is 0. Check that the midpoint is on the axis.
Exercise 3
A hip width is 9 cm. Mark hip points and verify with the midpoint test.
Show answer and check
Hip points are 4.5 cm left and 4.5 cm right of the axis. The midpoint is on the axis.
Why: Half of 9 cm is 4.5 cm. Equal offsets produce a midpoint at the axis.
Check: Difference: 4.5 minus 4.5 equals 0. Midpoint: average of the two offsets is 0 from the axis.
Exercise 4
A small feature is placed at a height that is above the x-height band. State the convention and one valid correction.
Show answer and check
X-height runs from baseline to midline. Move the feature down so it sits within that band, or redraw the band and place the feature inside it.
Why: The convention defines a checkable vertical range. Letter styles vary, so the band allows alternatives rather than one exact line.
Check: Mark baseline and midline, then confirm the feature lies between them. Record the band height in the same unit as other measurements.
Common mistakes
- Measuring paired features from the page edge instead of the axis. Re-measure each feature from the vertical axis and record the offset.
- Using different units for left and right offsets. Convert all measurements to one unit before comparing.
- Treating x-height as one exact line. Use a band from baseline to midline and allow valid letter-style variation.
- Shifting the nose or mouth off the axis without a stated reason. Keep centers on the axis for strict frontal symmetry, or label an intentional shift.
Self-check rubric
- A single vertical symmetry axis is clearly present.
- Shoulder and hip widths are marked as equal left and right offsets.
- Paired features are measured from the axis, not the page edge.
- Midpoint test confirms each pair centers on the axis.
- X-height is treated as a baseline-to-midline band, allowing letter-style variation.
- Units are consistent and numerical values are labeled as hypothetical examples.
- Valid alternatives are accepted when paired offsets remain equal.
Questions and answers
What counts as frontal symmetry here?
A single vertical axis with paired features at equal distances from it. Three-quarter and profile views are outside this lesson.
How precise must the offsets be?
Use your own measurement tolerance. A simple check is that the left and right distances differ by zero or a small stated amount.
Why define x-height as baseline to midline?
It gives a checkable vertical band for small features. Letter styles vary, so the band allows valid alternatives.
Are the numbers in the examples fixed rules?
No. They are hypothetical examples. Measure your actual paper and tools and keep units consistent.