Free original lessons
Maneki-Neko Drawing: Paw, Collar, and Coin
Learn to draw a maneki-neko with a raised paw, collar band, and oval coin using simple proportion guides and a clear convention for line placement.
Free lesson
Four exercises
Worked answers
Object Drawing Lessons
This lesson teaches a repeatable way to draw a maneki-neko: a seated cat figure with one raised paw, a collar band, and a coin detail. You will use a simple convention: the cat's head is an oval, the body is a rounded trapezoid, and the raised paw is a separate rounded shape attached at the shoulder. The collar is a band that crosses the neck, and the coin is an ellipse held near the chest or belly. Because drawing styles vary, the rubric rewards clear placement and readable features rather than a single exact outline. All measurements below are hypothetical examples; measure your own paper and tools before drawing.
Practice materials: Printable downloads are not available for this lesson yet. Use the instructions and four exercises below.
Reference illustration
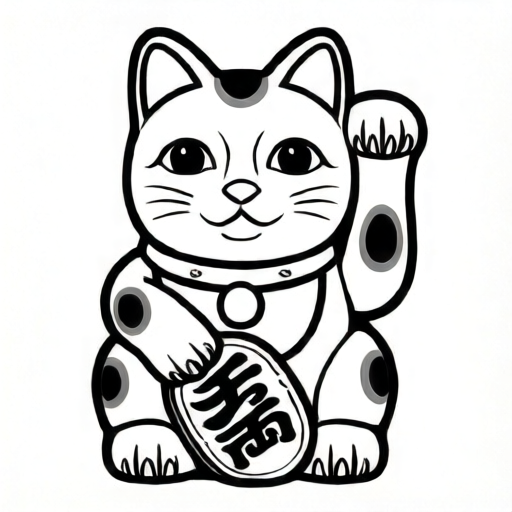
Use the stated measurements and conventions for each exercise.
Set the body proportion guide
Start with a light construction drawing. Draw a vertical center line. Place the head oval near the top, then a body shape below it. A common proportion is head height about one third of total figure height, but this is a style choice. Keep the body wider at the base so the figure looks seated.
Mark three horizontal guides: top of head, midline of head (the x-height line for facial features), and base of body. The x-height convention here means the baseline of the eyes to the midline of the head oval; letter styles and eye styles vary, so treat this as a placement guide, not a fixed rule.
- Draw a vertical center line on your paper.
- Draw a head oval centered on the line; mark its midline.
- Draw a rounded trapezoid body below the head, wider at the base.
- Add a small base curve to show the seated bottom.
Construct the raised paw
Choose one side for the raised paw and keep it consistent. The raised paw is a rounded shape, like a mitten, attached at the shoulder. Draw a short arm line from the shoulder to the paw shape. The paw should sit above the collar line and not overlap the face.
For a checkable construction, make the paw shape about the same height as the head oval's lower half. This is a hypothetical proportion; adjust to your style. The important check is that the paw reads as separate from the body and clearly raised.
- Mark the shoulder point on the chosen side.
- Draw a short arm line upward from the shoulder.
- Draw a rounded paw shape at the end of the arm line.
- Add two or three short lines inside the paw to suggest toes.
Add collar band and coin ellipse
The collar is a band that crosses the neck between the head and body. Draw two curved lines that follow the neck shape, then connect them at the ends. The collar should be visible on both sides of the neck. The coin is an ellipse placed near the chest or belly, below the collar.
Use a light ellipse for the coin and add a simple inner mark, such as a short vertical line or a small circle, to suggest a design. Keep the coin smaller than the head oval. Check that the collar band does not cover the raised paw's attachment point.
- Draw two curved lines across the neck for the collar band.
- Connect the ends of the band with short curves.
- Draw an ellipse for the coin below the collar.
- Add one simple inner mark inside the coin.
Refine and check readability
Darken the final lines and erase construction marks lightly. Check that the raised paw, collar, and coin are each visible without labels. The figure should read as a maneki-neko, not a generic cat, because the raised paw and coin are present.
Use the rubric to evaluate placement, not exact shape. Valid alternatives include a left or right raised paw, a wider or narrower collar, and a coin with different simple inner marks, as long as the features are clear and consistent.
- Trace over the final lines with a darker pencil.
- Erase construction lines gently.
- Label nothing on the final drawing; check features by eye.
- Compare your drawing to the rubric before finishing.
Worked example
Draw a maneki-neko on a sheet of paper. Use a head oval, a seated body, a raised paw on the right side, a collar band, and a coin ellipse. Keep the paw beside the head and the coin below the collar.
Worked answer
A completed drawing shows a seated cat figure with a head oval at the top, a wider body below, a rounded raised paw attached at the right shoulder and sitting beside the head, a two-line collar band across the neck, and an ellipse coin below the collar with one simple inner mark. Construction lines are erased and the features are readable without labels.
Four practice exercises
Exercise 1
On a blank sheet, draw only the body proportion guide for a maneki-neko: a vertical center line, a head oval, a seated body trapezoid, and three horizontal guides. Do not add the paw, collar, or coin yet.
Show answer and check
A construction drawing with a vertical center line, a head oval centered on it, a rounded trapezoid body wider at the base, and three horizontal guides marking top of head, head midline, and body base.
Why: The guide sets placement before detail. A centered head and wider base make the seated figure readable. The three guides give consistent reference points for later features.
Check: Check that the head oval is centered on the vertical line, the body base is wider than the top of the body, and all three horizontal guides are present and roughly level.
Exercise 2
Draw a maneki-neko with the raised paw on the left side. Include the collar band and coin ellipse. Keep the paw beside the head and the coin below the collar.
Show answer and check
A seated cat figure with a left raised paw attached at the left shoulder, a two-line collar band across the neck, and an ellipse coin below the collar with one simple inner mark.
Why: Choosing the left side tests consistency. The paw must attach at the shoulder and stay beside the head. The collar and coin must be placed in the correct order from top to bottom.
Check: Check that the raised paw is on the left, does not overlap the face, the collar band has two lines, and the coin is an ellipse below the collar and smaller than the head.
Exercise 3
Draw a maneki-neko where the coin is a flattened ellipse with a short vertical inner line. The collar band should be wider than in the worked example. Use either side for the raised paw.
Show answer and check
A maneki-neko drawing with a clearly flattened coin ellipse, a short vertical inner line, a wider two-line collar band, and a raised paw on either side that stays beside the head.
Why: A flattened ellipse reads as a coin rather than a circle. A wider collar band is a valid style choice if it remains a band with two lines. The inner line is a simple checkable detail.
Check: Check that the coin width is greater than its height, the inner line is short and vertical, the collar band has two lines and is visibly wider, and the raised paw is separate from the body.
Exercise 4
Draw a maneki-neko and then self-check it against the rubric. If any feature is unclear, redraw that feature once. Write one sentence saying which feature you redrew and why.
Show answer and check
A completed drawing that meets the rubric, plus a sentence such as: I redrew the collar band because it was a single line, so I added a second line and connected the ends.
Why: Self-checking connects the drawing to clear criteria. Redrawing one feature practices correction without starting over. The sentence makes the check explicit.
Check: Check that the final drawing has a raised paw, a two-line collar band, and an ellipse coin below the collar. Check that the sentence names one feature and gives a reason tied to the rubric.
Common mistakes
- The raised paw overlaps the face or collar band. Move the shoulder point lower and redraw the arm line so the paw sits beside the head, not over it.
- The collar band is drawn as a single line. Draw two curved lines with a small gap to show the band's width, then connect the ends.
- The coin is drawn as a circle instead of an ellipse. Flatten the coin shape slightly and check that its width is greater than its height.
- The body is too narrow at the base, so the figure does not look seated. Widen the bottom of the body trapezoid and add a small base curve.
Self-check rubric
- The figure reads as a seated cat with a head oval and a wider body base.
- One paw is clearly raised and attached at the shoulder; it does not overlap the face.
- The collar band is drawn with two lines and is visible on both sides of the neck.
- The coin is an ellipse placed below the collar and is smaller than the head oval.
- Construction lines are lightly erased and final features are readable without labels.
- Valid alternatives are accepted: either side for the raised paw, varied collar width, and different simple coin marks.
Questions and answers
Can the raised paw be on either side?
Yes. Choose one side and keep it consistent. The rubric checks that the paw is clearly raised and separate from the body, not which side it is on.
How large should the coin be?
Keep the coin smaller than the head oval. A hypothetical example is coin width about one third of head width, but adjust to your style and check that it reads as a coin.
What does x-height mean in this lesson?
It is a placement guide: the baseline of the eyes to the midline of the head oval. Eye styles vary, so use it to place features consistently rather than to force one exact look.
Do I need special paper or tools?
No. Use any paper and pencil you have. Measure your own paper and tools if you want to set numerical proportions; the numbers here are hypothetical examples.