Free original lessons
Draw a Cheetah: Spot Pattern, Slender Body, and Pose
Learn cheetah-specific spots, slender proportions, and dynamic pose with a printable plate, placement grid, and independent silhouette practice.
Free lesson
Four exercises
Worked answers
Object Drawing Lessons
This lesson teaches a drawing of a cheetah by focusing on three cheetah-specific features: solid round spots (not rosettes), a slender elongated body, and a pose that shows speed or alertness. You will use a proportion guide, a spot-placement grid, and a pose outline. All resources are planned as free printables; none are built yet. Work on plain paper with pencil and eraser. The convention for spot size is defined below so your drawing can be checked fairly, and valid alternatives are allowed.
Practice materials: Printable downloads are not available for this lesson yet. Use the instructions and four exercises below.
Reference illustration
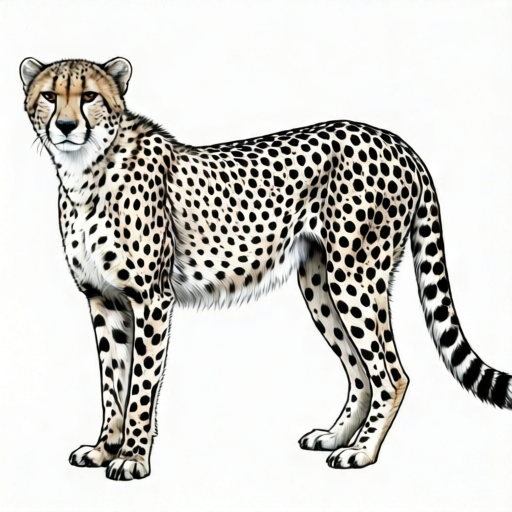
Use the stated measurements and conventions for each exercise.
Cheetah Body Proportions
A cheetah has a small head, deep chest, narrow waist, long legs, and a long tail. Use head length as your unit. A typical side view is about 4.5 head lengths from nose to tail base, with legs about 2 head lengths tall. These numbers are hypothetical examples for practice, not standards.
Draw a horizontal ground line. Mark shoulder height and hip height slightly higher at the shoulder. Place the chest circle forward and the hip circle back, then connect with a curve that dips at the waist. Add a small head circle and a tail curve.
- Draw a ground line and mark two head-length units for leg height.
- Place a chest circle and a hip circle about 2.5 head lengths apart.
- Connect the circles with a line that narrows at the waist.
- Add a small head circle forward of the chest and a long tail curve behind the hip.
- Check that the body is longer than tall and the waist is narrower than the chest.
Spot Pattern Placement
Cheetah spots are solid, round, and separate, never rosettes. They are denser on the back and sides and sparser on the belly and legs. The face has small spots and tear lines from the inner eye to the mouth corner. Use a grid of three rows on the body: top row large spots, middle row medium, bottom row small.
Convention: a spot counts as valid if it is a closed round or oval mark with clear space around it. Spots may vary in size by row. Do not connect spots into stripes or rings. This convention allows many correct patterns.
- Lightly draw three horizontal guide rows on the body from shoulder to hip.
- Place large spots in the top row, medium in the middle, small in the bottom row.
- Leave clear gaps between spots so none touch.
- Add small spots on the head and sparse spots on the upper legs.
- Draw two tear lines from each inner eye to the mouth corner.
Pose and Motion
Choose one pose: standing alert, walking, or running. For a running pose, stretch the front legs forward and back legs backward, and curve the spine. For standing alert, keep legs vertical and head high. The tail acts as a counterbalance: in running it extends back; in standing it curves down.
Check pose by drawing a line from the nose through the spine to the tail tip. In running, this line should be long and low; in standing, more upright. Keep the slender body visible in every pose.
- Choose standing, walking, or running and mark the ground contact points.
- Draw the spine curve that matches the pose.
- Attach legs from shoulder and hip circles to the contact points.
- Add the tail curve opposite the head direction for balance.
- Check that the pose line is clear and the body stays slender.
Refining and Checking
Erase construction circles lightly, then darken the outline. Keep the head small and the chest deep. Confirm spots are separate and round. Use the rubric to score your drawing and note one improvement.
Measure your actual paper and pencil if you scale the drawing; label any chosen sizes as hypothetical examples. Do not assume printer tolerances.
- Erase guide circles and grid lines.
- Darken the body outline and tail.
- Recheck spot separation and tear lines.
- Score with the rubric and write one fix.
Worked example
Draw a standing alert cheetah in side view using head length as one unit. Body length 4.5 units, leg height 2 units, three spot rows, and two tear lines per eye.
Worked answer
A side-view cheetah with a small head, deep chest, narrow waist, long tail, vertical legs, separate round spots in three rows, and tear lines. The drawing scores at least 3 on each rubric row.
Four practice exercises
Exercise 1
Draw a standing cheetah side view. Use head length 1 unit, body 4.5 units, leg height 2 units. Add three spot rows and two tear lines per eye.
Show answer and check
A side-view cheetah with small head, deep chest, narrow waist, vertical legs, long tail, separate spots in three rows, and tear lines.
Why: The proportions keep the body long and slender; three rows organize spot size; tear lines are cheetah-specific.
Check: Measure body length against head length (about 4.5) and leg height (about 2). Confirm no spots touch and each eye has two tear lines.
Exercise 2
Draw a running cheetah with front legs stretched forward and back legs backward. Show the spine curve and tail extended back. Add spots only on the upper body and sparse leg spots.
Show answer and check
A running cheetah with long low spine line, extended legs, tail back, and separate spots concentrated on the back and sides.
Why: Running pose uses stretched legs and a low spine line; spot placement follows denser back and sparser legs.
Check: Draw a line from nose through spine to tail tip; it should be long and low. Check that leg spots are fewer than back spots and none touch.
Exercise 3
Draw a cheetah face in front view. Include small head, two tear lines from each inner eye to the mouth corner, and small separate spots on the forehead and cheeks.
Show answer and check
A front-view cheetah face with small round spots and two tear lines per eye.
Why: Front view tests tear-line placement and small face spots without body proportions.
Check: Count two tear lines per eye. Confirm face spots are separate and round or oval, not connected.
Exercise 4
Draw a walking cheetah with one front leg forward and one back leg forward. Use three spot rows with large top spots and small bottom spots. Label your head-length unit.
Show answer and check
A walking cheetah with alternating leg positions, three spot rows with size variation, and a labeled unit.
Why: Walking pose tests leg alternation and spot row organization; labeling the unit makes proportion checkable.
Check: Check that opposite legs are forward. Measure top-row spots larger than bottom-row spots. Confirm the labeled unit matches your head length.
Common mistakes
- Drawing rosettes or connected rings instead of solid spots. Redraw each mark as a separate closed round or oval spot with clear space around it.
- Making the body too heavy or the waist wide. Narrow the waist curve and keep the chest deeper than the belly.
- Placing spots evenly like a grid pattern. Use three rows with larger spots on top and smaller below, leaving irregular gaps.
- Forgetting tear lines on the face. Add two short lines from each inner eye to the mouth corner.
Self-check rubric
- Proportions: body about 4.5 head lengths and legs about 2 head lengths (hypothetical targets), slender waist visible.
- Spots: solid round or oval marks, separate with clear gaps, three rows with size variation; no rosettes or stripes.
- Pose: chosen pose is clear, spine curve matches pose, tail balances head direction.
- Face: small head, two tear lines per eye, small face spots.
- Craft: clean outline, guide lines erased, one written improvement.
Questions and answers
How many spots should I draw?
No fixed number. Aim for separate spots in three rows, denser on the back and sparser on the belly. Quality of separation matters more than count.
Can spots be oval?
Yes. The convention allows round or oval closed marks with clear space around them.
What pose is easiest for beginners?
Standing alert is easiest because legs are vertical and the spine is simple. Running is harder but shows speed.
How do I check my proportions?
Use head length as a unit. Body length about 4.5 units and leg height about 2 units are hypothetical practice targets.