Free original lessons
Rune Drawing: Angular Glyphs, Stroke Order, and Carved Shading
Learn to draw angular rune-style glyphs with clear stroke order and carved-stone shading. Includes a worked example, four practice tasks, and a fair rubric.
Free lesson
Four exercises
Worked answers
Object Drawing Lessons
This lesson teaches a repeatable method for drawing angular rune-style glyphs. You will plan each glyph on a baseline and midline, build it with a deliberate stroke order, and add carved-stone shading that reads as depth rather than decoration. The convention is explicit: x-height runs from baseline to midline; verticals are drawn top to bottom; diagonals are drawn from the upper end to the lower end; horizontals are drawn left to right. Letter styles vary, so the rubric rewards consistent construction and legible shading, not a single universal shape. All measurements are hypothetical examples; measure your own paper and tools before setting values.
Practice materials: Printable downloads are not available for this lesson yet. Use the instructions and four exercises below.
Reference illustration
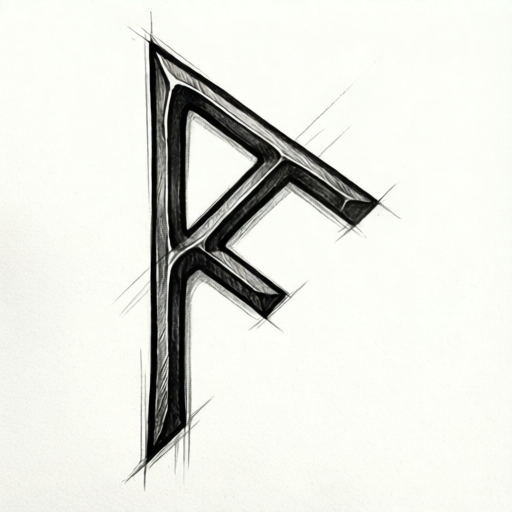
Use the stated measurements and conventions for each exercise.
Set the working frame
Draw a baseline and a midline spaced by your chosen x-height. For this lesson, a hypothetical x-height of 20 mm is used in examples; substitute your measured value. Mark a left guide and a right guide so each glyph has a consistent width. Keep the frame light so it does not compete with the final strokes.
Decide a stroke weight before drawing. A hypothetical main-stroke width of 2 mm and a shading-stroke width of 1 mm are used below; these are examples, not standards. Test them on scrap paper with your actual tool.
- Measure and draw the baseline and midline.
- Mark left and right guides for the glyph width.
- Test main and shading stroke widths on scrap paper.
- Label the frame lightly so it can be erased or ignored.
Build glyphs with stroke order
Angular rune-style glyphs are built from verticals, horizontals, and diagonals that meet at clear junctions. Use the convention above so the order is checkable. Draw the longest structural stroke first, then the strokes that depend on its endpoints, then the short connectors. This reduces drift and keeps junctions tight.
A simple example glyph is a vertical stem from baseline to midline, a diagonal from the top of the stem to the right guide at the baseline, and a short horizontal from the stem to the right guide at the midline. Draw the stem, then the diagonal, then the horizontal. Check that the diagonal ends exactly at the baseline and right guide.
- Draw the longest vertical or diagonal first.
- Add strokes that use the first stroke's endpoints.
- Add short connectors last.
- Check junctions before adding shading.
Add carved-stone shading
Carved shading suggests a groove cut into stone. Choose one light direction and keep it for the whole plate. A hypothetical light from the upper left means the upper and left inner edges of a groove receive a thin shadow line, while the lower and right inner edges receive a thin highlight line. Keep shading inside the glyph footprint so the silhouette stays angular.
Shade only after the stroke order is complete and junctions are clean. Use a lighter stroke than the main stroke. Do not shade every edge equally; shade the edges that face away from the light and highlight the opposite inner edge. If your tool cannot make a fine line, use a broken line of short marks and state that choice in your notes.
- Choose and note one light direction.
- Identify inner edges facing away from the light.
- Add thin shadow marks on those edges.
- Add thin highlight marks on opposite inner edges.
- Check that shading stays inside the glyph.
Check consistency across a plate
A plate is a set of glyphs drawn with the same frame, stroke weight, and light direction. Compare glyphs by placing them side by side and checking baseline contact, midline contact, and junction tightness. Consistent stroke weight matters more than perfect symmetry because angular glyphs can be validly asymmetric.
Record your chosen values on the plate: x-height, stroke widths, and light direction. This makes the work checkable and allows valid alternative styles to be judged fairly.
- Compare baseline and midline contact across glyphs.
- Compare main-stroke width across glyphs.
- Confirm one light direction is used throughout.
- Record chosen values on the plate.
Worked example
Draw a glyph with a vertical stem from baseline to midline, a diagonal from the stem top to the right guide at baseline, and a horizontal from the stem to the right guide at midline. Use a hypothetical 20 mm x-height, 2 mm main stroke, 1 mm shading stroke, and light from upper left. Describe the stroke order and shading.
Worked answer
Draw the vertical stem top to bottom. Draw the diagonal from the stem top to the baseline-right guide intersection. Draw the horizontal left to right at the midline. Check junctions. Add 1 mm shadow marks on inner edges facing away from upper-left light and 1 mm highlight marks on opposite inner edges, keeping all marks inside the glyph. Record the values on the plate.
Four practice exercises
Exercise 1
Draw a glyph with a vertical stem from baseline to midline and a diagonal from the stem top to the left guide at baseline. Use a hypothetical 20 mm x-height and 2 mm main stroke. State the stroke order and one check.
Show answer and check
Draw the vertical stem top to bottom, then the diagonal from the stem top to the baseline-left guide intersection. Check that the diagonal ends exactly at the baseline and left guide.
Why: The stem is the longest structural stroke, so it is drawn first; the diagonal depends on the stem top endpoint.
Check: Measure baseline contact at the left guide and confirm the diagonal starts at the stem top.
Exercise 2
Draw a glyph with a horizontal at the midline from left guide to right guide and a vertical from the horizontal midpoint to the baseline. Use a hypothetical 20 mm x-height. State the stroke order and one check.
Show answer and check
Draw the horizontal left to right at the midline, then the vertical top to bottom from the horizontal midpoint to the baseline. Check that the vertical meets the horizontal at its midpoint and touches the baseline.
Why: The horizontal establishes the midpoint endpoint needed by the vertical.
Check: Confirm the vertical starts at the horizontal midpoint and ends on the baseline.
Exercise 3
Draw a glyph with a diagonal from the left guide at midline to the right guide at baseline and a short horizontal from the diagonal midpoint to the right guide at midline. Use a hypothetical 20 mm x-height. State the stroke order and one check.
Show answer and check
Draw the diagonal from upper left to lower right, then the horizontal left to right from the diagonal midpoint to the right guide at midline. Check that the horizontal starts at the diagonal midpoint and stays at the midline.
Why: The diagonal is the main structural stroke; the horizontal depends on its midpoint.
Check: Confirm the horizontal is level with the midline and begins at the diagonal midpoint.
Exercise 4
Take the glyph from exercise 1 and add carved shading with light from upper left using a hypothetical 1 mm shading stroke. Describe where shadow and highlight marks go and one check.
Show answer and check
Add shadow marks on inner edges facing away from upper-left light, such as the lower and right inner edges of the stem and diagonal. Add highlight marks on opposite inner edges. Check that all shading stays inside the glyph and uses one light direction.
Why: Carved shading reads as depth when shadow and highlight are placed consistently relative to one light direction.
Check: Confirm shadow marks face away from upper left, highlight marks face toward it, and no marks cross the glyph silhouette.
Common mistakes
- Drawing short connectors before the main structural stroke. Draw the longest vertical or diagonal first, then add dependent strokes.
- Shading outside the glyph silhouette. Keep shadow and highlight marks inside the glyph footprint.
- Changing light direction between glyphs. Note one light direction and apply it to every glyph on the plate.
- Using inconsistent main-stroke width. Test the width on scrap paper and keep the same tool angle and pressure.
Self-check rubric
- Baseline and midline are clearly established and used consistently.
- Stroke order follows the stated convention: verticals top to bottom, diagonals upper to lower, horizontals left to right.
- Main-stroke width is consistent across the plate.
- Junctions are tight and strokes meet at intended endpoints.
- One light direction is used and carved shading stays inside the glyph.
- Chosen values are recorded, and valid alternative styles are accepted if construction and shading are consistent.
Questions and answers
Must every glyph be symmetrical?
No. Angular rune-style glyphs can be validly asymmetric. The rubric checks consistent construction, stroke order, and shading, not a single universal shape.
What if my tool cannot make a 1 mm shading line?
Use a broken line of short marks or a lighter pressure and state the choice in your notes. The hypothetical 1 mm value is an example, not a requirement.
Where does x-height sit?
X-height runs from the baseline to the midline. Verticals are drawn top to bottom, diagonals from upper end to lower end, and horizontals left to right.
How do I check carved shading?
Confirm one light direction, shadow marks on edges facing away from the light, highlight marks on opposite inner edges, and no shading outside the glyph.