Free original lessons
Saola Drawing: Horn, Face, and Body Proportions
Learn to draw a saola in side view using measured proportion landmarks, a curved horn guide, and clear face feature placement.
Free lesson
Four exercises
Worked answers
Object Drawing Lessons
This worksheet teaches a stylized side-view saola drawing using body, head, horn, and face-marking guides. WWF describes the saola as antelope-like, with two parallel horns and white facial markings; WCS describes the horns as long and gently curving. The drawing ratios below are practice choices, not biological measurements. The animal is rarely observed, so follow a clear reference image for details beyond the documented features.
Practice materials: Printable downloads are not available for this lesson yet. Use the instructions and four exercises below.
Reference illustration
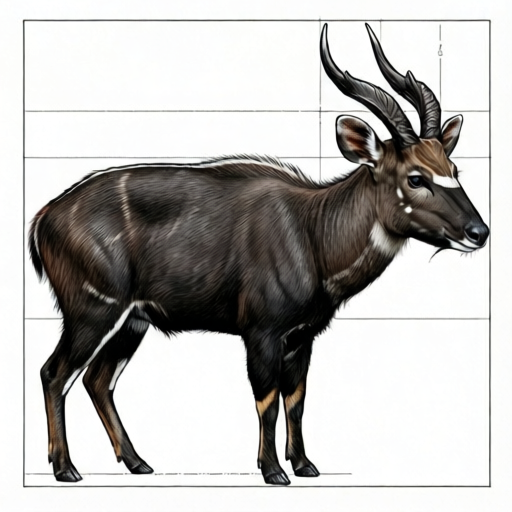
Use the stated measurements and conventions for each exercise.
Setting Up Proportion Landmarks
For the body, use a simple elongated oval as a drawing guide and label the baseline, topline, and shoulder and rump marks. The sample body ratio and leg placement in this lesson are illustrative choices for a readable side view, not a claim about typical anatomy. Keep one unit throughout and use the same landmarks in every exercise.
Add a horizontal body-depth midline halfway between the baseline and the topline, so baseline-to-midline equals midline-to-topline and each equals half the body depth. This is a drawing aid, not a biological standard. Separately, use a head-midline convention for face features: define the head midline as the horizontal midline of the head, halfway between the topline of the head and the jawline, and place the eye near that horizontal midline, slightly above it, rather than at the topline. Keep all guide lines light so they can be erased or left as construction marks.
- Measure your drawing area and record its width and height in centimetres.
- Choose a body-length unit (BL) that fits the page; label it as a hypothetical example.
- Draw a light baseline and mark shoulder and rump points one BL apart.
- Draw a horizontal body-depth midline halfway between the baseline and the topline, and mark the topline height.
- Check that the body rectangle is wider than it is tall by about one quarter.
Building the Body and Legs
Connect the shoulder and rump marks with a gentle back line and draw a belly line as part of the chosen silhouette. The leg length, belly height, and body-depth ratio below are drawing guides for this worksheet, not anatomical constants. Draw the near legs first, then use a small offset for the far legs to show depth.
Draw the near front leg and near hind leg first, then offset the far legs slightly to suggest depth. Keep the hooves small and close to the baseline. The neck rises from the shoulder at a shallow angle, roughly 30 to 40 degrees from horizontal in side view, and the head sits forward of the chest.
- Draw the back line from shoulder to rump with a slight dip and rise.
- Draw the belly line parallel to the baseline with a gentle upward curve, sitting at about half the body depth above the baseline (the body-depth midline).
- Mark leg length as about half the body depth (baseline to topline), measured from baseline to belly line; because the belly line sits at the body-depth midline, this makes leg length equal to the depth above the belly line. Draw near legs first.
- Offset far legs slightly and keep hooves small and near the baseline.
- Draw the neck at a shallow angle and place the head forward of the chest.
Placing the Face Features
For this drawing guide, divide the head span from horn base to nose tip into three equal parts. On a 6 cm span, place the eye between 4 and 6 cm behind the nose tip (for example, 4.5 cm). This is a reproducible placement convention, not a measured universal eye position. Use a horizontal guide halfway between the head top and jawline to keep eye height consistent. WWF and WCS identify white facial markings as a visible feature; add them as a separate pattern cue.
Use the head-height guide for vertical placement: put the eye near, but slightly above, the halfway line between head top and jawline. Treat the muzzle and nose pad as drawing choices, and check their shape against a reference. Facial-marking details vary in photographs and the worksheet accepts alternative markings if the eye and horn placement remain clear.
- Divide the head length into thirds from horn base to nose tip.
- Place the eye in the third nearest the horn base, between two thirds and the full head length behind the nose tip (for example, about 4.5 cm behind the nose tip on a 6 cm head).
- Place the ear behind the eye and below the horn base, angled backward.
- Draw a narrow muzzle and a small nose pad.
- Check eye height against the horizontal head midline (halfway between head topline and jawline), placing the eye slightly above it.
Drawing the Horn Curve
WWF describes two parallel horns with sharp tips, while WCS describes long, gently curving horns. For the side-view drawing, use two nearly parallel horns and a slight backward curve as a stylistic choice; do not treat one curve as the only natural form. Measure horn length along the curve if you want to compare it with your chosen head span.
A practical guide is to make horn length about equal to head length, measured along the curve. This is a hypothetical starting ratio, not a fixed rule. Check the curve by placing a straight edge from horn base to horn tip; the arc should bow outward from that line by about one fifth of the horn length. Keep the horn thickness even and taper slightly toward the tip.
- Mark the horn base on top of the head, slightly behind the eye line.
- Draw a smooth arc rising above the topline and curving backward.
- Offset the far horn slightly to suggest depth.
- Check horn length against head length and adjust the curve.
- Taper the horn slightly toward the tip and keep thickness even.
Worked example
A drawing area is 20 cm wide and 15 cm tall. Choose a body-length unit of 8 cm. Place shoulder and rump points, set a shoulder height of 6 cm, and describe where the eye and horn tip should go.
Worked answer
Mark the shoulder point 4 cm from the left edge and the rump point 12 cm from the left edge, so the body length is 8 cm. Draw a vertical midline at the shoulder and mark the topline 6 cm above the baseline. The body rectangle is 8 cm by 6 cm, which is about one quarter wider than tall. Place the eye about two thirds of the head length behind the nose tip and near the head midline. Draw the horn base slightly behind the eye line and curve the horn backward so the tip sits above the shoulder or slightly behind it, with horn length about equal to head length.
Four practice exercises
Exercise 1
A drawing area is 16 cm wide and 12 cm tall. Use a body-length unit of 7 cm and a shoulder height of 5 cm. Describe the shoulder and rump positions and check the body rectangle ratio.
Show answer and check
Place the shoulder point 3 cm from the left edge and the rump point 10 cm from the left edge. The body length is 7 cm and the shoulder height is 5 cm. The rectangle is 7 cm by 5 cm, which is 2 cm wider than tall, or about two fifths wider. This is wider than the one-quarter guide, so shorten the body by about 0.75 cm (to about 6.25 cm) or raise the shoulder height by about 0.6 cm (to about 5.6 cm) to bring the ratio closer to one quarter.
Why: The body-length unit sets the horizontal distance. The shoulder height sets the vertical distance. Comparing width to height gives a simple checkable ratio.
Check: Measure the drawn rectangle with a ruler and divide width by height. Compare the result to 1.25; adjust one dimension if the difference is large.
Exercise 2
A drawing guide uses a 6 cm head span from horn base to nose tip. Where does this worksheet place the eye horizontally, and what vertical guide helps place it?
Show answer and check
Place the eye 4–6 cm behind the nose tip (for example, 4.5 cm) and near the horizontal halfway guide between the head top and jawline. These are drawing conventions for this practice task.
Why: The 6 cm span divided into thirds gives 2 cm sections; the third nearest the horn base is the last 2 cm, from 4 to 6 cm behind the nose tip. The halfway guide makes vertical placement repeatable.
Check: Measure 4–6 cm back from the nose tip and check that the eye sits near the horizontal guide halfway between head top and jawline.
Exercise 3
A horn is drawn with a straight base-to-tip line of 5 cm. The arc bows outward by 1 cm at its widest point. Is this within the one-fifth guide, and what adjustment would bring it closer?
Show answer and check
One fifth of 5 cm is 1 cm, so the bow is exactly at the guide. No adjustment is needed for the bow. Check that the horn also curves backward and that the tip sits above the shoulder or slightly behind it.
Why: The one-fifth guide compares the outward bow to the straight base-to-tip length. A 1 cm bow on a 5 cm line matches the guide.
Check: Measure the straight base-to-tip line and the maximum outward bow. Divide the bow by the line length; the result should be about 0.2.
Exercise 4
A side-view saola has a body length of 9 cm and a body depth of 8 cm from baseline to topline. The belly line sits 5 cm above the baseline, so the legs are 5 cm long from baseline to belly line. Identify two proportion problems and state a fix for each.
Show answer and check
First, the body rectangle is 9 cm by 8 cm, only 1 cm wider than tall, which is less than the one-quarter guide; lengthen the body to about 10 cm or reduce the body depth to about 7.2 cm. Second, leg length is 5 cm while half the body depth is 4 cm, so the legs are too long by about 1 cm; shorten the legs to about 4 cm by lowering the belly line to the body-depth midline (4 cm above baseline). These fixes keep the saola compact and short-legged.
Why: The body ratio check compares width to height. The leg check compares leg length (baseline to belly line) to half the body depth (baseline to topline), since the belly line should sit at the body-depth midline. Both are simple arithmetic checks.
Check: Measure the rectangle and divide width by height; aim for about 1.25. Measure leg length from baseline to belly line and compare it to half the body depth (baseline to topline); they should be close, with the belly line at the body-depth midline.
Common mistakes
- Making the legs too long, so the saola looks like a deer. Measure leg length from baseline to belly line and keep it near half the body depth (baseline to topline); since the belly line sits at the body-depth midline, shorten the legs before adding details.
- Placing the eye too high on the face, near the topline. Use the head-midline convention: place the eye near the head midline, in the third nearest the horn base.
- Drawing horns that curve forward or outward like antlers. Start at the horn base and draw a backward arc; check the bow against a straight edge from base to tip.
- Making the body too long and narrow. Set shoulder and rump points one BL apart and check that the body rectangle is only slightly wider than tall.
Self-check rubric
- Body length and shoulder height follow a consistent unit and the body rectangle is wider than tall by roughly one quarter.
- Leg length (baseline to belly line, with the belly line at the body-depth midline) is about half the body depth (baseline to topline).
- Eye is placed in the third nearest the horn base (about two thirds of the head length behind the nose tip) and near the head midline.
- Ear sits behind the eye and below the horn base, angled backward.
- Horns start at the horn base, curve backward, and bow outward from a straight base-to-tip line by about one fifth of horn length.
- Face features and horn placement are clear even if markings or line style vary.
Questions and answers
Do I need to use exact measurements?
No. The numerical values are hypothetical examples. Measure your own paper and keep the ratios consistent so the drawing remains checkable.
Can I change the facial markings?
Yes. The rubric accepts valid alternative marking schemes as long as the eye, ear, muzzle, and horn base are clearly placed.
How do I know if the horn curve is correct?
Place a straight edge from horn base to horn tip. The arc should bow outward by about one fifth of the horn length, and the horn should curve backward.
What if my saola looks too tall?
Check the body rectangle: shoulder-to-rump length should be about one quarter longer than shoulder height. Reduce height or lengthen the body slightly.