Free original lessons
Capybara Drawing: Body Proportion and Fur Direction
Learn realistic capybara drawing by building body-mass blocks, setting head proportion, and mapping fur-direction strokes for a side-view study.
Free lesson
Four exercises
Worked answers
Object Drawing Lessons
This lesson teaches a repeatable method for drawing a realistic capybara in side view. You will construct the body from simple mass blocks, place the head using a proportion check, and then apply fur-direction strokes that follow the animal's form. The approach prioritizes measurable relationships over copying a single reference, so you can adapt it to different capybara poses while keeping the species' heavy, barrel-shaped silhouette and coarse, low-contrast coat believable. All measurements are hypothetical examples; measure your own paper and reference to set your own scale.
Practice materials: Printable downloads are not available for this lesson yet. Use the instructions and four exercises below.
Reference illustration
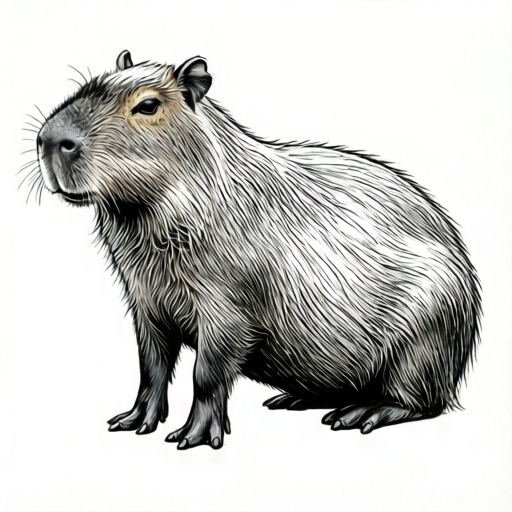
Use the stated measurements and conventions for each exercise.
Building the body-mass blocks
A capybara's body reads as a large, rounded barrel with a deep chest, a level back, and a high, blocky rump. Begin by drawing a horizontal baseline for the ground. Mark the total body length from nose tip to rump as a single unit, then divide it into four equal parts. In a typical side view, the head occupies roughly the first quarter, the chest and shoulders the second, the midsection the third, and the rump the fourth. These are hypothetical proportions for a relaxed standing pose; adjust only after checking your own reference.
Next, draw three overlapping ovals: a chest oval, a mid-body oval, and a rump oval. The chest oval should be slightly taller than wide, the mid-body oval wider than tall, and the rump oval the tallest and most block-like. Keep the top line of all three ovals close to a level back line. The belly line should dip gently between chest and rump, never forming a sharp V. Use light construction lines so they can be erased or absorbed into the final contour.
- Draw a ground baseline and mark total body length as one unit.
- Divide the length into four equal parts and label head, chest, midsection, rump.
- Draw a chest oval in the second quarter, a mid-body oval in the third, and a rump oval in the fourth.
- Align the tops of the ovals to a level back line and check that the belly line dips gently.
- Refine the outer contour so the three masses read as one continuous body.
Setting head proportion and feature placement
The head is blunt and boxy, not pointed. Use the first quarter of the body length as the head length. Draw a rounded rectangle for the skull, with the nose end slightly narrower than the back of the head. The eye sits roughly halfway between the nose tip and the ear base, and slightly above the midline of the head. The ear is small and rounded, set high and slightly back. The muzzle is broad and flat-fronted, with the nostril line near the top of the nose block.
Check proportion by comparing head length to body length: the head should fit about four times into the total length. Compare head height to chest depth: the head should be noticeably shorter than the chest is deep. If the head looks too large, reduce its length before adjusting the body. Keep the neck short and thick, blending the head into the chest oval without a visible narrow joint.
- Mark head length as one quarter of total body length.
- Draw a rounded rectangle for the skull, narrowing slightly toward the nose.
- Place the eye halfway from nose tip to ear base and slightly above the head midline.
- Set the ear high and slightly back, small and rounded.
- Blend the short, thick neck into the chest oval.
Mapping fur-direction strokes
Capybara fur is coarse and lies close to the body. Use short, overlapping strokes that follow the underlying form rather than a single uniform direction. On the chest and shoulders, strokes flow downward and slightly backward. Along the midsection, they follow the barrel curve, sweeping from the back line toward the belly. On the rump, strokes fan outward and downward from the high point of the hindquarters. On the head, strokes move from the nose toward the ears, with shorter strokes around the eye and cheek.
Define a convention for stroke density: use three density levels, light, medium, and heavy. Light means sparse strokes with visible paper between them; medium means strokes touch but do not overlap heavily; heavy means overlapping strokes that darken the area. Apply heavy density only where form turns away from the light, such as under the belly, behind the front leg, and at the lower rump. Keep the back line and top of the head light to medium so the silhouette stays readable.
- Draw a few guide arrows on the construction body showing downward-backward flow on the chest.
- Add curved guide arrows sweeping from back to belly along the midsection.
- Fan guide arrows outward and downward on the rump.
- Draw short head strokes from nose toward ears, with shorter cheek strokes.
- Apply light, medium, and heavy density according to form turning away from the light.
Refining silhouette and shading
Once the masses and fur direction are mapped, refine the outer silhouette. The back should be nearly level, the rump high and rounded, and the belly low but not sagging. The legs are short and sturdy; the front leg attaches under the chest oval, and the hind leg under the rump oval. Keep the feet simple and blocky in side view. Erase construction lines that cut across the final contour, but leave faint guide marks where they help you check proportion.
Shade using the fur-direction strokes rather than smooth blending. Build density gradually from light to medium to heavy. Leave the top of the back and the top of the head lighter. Darken under the belly, behind the front leg, and at the lower rump. Check the drawing by stepping back: the body should read as one heavy barrel, the head should be about one quarter of the total length, and the fur strokes should follow the form rather than run in a single flat direction.
- Refine the back line to nearly level and the rump to a high, rounded block.
- Attach short, sturdy legs under the chest and rump ovals.
- Erase construction lines that cross the final contour.
- Build shading with fur-direction strokes in three density levels.
- Step back and check body mass, head proportion, and stroke flow.
Worked example
A side-view capybara is drawn with total body length 20 cm on paper. The head is marked as 5 cm, the chest oval spans 5 cm, the mid-body oval spans 5 cm, and the rump oval spans 5 cm. The chest oval is 6 cm tall, the mid-body oval is 5 cm tall, and the rump oval is 7 cm tall. The back line is level. Describe how to check the proportion and where to place heavy fur density.
Worked answer
Head length is 5 cm, which is one quarter of 20 cm, so the four-part division is correct. The rump is the tallest mass at 7 cm, the chest is 6 cm, and the mid-body is 5 cm, giving a heavy barrel silhouette with a high rump. Heavy fur density should go under the belly, behind the front leg, and at the lower rump where form turns away from the light. The back line and top of the head stay light to medium.
Four practice exercises
Exercise 1
On a 24 cm total body length, mark the four-part division. State the length of each part and the head length check.
Show answer and check
Each part is 6 cm. Head length is 6 cm, which is one quarter of 24 cm, so the check passes.
Why: Divide total length by four: 24 divided by 4 equals 6. The head occupies the first part, so head length equals 6 cm.
Check: Add the four parts: 6 plus 6 plus 6 plus 6 equals 24 cm. Confirm head length equals total length divided by four.
Exercise 2
A chest oval is 8 cm tall, a mid-body oval is 7 cm tall, and a rump oval is 9 cm tall. The back line is level. Which mass is tallest, and where should heavy fur density be placed?
Show answer and check
The rump oval is tallest at 9 cm. Heavy fur density should be placed under the belly, behind the front leg, and at the lower rump.
Why: Compare heights: 9 is greater than 8 and greater than 7, so the rump is tallest. Heavy density follows form turning away from light, which occurs under the belly, behind the front leg, and at the lower rump.
Check: Order the heights from smallest to largest: 7, 8, 9. Confirm the largest value belongs to the rump. Check that heavy density is not placed on the level back line or top of the head.
Exercise 3
Describe the fur-direction strokes for the chest, midsection, rump, and head using the lesson convention. Then state one valid alternative that still describes the form.
Show answer and check
Chest: downward and slightly backward. Midsection: sweeping from back line toward belly along the barrel curve. Rump: fanning outward and downward from the high point. Head: from nose toward ears, with shorter cheek strokes. A valid alternative is slightly more horizontal chest strokes if they still follow the downward-backward flow of the chest form.
Why: The convention ties stroke direction to local form. Each body region has a dominant flow that describes its curvature. Alternatives are valid when they preserve that form description.
Check: For each region, ask whether the strokes follow the local curve rather than running in one flat direction. Confirm the alternative still reads as downward-backward on the chest.
Exercise 4
A drawing has total body length 28 cm and head length 9 cm. The back line slopes downward from rump to shoulders. Identify two proportion or construction errors and state fixes.
Show answer and check
Error one: head length should be about one quarter of 28 cm, which is 7 cm, so 9 cm is too long. Fix: reduce head length to about 7 cm. Error two: the back line should be nearly level, not sloping downward from rump to shoulders. Fix: align the tops of the chest, mid-body, and rump ovals to a level back line before refining.
Why: The four-part division gives 28 divided by 4 equals 7 cm for the head. A sloping back line contradicts the level-back construction check.
Check: Multiply 7 by 4 to confirm 28 cm. Compare the back line to a horizontal guide; if the rump and shoulders differ noticeably in height, adjust the ovals.
Common mistakes
- Making the head too large or too pointed. Set head length to about one quarter of total body length and draw a blunt, rounded rectangle rather than a wedge.
- Drawing a sloping or curved back line. Align the tops of the chest, mid-body, and rump ovals to a nearly level back line before refining the contour.
- Using one uniform fur direction across the whole body. Map separate flow arrows for chest, midsection, rump, and head, then draw short strokes that follow each local form.
- Shading with smooth blending that erases the coarse coat. Build density with overlapping fur-direction strokes in light, medium, and heavy levels instead of blending.
- Making the legs too long or thin. Keep legs short and sturdy, attaching them under the chest and rump ovals with blocky feet in side view.
Self-check rubric
- Body length is divided into four roughly equal parts for head, chest, midsection, and rump.
- Head length is about one quarter of total body length and the head is blunt, not pointed.
- Back line is nearly level and the rump is the highest, most block-like mass.
- Belly line dips gently without a sharp V.
- Legs are short and sturdy, attached under the chest and rump ovals.
- Fur-direction strokes follow local form: downward-backward on chest, back-to-belly on midsection, outward-downward on rump, nose-to-ear on head.
- Stroke density uses at least two of the three defined levels, with heavy density where form turns away from light.
- Valid alternatives are accepted if the silhouette reads as a heavy capybara and strokes describe the form.
Questions and answers
Do I need to copy a specific capybara photo?
No. The method uses measurable proportions and fur-direction conventions so you can adapt the drawing to different references while keeping the species' heavy barrel shape.
What if my capybara is sitting or turning?
Keep the four-part length division as a starting check, but compress or overlap the mass ovals to match the pose. Recheck head length against the visible body length.
How do I know if my fur strokes are correct?
Use the convention: strokes follow the local form, with downward-backward flow on the chest, back-to-belly sweep on the midsection, outward-downward fan on the rump, and nose-to-ear flow on the head. Valid alternatives exist if the strokes still describe the form.
Can I use smooth shading anywhere?
Keep shading stroke-based to preserve the coarse coat. If you blend, do so lightly and only after the fur-direction strokes are established.