Free original lessons
Draw a Rooster: Comb, Tail Feathers, and Body Construction
Learn a repeatable method for drawing a rooster with clear comb shapes, a fan of tail feathers, and a balanced body, using simple measured proportions and self-checks.
Free lesson
Four exercises
Worked answers
Object Drawing Lessons
This lesson teaches a construction method for drawing a rooster, not a single finished style. You will build the body from a few measured ovals, place the comb and wattle with simple shapes, and lay out tail feathers as a fan. A convention is defined so you can check your work: x-height means the distance from the baseline to the midline of a letter, and letter styles vary, so treat all letter-based measurements as guides rather than fixed rules. All numerical values here are hypothetical examples chosen for practice; measure your own paper and tools if you adapt them. The method works for standing and crowing poses and leaves room for your own line quality and feather detail.
Practice materials: Printable downloads are not available for this lesson yet. Use the instructions and four exercises below.
Reference illustration
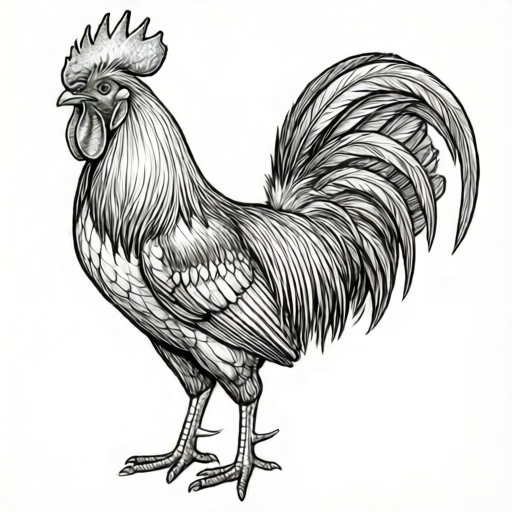
Use the stated measurements and conventions for each exercise.
Set up the page and choose a scale
Decide the overall height of the rooster on your page. As a hypothetical example, use a body height of 12 cm from the ground line to the top of the back, and a total height of 18 cm including the comb. Mark a ground line and a top guide line. These two lines keep the bird from drifting up or down the page.
Define your x-height convention before drawing. On a separate strip of paper, write a lowercase x in your normal handwriting. The distance from the baseline of that x to its midline is your x-height. Letter styles vary, so your x-height may differ from a classmate's; that is expected. Use your own x-height as a repeatable unit for small features such as the eye and the wattle.
Choose a light pencil for construction lines and a darker tool for the final outline. Keep construction lines visible until the end so you can compare shapes and correct them.
- Draw a horizontal ground line near the lower third of the page.
- Mark a top guide line at your chosen total height.
- Write a lowercase x on scrap paper and measure baseline to midline; record this as your x-height.
- Lightly mark the body height and total height on the page using your chosen scale.
Build the body from measured ovals
The rooster body is a tilted oval, wider at the chest and narrower toward the tail. As a hypothetical example, make the body oval 9 cm long and 6 cm tall, tilted about 20 degrees so the chest is lower than the tail base. Place the oval so its lowest point sits just above the ground line, leaving room for the legs.
Add a smaller circle for the head above and slightly forward of the body. A hypothetical head diameter of 3 cm works with the 9 cm body oval. Connect head and body with a short neck curve. The neck should be narrower than the head and body so the silhouette reads clearly.
Check the balance: the head should sit over the front third of the body, not the center. If the head is centered, the rooster will look like a duck. Adjust the head circle forward before adding details.
- Draw a tilted oval for the body, chest lower and tail base higher.
- Place a smaller circle for the head above and forward of the body.
- Connect the head and body with two short neck curves.
- Check that the head sits over the front third of the body.
Place the comb, wattle, and face
The comb sits on top of the head and is drawn as a row of rounded bumps. As a hypothetical example, use three bumps, each about half your x-height tall, rising from the top of the head circle. The comb should follow the curve of the head, not sit as a flat bar.
The wattle hangs below the beak. Draw the beak as a small triangle pointing forward, then add a rounded wattle below it about one x-height long. The eye is a small dot or short dash placed about one x-height behind the beak and slightly above the midline of the head.
Because letter styles vary, your x-height may make the comb and wattle larger or smaller than a classmate's. That is acceptable if the proportions stay consistent within your own drawing. The check is internal consistency, not matching a single universal size.
- Draw three rounded bumps on top of the head for the comb.
- Add a small forward-pointing triangle for the beak.
- Hang a rounded wattle below the beak, about one x-height long.
- Place the eye one x-height behind the beak and slightly above the head midline.
Lay out the tail-feather fan
The tail feathers form a fan rising from the tail base at the back of the body oval. As a hypothetical example, draw five long curved feathers, each about 10 cm long, spreading through a 60-degree arc. Start each feather at the same tail base point so the fan has a clear origin.
Draw the longest central feather first, then add shorter feathers on each side. Vary the curve slightly so the fan looks natural rather than mechanical. Keep the feather tips rounded or slightly pointed, but be consistent within the drawing.
Check the fan against the body: the fan should rise above the back line and extend behind the body. If the fan overlaps the head or sits below the back, adjust the tail base point or the feather angles.
- Mark the tail base at the back of the body oval.
- Draw the longest central tail feather first.
- Add two shorter feathers on each side within a 60-degree arc.
- Check that the fan rises above the back and extends behind the body.
Worked example
Draw a standing rooster using a 9 cm by 6 cm body oval tilted 20 degrees, a 3 cm head circle placed over the front third of the body, a three-bump comb, a one x-height wattle, and a five-feather tail fan spreading through 60 degrees.
Worked answer
The finished drawing shows a tilted body oval with the chest lower than the tail base, a head circle forward of center, a comb of three rounded bumps following the head curve, a small triangular beak with a rounded wattle below, and five curved tail feathers rising from one tail base point in a fan. The legs are two short lines from the lower body to the ground line. The silhouette reads as a rooster because the head is forward, the comb is on top, and the tail fan rises behind.
Four practice exercises
Exercise 1
A student draws a body oval 8 cm long and 5 cm tall, then places a 2.5 cm head circle centered over the middle of the oval. Using the lesson's placement rule, describe where the head should move and why.
Show answer and check
The head should move forward so it sits over the front third of the body oval, because a centered head makes the silhouette read as a duck rather than a rooster.
Why: The lesson states the head belongs over the front third of the body. Centering removes the forward-leaning rooster silhouette, so moving the head forward corrects the balance.
Check: Measure the body oval length, divide by three, and confirm the head center lies within the front third nearest the chest.
Exercise 2
A drawing uses a comb of three bumps, each 1 cm tall, and a wattle 2 cm long. The student's x-height is 1 cm. State whether the wattle is consistent with the x-height convention and give the corrected length if not.
Show answer and check
The wattle is not consistent; it should be about 1 cm long to match one x-height, so the corrected length is 1 cm.
Why: The lesson sets the wattle at about one x-height. With an x-height of 1 cm, a 2 cm wattle is twice the convention, so it should be shortened to 1 cm.
Check: Compare the wattle length to the recorded x-height; they should be approximately equal.
Exercise 3
Five tail feathers are drawn from three different starting points on the back of the body. Describe the correction needed and the check you would use after correcting.
Show answer and check
Move all five feathers so they start from one tail base point at the back of the body oval, then check that the fan spreads through a consistent arc and rises above the back line.
Why: The lesson anchors all tail feathers at one tail base point so the fan reads as a single structure. Multiple starting points break the fan construction.
Check: Trace each feather back to its start; all should meet at the same tail base point, and the fan should rise above the back and extend behind the body.
Exercise 4
A student's x-height is 0.8 cm. They draw the eye 0.8 cm behind the beak and the comb bumps 0.4 cm tall. Using the lesson's conventions, state whether the eye placement and comb height are consistent, and explain.
Show answer and check
The eye placement is consistent because it is one x-height behind the beak. The comb bumps at 0.4 cm are half the x-height, which is consistent with the hypothetical example of bumps about half an x-height tall.
Why: The lesson places the eye one x-height behind the beak and gives comb bumps about half an x-height tall as an example. Both values match the student's 0.8 cm x-height.
Check: Measure the eye-to-beak distance and compare it to the recorded x-height; measure one comb bump and compare it to half the x-height.
Common mistakes
- Centering the head over the body oval. Move the head circle forward so it sits over the front third of the body; this creates the rooster's forward-leaning silhouette.
- Drawing the comb as a flat bar instead of following the head curve. Draw the comb bumps along the curve of the head circle, with each bump rising from the head outline.
- Making the tail feathers start from different points. Anchor all tail feathers at one tail base point so the fan reads as a single structure.
- Using inconsistent x-height for the eye, wattle, and comb. Measure your x-height once on scrap paper and use that same unit for all small features in the drawing.
Self-check rubric
- Body oval is tilted with the chest lower than the tail base and sits above the ground line.
- Head circle is placed over the front third of the body, not centered.
- Comb is drawn as rounded bumps following the head curve.
- Wattle hangs below the beak and is consistent with the chosen x-height.
- Tail feathers all start from one tail base point and spread in a clear fan.
- Construction lines are light and final outline is clear.
- Proportions are internally consistent, even if they differ from the hypothetical example values.
Questions and answers
Do I have to use the hypothetical measurements given?
No. The numbers are examples for practice. Measure your own paper and choose a scale that fits, then keep your chosen values consistent throughout the drawing.
What if my handwriting x-height is very small or very large?
That is fine. Letter styles vary, so your x-height is a personal unit. Use it consistently for the eye, wattle, and comb bumps, and check internal consistency rather than matching a fixed size.
Can I draw the rooster in a crowing pose?
Yes. Tilt the head upward, open the beak slightly, and raise the neck curve. Keep the body oval and tail fan construction the same, and adjust the head position so it still sits over the front third of the body.
How many tail feathers should I draw?
Five is a practical example, but three to seven works. Keep all feathers anchored at one tail base point and spread them through a consistent arc.