Free original lessons
Draw a Silverback Gorilla: Head, Chest and Knuckle-Walk Pose
Learn to draw a silverback gorilla with correct head proportion, heavy chest and shoulder mass, and a believable knuckle-walk stance using simple landmarks and checks.
Free lesson
Four exercises
Worked answers
Object Drawing Lessons
This lesson builds a silverback gorilla drawing from three linked decisions: head size and placement, chest and shoulder mass, and the knuckle-walk limb arrangement. You will use a defined proportion convention and checkable landmarks rather than copying a single style. All measurements are relative to the gorilla's own body, so the drawing can be scaled to any paper size. The convention treats the top of the head as the crown, the eye line as a horizontal through the eyes, and the shoulder line as the highest point of the back mass behind the neck. X-height is baseline to midline for any lettering you add; letter styles vary, so labels may be printed or cursive as long as they are legible. Numerical examples are hypothetical and should be replaced by measurements of your actual paper and tools.
Practice materials: Printable downloads are not available for this lesson yet. Use the instructions and four exercises below.
Reference illustration
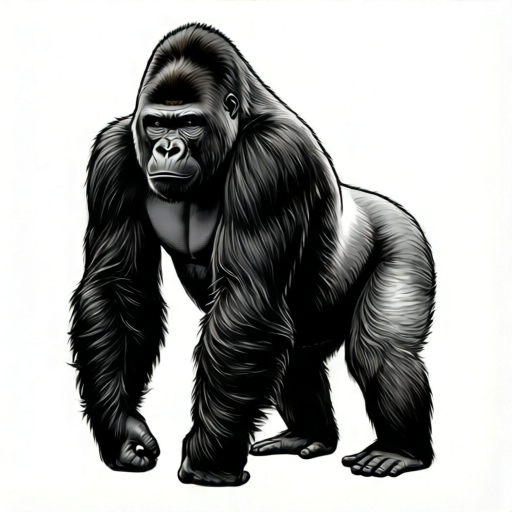
Use the stated measurements and conventions for each exercise.
Set the head proportion and eye line
Begin with a light vertical axis for the body and a horizontal eye line. In this convention, the silverback head is drawn as a rounded wedge: the crown is the highest point, the brow ridge sits just above the eye line, and the muzzle projects forward below the eyes. A workable starting ratio is that the head length from crown to chin is about one-fifth of the shoulder height, defined here as the vertical distance from the shoulder line to the ground line in the drawn pose. Treat this as a hypothetical example and adjust after measuring your own reference or paper.
Place the eye line roughly halfway between crown and chin. The sagittal crest, the raised ridge along the top of the skull, adds height behind the brow. Keep the ears small and set low, near the jaw line. The muzzle should be broad but not long; a common error is to stretch it like a chimpanzee's.
- Draw a light vertical body axis and a horizontal eye line.
- Mark crown, eye line, and chin so the eye line is near the midpoint.
- Add a low brow ridge just above the eye line and a broad muzzle below it.
- Place small ears at jaw level and check that the head reads as a rounded wedge, not a circle.
Build chest and shoulder mass
The silverback's silhouette is dominated by a deep chest and high shoulder mass. In the knuckle-walk pose, the back slopes from the high shoulders down toward the hips. Draw the chest as a broad oval whose width is about one and a half head widths; this is a hypothetical starting value, not a fixed rule. The shoulder mass sits above and behind the chest oval, creating the characteristic hump.
Keep the neck short and thick so the head appears to sit directly on the shoulder mass. The chest should project forward of the front limbs, and the belly should be lower than the chest but not sagging. Check the mass by comparing the vertical distance from shoulder line to chest bottom with the head length; they should be similar in this convention.
- Draw a broad chest oval centered on the body axis.
- Add a shoulder mass above and behind the chest, forming a sloping back line.
- Connect the head to the shoulder mass with a short, thick neck.
- Check that the chest projects forward and that the belly sits lower but does not sag.
Place the knuckle-walk limbs
In knuckle-walk, the front limbs are longer than the hind limbs in appearance because the body is tilted. The arms reach down and slightly forward, with the wrists bent so the knuckles contact the ground. Draw the front arm as two segments: upper arm from shoulder to elbow, forearm from elbow to wrist. The elbow should sit near the chest bottom, and the wrist should be roughly under the shoulder or slightly forward.
The hind limbs are bent, with the feet flat and the knees forward. The hips sit lower than the shoulders. A simple check is that the shoulder line is higher than the hip line by about one head length. The knuckles of both hands should rest on the same ground line, and the feet should also meet that line. Avoid straight, stiff arms; the wrist bend is what makes the pose read as knuckle-walking.
- Draw a ground line and mark two knuckle contact points and two foot contact points.
- Sketch the front arm from shoulder to elbow to wrist, bending the wrist so knuckles touch the ground.
- Sketch the hind limb from hip to knee to ankle, with the foot flat on the ground line.
- Check that shoulders are higher than hips and that all four contact points meet the ground line.
Refine the silverback features and check the whole pose
Add the silverback's silver-gray saddle across the back and shoulders, contrasting with the darker body fur, but keep it as a simple band rather than individual hairs. The face should show a heavy brow, close-set eyes, and a broad nose. The hands are large; draw the knuckles as a rounded block rather than separate fingers. The feet are also large and flat.
Finish by checking three relationships: head length to shoulder height (shoulder line to ground line in the drawn pose), chest width to head width, and shoulder-to-hip height difference. If the head-to-body ratio is off, adjust whichever is easier to change; the worked example reduces an oversized head, while other mismatches may be fixed by adjusting chest or limb mass. When you change head length, keep the crown, eye line, brow ridge, and muzzle landmarks in their relative positions so the head still reads correctly. Keep line weight light until the pose is confirmed.
- Add a simple saddle band across the back and shoulders.
- Draw the brow, eyes, nose, and a rounded knuckle block on each hand.
- Compare head length, chest width, and shoulder-to-hip height against the convention.
- Adjust chest or limb mass first, then darken confirmed lines.
Worked example
A learner draws a knuckle-walk silverback on a 20 cm tall sheet. They set the shoulder line 18 cm above the ground line and head length at 5 cm. The chest width is 4 cm, and the shoulder line is 2 cm above the hip line. Using the convention that head length is about one-fifth of shoulder height (shoulder line to ground line), chest width is about one and a half head widths, and shoulder-to-hip difference is about one head length, identify the proportion problems and state corrections.
Worked answer
Head length should be about one-fifth of 18 cm, which is 3.6 cm, but it is 5 cm, so the head is too large. Chest width should be about 1.5 times head width; if head width is roughly 3 cm, chest width should be about 4.5 cm, so 4 cm is slightly narrow. The shoulder-to-hip difference of 2 cm is much less than the corrected head length of about 3.6 cm, so the shoulder mass should be raised or the hips lowered to increase the difference toward about 3.6 cm. Correction: reduce head length toward 3.6 cm, widen the chest slightly toward 4.5 cm, and raise the shoulder mass or lower the hips by roughly 1.6 cm so the shoulder-to-hip difference approaches the corrected head length of about 3.6 cm.
Four practice exercises
Exercise 1
On a sheet where you set the shoulder line 15 cm above the ground line, use the convention that head length is about one-fifth of shoulder height. Calculate the target head length and state one landmark you will mark first.
Show answer and check
Target head length is about 3 cm. Mark the crown first, then the eye line near the midpoint of the head length.
Why: One-fifth of 15 cm is 3 cm. The crown is the highest point and anchors the head proportion check.
Check: Measure the drawn head from crown to chin and compare with 3 cm; adjust before adding detail.
Exercise 2
A drawing has the shoulder line 4 cm above the hip line and head length 3 cm. Using the convention that shoulder-to-hip difference is about one head length, is the pose acceptable? Explain.
Show answer and check
The shoulder-to-hip difference is 4 cm versus a target of about 3 cm, so the difference is about 1 cm too large; lower the shoulder mass or raise the hips to reduce the difference toward 3 cm.
Why: The convention compares the vertical difference with head length; a 1 cm mismatch is large enough to change the silhouette.
Check: Measure the vertical distance between shoulder and hip lines and compare it with the measured head length.
Exercise 3
Describe where to place the knuckle contact points and foot contact points for a knuckle-walk pose, and state one check that confirms the limb placement.
Show answer and check
Place two knuckle points and two foot points on the same ground line, with the wrists bent so knuckles touch and the feet flat. Check that all four points meet that line and that the elbows sit near the chest bottom.
Why: A shared ground line makes the pose readable and prevents floating limbs; bent wrists distinguish knuckle-walking from standing.
Check: Draw a single horizontal ground line and confirm each contact point touches it.
Exercise 4
A learner's chest width is 5 cm and head width is 4 cm. Using the convention that chest width is about one and a half head widths, calculate the target chest width and state whether the drawn chest is too wide or too narrow.
Show answer and check
Target chest width is about 6 cm, so the drawn chest at 5 cm is too narrow by about 1 cm.
Why: One and a half times 4 cm is 6 cm; comparing the drawn value with the target shows the direction of correction.
Check: Measure chest width across the widest part and compare with 1.5 times the measured head width.
Common mistakes
- Drawing the head too large relative to the chest. Measure head length and compare it with shoulder height, measured from the shoulder line to the ground line in the drawn pose; if the head is more than about one-fifth of that height, reduce it or enlarge the chest and shoulder mass.
- Making the arms straight and vertical. Bend the wrist so the knuckles contact the ground and place the elbow near the chest bottom; the arm should read as two segments, not one straight line.
- Placing the shoulders level with or lower than the hips. Raise the shoulder mass and slope the back downward toward the hips; check that the shoulder line is higher than the hip line by roughly one head length.
- Stretching the muzzle like a chimpanzee's. Keep the muzzle broad and short, with the brow ridge close above the eye line; compare muzzle length with head length and shorten if needed.
Self-check rubric
- Head landmarks are present: crown, eye line near midpoint, low brow ridge, broad short muzzle.
- Head length is checked against shoulder height (shoulder line to ground line in the drawn pose) using the stated convention, with any numerical values labeled as hypothetical.
- Chest and shoulder mass are distinct, with the shoulder line higher than the hip line.
- Front limbs show a bent wrist with knuckles on the ground line; hind limbs show bent knees and flat feet.
- All four contact points meet the same ground line.
- The saddle band is simple and does not obscure the body structure.
- Labels, if used, follow the x-height convention from baseline to midline and are legible in any letter style.
Questions and answers
How do I know if the head proportion is correct?
Use the convention that head length from crown to chin is about one-fifth of shoulder height, measured from the shoulder line to the ground line in the drawn pose. Measure both on your drawing; if the ratio is far off, adjust the head or the body mass before adding detail.
Where should the knuckles touch the ground?
Both hands should meet the same ground line as the feet. The wrists bend so the knuckles, not the palms, contact the ground. The contact points can be slightly forward of the shoulders.
Can I use a different head shape?
Yes. The convention defines landmarks, not a single style. As long as the crown, eye line, brow ridge, and broad muzzle are present and the head-to-body ratio is checked, valid alternatives are acceptable.
What if my paper is a different size?
All proportions are relative, so scale the whole drawing to your paper. Measure your actual paper and tools, and label any numerical example you choose as hypothetical.