Free original lessons
Draw an All-Seeing Eye Emblem with Rayed Triangle
Construct a symmetrical all-seeing eye emblem: triangle, centered eye, radiating rays, and a clear symmetry axis, with checks and four practice tasks.
Free lesson
Four exercises
Worked answers
Object Drawing Lessons
This guide teaches a repeatable construction for an all-seeing eye emblem: an eye centered inside a triangle, with rays radiating outward and a single vertical symmetry axis. The method uses simple geometry and a defined drawing convention so you can check your work. You will set a center point, build the triangle, place the eye, add rays, and verify symmetry. All measurements are hypothetical examples; measure your own paper and tools. The convention for the eye is explicit: the upper lid is an arc from the outer corner to the inner corner, the lower lid is a shallower arc, and the iris is a circle centered between the lids. Letter styles and line weights may vary; the rubric accepts valid alternatives that preserve symmetry and proportion.
Practice materials: Printable downloads are not available for this lesson yet. Use the instructions and four exercises below.
Reference illustration
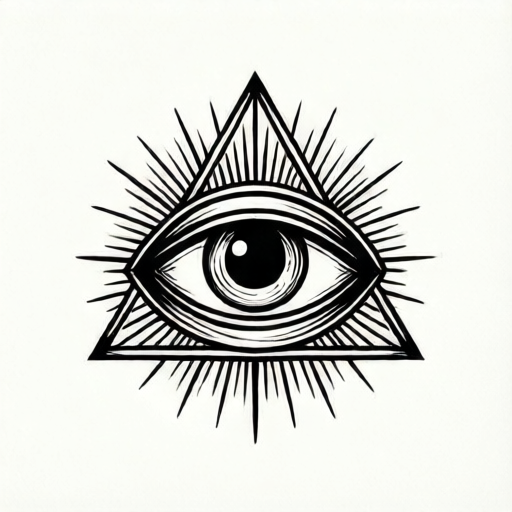
Use the stated measurements and conventions for each exercise.
Set the center and symmetry axis
Place your paper in landscape orientation. Mark a center point C near the middle. Draw a light vertical line through C; this is the symmetry axis. Every feature will be mirrored across this line. Use a ruler or straightedge and a pencil you can erase.
Choose a triangle height H as a hypothetical example, such as 12 cm, and a base width B, such as 14 cm. Measure your actual paper first so the emblem fits with a margin. Define C as the midpoint of the triangle height: mark the top vertex T at distance H/2 above C, and mark the two base vertices L and R at distance H/2 below C, at equal distances B/2 left and right of the axis. For the example, H/2 is 6 cm and B/2 is 7 cm, so the base vertices are 6 cm below C, and the base is 12 cm below T.
- Mark center C and draw the vertical symmetry axis.
- Mark top vertex T on the axis.
- Mark base vertices L and R at equal distances from the axis.
- Connect T to L, T to R, and L to R to form the triangle.
Place the eye inside the triangle
The eye sits on the symmetry axis, centered horizontally. Choose an eye width W as a hypothetical example, such as 6 cm, and an eye height E, such as 3 cm. The eye center O lies on the axis below T. A practical placement is one-third of the triangle height below T, measured along the axis. With the example triangle height of 12 cm, that places O 4 cm below T.
Draw the upper lid as an arc from the left corner to the right corner, peaking at the top of the eye height. Draw the lower lid as a shallower arc from the same corners, dipping to the bottom of the eye height. The iris is a circle centered at O with diameter no more than half the eye height; reduce it if needed so the circle stays fully inside the drawn lids. Erase construction lines only after checking symmetry.
- Mark eye center O on the axis.
- Mark left and right eye corners at equal distances W/2 from the axis.
- Draw the upper lid arc and lower lid arc between the corners.
- Draw the iris circle centered at O.
- Check that left and right distances from the axis match.
Add radiating rays
Rays radiate outward from the triangle. Use a consistent count, such as 12 rays, as a hypothetical example. Place one ray start exactly at the top vertex T so the top ray lies on the symmetry axis. For the remaining starts, choose an explicit number of mirrored side pairs. For 12 rays, use 5 side pairs: mark them at evenly spaced heights along the two equal sides, excluding the base vertices, and reflect each left-side point across the axis to its right-side partner. Then place the final start where the axis meets the base. This gives 1 + 10 + 1 = 12 starts.
Each ray starts just outside the triangle edge and extends outward by a fixed length, such as 2 cm. Draw each ray outward from its edge, then mirror each left-side ray across the axis to define the matching right-side ray, so left and right rays match. Vary ray length only if you state a rule, such as alternating long and short rays, and apply it symmetrically.
- Choose a ray count and a fixed ray length.
- Mark the top vertex T as the first ray start on the axis.
- Mark the chosen number of mirrored side pairs at evenly spaced heights along the equal sides, excluding the base vertices.
- Place any remaining start at the axis-base intersection if the count is odd.
- Draw each ray outward from its edge, then mirror it across the axis so left and right rays match.
Refine line weight and shading
Use a heavier line for the triangle and eye outline, and a lighter line for rays and construction marks. Shading is optional; if used, keep it symmetrical. A simple convention is to shade the iris darker than the lids and leave the rays unshaded. Avoid realistic eye shading; this is an emblem, not a portrait.
Check the final drawing against the rubric: symmetry, centered eye, even ray spacing, and clean line hierarchy. Valid alternatives include different ray counts, alternate long-short ray patterns, and varied line weights, provided the symmetry axis and centered eye are preserved.
- Trace final lines with consistent weight.
- Apply optional symmetrical shading.
- Erase construction marks.
- Run the symmetry and spacing checks.
Worked example
Construct an emblem with triangle height 12 cm, base 14 cm, eye width 6 cm, eye height 3 cm, and 12 rays of length 2 cm. Describe the placement and checks.
Worked answer
Mark center C and a vertical axis. Place top vertex T 6 cm above C. Place base vertices L and R 7 cm left and right of the axis, 6 cm below C. Connect T-L, T-R, L-R. Place eye center O on the axis one-third of the triangle height below T, which is 4 cm below T. Mark eye corners 3 cm left and right of the axis. Draw upper and lower lid arcs peaking and dipping 1.5 cm from O. Draw an iris circle of diameter 1.5 cm centered at O; this equals the maximum half-eye-height limit. For 12 rays, mark the top vertex T as one ray start on the axis. Then mark 5 mirrored pairs of start points at evenly spaced heights along the two equal sides, excluding the base vertices, reflecting each left-side point across the axis. Place the final start where the axis meets the base, giving 1 + 10 + 1 = 12 starts. Draw each ray 2 cm outward from its edge, then mirror each left-side ray across the axis to define the matching right-side ray. Check: left and right eye corners are 3 cm from the axis; iris diameter 1.5 cm equals half the eye height 3 cm; each left-side ray start has a matching right-side start at the same perpendicular distance from the axis.
Four practice exercises
Exercise 1
Using triangle height 10 cm and base 12 cm, place the eye center one-third of the height below the top vertex. State the distance from the top vertex to the eye center.
Show answer and check
The eye center is 10/3 cm, about 3.33 cm, below the top vertex.
Why: One-third of the triangle height is 10 divided by 3. This places the eye on the axis at a consistent proportional position.
Check: Measure from the top vertex down the axis; the distance should be about 3.33 cm. Confirm the eye center lies on the axis.
Exercise 2
An eye has width 8 cm and height 4 cm. What is the maximum iris diameter that keeps the iris fully inside the lids if the iris is centered?
Show answer and check
The maximum iris diameter is 2 cm, half the eye height, per the stated convention.
Why: The convention limits the iris diameter to no more than half the eye height. Half of 4 cm is 2 cm, so a centered iris larger than 2 cm would violate the stated rule.
Check: Draw a 2 cm circle centered at the eye center; it should stay fully inside the lids with a gap above and below. A larger circle would exceed the half-height limit.
Exercise 3
You want 10 rays placed symmetrically on an isosceles triangle: one ray start at the top vertex on the symmetry axis, then mirrored pairs of start points placed by reflection across the axis. If you place 4 mirrored pairs along the two equal sides, and each pair is at a perpendicular distance from the axis of 1 cm, 2 cm, 3 cm, and 4 cm respectively, how many ray starts are on the sides, and how many remain for the base?
Show answer and check
The 4 mirrored pairs give 8 ray starts on the sides (4 left + 4 right). With the top vertex already counted, 10 - 1 - 8 = 1 start remains, placed where the axis meets the base.
Why: Each mirrored pair contributes two starts, one on each side, at equal perpendicular distance from the axis. Four pairs give 8 starts. The top vertex is 1 start on the axis. Subtracting from the total of 10 leaves 1 start for the base-axis intersection, which keeps the count odd and symmetric.
Check: Count the starts: 1 top vertex + 4 left + 4 right + 1 base-axis point = 10 rays. Confirm each left-side start has a matching right-side start at the same perpendicular distance from the axis.
Exercise 4
A drawing has left eye corner 2.5 cm from the axis and right eye corner 3.0 cm from the axis. Is the eye centered? If not, what adjustment makes it centered?
Show answer and check
No. Move the right corner inward by 0.5 cm, or move the left corner outward by 0.5 cm, so both are 2.75 cm from the axis.
Why: Centering requires equal distances from the axis. The average of 2.5 and 3.0 is 2.75 cm.
Check: Measure both corner distances after adjustment; they should match at 2.75 cm.
Common mistakes
- The eye is not centered on the symmetry axis. Measure equal distances from the axis to the left and right eye corners; adjust until they match.
- Rays are unevenly spaced or not mirrored. Mark start points in mirrored pairs by reflection across the axis, then mirror each ray before drawing.
- The iris touches or crosses the lids. Reduce the iris diameter or increase eye height so the circle stays fully inside.
- The triangle is not isosceles. Check that base vertices are equal distances from the axis and that both sides have equal length.
Self-check rubric
- Symmetry axis is vertical and all features are mirrored across it.
- Triangle is isosceles with equal side lengths and equal base distances from the axis.
- Eye is centered on the axis with equal left and right corner distances.
- Iris is fully inside the lids and centered at the eye center.
- Rays are evenly spaced, mirrored, and consistent in length or follow a stated symmetric pattern.
- Line hierarchy is clear: main shapes heavier, rays and construction marks lighter.
- Valid alternatives are accepted if symmetry, centering, and stated rules are preserved.
Questions and answers
Must the eye be exactly in the triangle center?
No. A common placement is one-third of the triangle height below the top vertex, but any centered placement on the axis is valid if stated and consistent.
How many rays should I draw?
Any consistent count works. Twelve is a hypothetical example. Keep spacing even and mirror rays across the axis.
Can I use different line weights?
Yes. Use heavier lines for main shapes and lighter lines for rays or construction marks, as long as the hierarchy is clear.
Is shading required?
No. Shading is optional. If used, keep it symmetrical and avoid realistic eye shading.