Free original lessons
Desert Mountains Drawing: Layered Ridges and Cacti
Plan a desert mountain scene by building three ridge layers, placing cacti by depth, and checking overlap, scale, and spacing with simple measurements.
Free lesson
Four exercises
Worked answers
Object Drawing Lessons
A desert mountain drawing reads clearly when depth is built in layers rather than drawn as one outline. This lesson uses three ridge silhouettes, a cactus shape breakdown, and a blank landscape panel to compose background, midground, and foreground. You will decide where each ridge sits, how much of it overlaps the next, and where cacti belong so scale supports distance. The convention for judging line placement is simple: treat the baseline as the ground line and the midline as the visual center of each shape; letter styles and hand pressure may vary, so judge structure, not neatness. All measurements below are hypothetical examples chosen for practice; measure your own paper and tools before drawing.
Practice materials: Printable downloads are not available for this lesson yet. Use the instructions and four exercises below.
Reference illustration
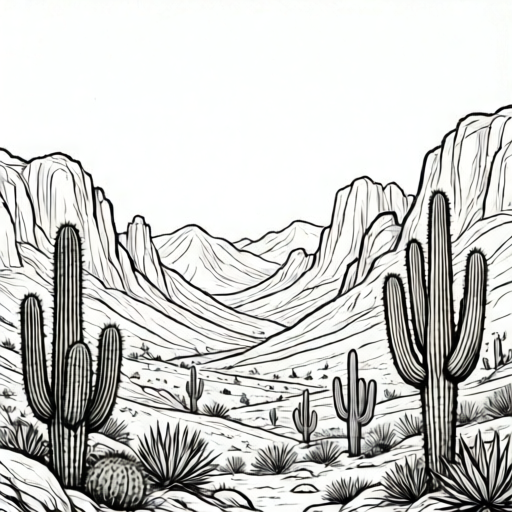
Use the stated measurements and conventions for each exercise.
Set the panel and the three ridge guides
Divide the drawing panel into three horizontal bands using light guide lines. For a hypothetical 18 cm by 24 cm panel, place the background ridge guide at 6 cm from the top, the midground guide at 12 cm, and the foreground guide at 18 cm. These are example values, not standards; adjust them to your paper.
Each ridge is a silhouette, not a full mountain. Draw only the top edge and the sides that meet the panel edge or a lower ridge. Keep the background ridge highest and simplest, the midground ridge more varied, and the foreground ridge lowest and largest in scale.
- Measure your panel height and mark three guide lines at roughly one-quarter, one-half, and three-quarters down.
- Sketch the background ridge as a slow, wide zigzag that stays near its guide line.
- Sketch the midground ridge with two or three sharper peaks that overlap the background ridge.
- Sketch the foreground ridge as a low, broad shape that overlaps the midground ridge.
- Label each ridge lightly as background, midground, or foreground before adding cacti.
Break the cactus into checkable shapes
A cactus in this scene is built from a vertical trunk and one or two side arms. Use a rounded rectangle for the trunk and smaller rounded rectangles for arms, then join them with curved elbows. The baseline is the ground contact point; the midline is the vertical center of the trunk. Judge the shape by whether the trunk is upright and the arms attach above the midpoint.
Scale follows depth. A background cactus may be only 1 cm tall on the hypothetical panel, a midground cactus 3 cm, and a foreground cactus 6 cm. These numbers are examples; the check is that nearer cacti are larger and lower on the panel than farther ones.
- Draw the trunk as a narrow rounded rectangle, keeping its midline vertical.
- Add one arm on the left or right, attaching above the trunk midpoint.
- Add a second arm only if it does not cross the first arm.
- Round the top of the trunk and the tips of the arms.
- Add short vertical spine marks at consistent spacing along the edges.
Compose overlap and spacing
Overlap is the main depth cue. A nearer ridge must cover part of the ridge behind it, and a foreground cactus must cover part of the foreground ridge. Leave a clear gap between separate cacti so silhouettes do not merge accidentally.
Check spacing with simple arithmetic. If three foreground cacti are placed across a 12 cm width, example gaps of 3 cm, 3 cm, and 3 cm leave 3 cm for margins. Adjust the numbers to your panel and confirm the total equals the panel width.
- Place background cacti first, small and near the background ridge line.
- Place midground cacti so their bases sit on or just below the midground ridge.
- Place foreground cacti last, largest and lowest, overlapping the foreground ridge.
- Check that no cactus floats above its ridge without a ground contact point.
- Erase guide lines only after the overlap order is clear.
Finish with contrast and a self-check
Strengthen the nearest ridge and foreground cacti with slightly darker edges, and keep background edges lighter. This is a contrast choice, not a required shading system. Valid alternatives include stippling, hatching, or plain outlines, as long as the layer order remains readable.
Use the rubric to check structure: three distinct ridges, correct overlap, cacti scaled by depth, upright trunks, and consistent ground contact. Handwriting and letter styles do not affect the score.
- Darken the foreground ridge edge and foreground cactus outlines.
- Keep background ridge edges lighter than midground edges.
- Confirm each cactus touches a ridge or ground line.
- Confirm nearer cacti are larger than farther cacti.
- Label the three layers on a separate check sheet, not on the final drawing.
Worked example
On a hypothetical 16 cm wide panel, place three foreground cacti with equal gaps and 2 cm margins on each side. Find the gap width.
Worked answer
The usable width is 16 minus 2 minus 2 equals 12 cm. Three cacti create two gaps between them, so each gap is 12 divided by 2 equals 6 cm. Check: 2 plus 6 plus 6 plus 2 equals 16 cm.
Why: Subtract the margins first, then divide the remaining width by the number of gaps, not the number of cacti.
Check: Add the margins and gaps back together and confirm the total equals the panel width.
Four practice exercises
Exercise 1
A hypothetical panel is 20 cm wide with 3 cm margins on each side. You place two cacti with one gap between them. Find the gap width.
Show answer and check
The usable width is 20 minus 3 minus 3 equals 14 cm. With one gap, the gap is 14 cm.
Why: Subtract both margins, then divide by the number of gaps, which is one.
Check: Add 3 plus 14 plus 3 and confirm the total is 20 cm.
Exercise 2
A background cactus is 2 cm tall, a midground cactus is 4 cm tall, and a foreground cactus is 7 cm tall. State whether the scale order is correct and why.
Show answer and check
Yes. The heights increase from background to foreground: 2 cm, then 4 cm, then 7 cm.
Why: Nearer objects should appear larger in this layered convention.
Check: Compare the three heights in order and confirm each nearer value is greater than the one behind it.
Exercise 3
On a hypothetical 24 cm tall panel, ridge guides are planned at 6 cm, 12 cm, and 18 cm from the top. Find the spacing between consecutive guides and state whether the spacing is equal.
Show answer and check
The spacings are 12 minus 6 equals 6 cm, and 18 minus 12 equals 6 cm. The spacing is equal at 6 cm.
Why: Subtract each guide position from the next to find the interval.
Check: Add 6 plus 6 plus 6 and confirm the last guide is 18 cm from the top.
Exercise 4
A foreground cactus trunk is drawn 5 cm tall with its base on the foreground ridge. Its left arm attaches 1 cm above the base. State whether the arm attachment is above the trunk midpoint and give the midpoint height.
Show answer and check
The midpoint is 5 divided by 2 equals 2.5 cm above the base. The arm at 1 cm is below the midpoint, so it does not meet the convention.
Why: The midpoint is half the trunk height; compare the attachment height to that value.
Check: Measure the trunk height, halve it, and confirm the arm attachment is greater than the half-height.
Common mistakes
- Drawing all three ridges at the same height and scale. Move the background ridge higher, the midground ridge to the middle, and the foreground ridge lower, and make nearer ridges broader.
- Letting a background cactus appear larger than a foreground cactus. Recheck the height order: background smallest, midground medium, foreground largest.
- Attaching cactus arms at the very top or bottom of the trunk. Attach arms above the trunk midpoint so the elbow shape is visible.
- Leaving a cactus floating without a ground contact point. Extend the trunk base to the ridge line or ground line and mark the baseline.
Self-check rubric
- Three distinct ridge layers are present and labeled by position: background, midground, foreground.
- Nearer ridges overlap farther ridges at least once.
- Cacti are scaled by depth: background smallest, foreground largest.
- Each cactus trunk is upright and each arm attaches above the trunk midpoint.
- Each cactus has a visible ground contact point on a ridge or ground line.
- Spacing between cacti is checkable by simple arithmetic and consistent units.
- Valid alternatives in line style, shading, and cactus arm count are accepted if structure and scale remain correct.
Questions and answers
How many ridge layers should the scene have?
Use three: background, midground, and foreground. Three layers give clear overlap without crowding the panel.
Can I use different cactus shapes?
Yes. The convention allows rounded trunks and one or two arms; valid alternatives include columnar or branched shapes as long as scale and ground contact are correct.
Do the example measurements have to match my paper?
No. The 18 cm by 24 cm panel and the 6 cm, 12 cm, and 18 cm guides are hypothetical examples. Measure your own panel and choose proportional values.
How do I check overlap without erasing?
Trace the nearer edge lightly and confirm it crosses over the farther edge at least once. If no crossing exists, the layers may look flat.