Free original lessons
Draw a 1920s Flapper: Fringe Dress and Headband Guide
Learn to draw a flapper figure with a beaded fringe dress and feathered headband using simple pose, proportion, and texture steps.
Free lesson
Four exercises
Worked answers
Object Drawing Lessons
This guide teaches a clear, repeatable method for drawing a 1920s flapper figure. You will build a relaxed standing pose, shape the dropped-waist dress, add layered fringe, and finish with a headband and feather. The approach uses basic shapes and measured proportions so you can vary the pose without losing the period silhouette. All measurements are hypothetical examples; check your own paper and tools. A defined convention keeps the drawing readable: x-height means the distance from baseline to midline of lowercase letters, and letter styles vary, so treat any letter-based proportion as a guide, not a rule.
Practice materials: Printable downloads are not available for this lesson yet. Use the instructions and four exercises below.
Reference illustration
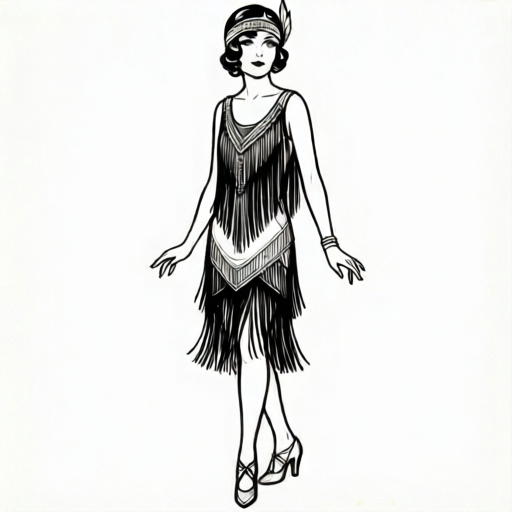
Use the stated measurements and conventions for each exercise.
Build the pose and proportions
Start with a light construction drawing. Place the head as an oval about 3 cm tall on a 20 cm figure. Mark a vertical center line and a shoulder line about one neck length below the chin (a hypothetical example is roughly 1 cm for a 3 cm head). The flapper silhouette is slender and relaxed, often with one hand lifted and the other resting near the hip.
Use the x-height convention to check small details: if you write a lowercase x on the page, its baseline-to-midline distance is the x-height. Use that distance only as a visual guide for spacing, not as a fixed standard. Letter styles vary, so adjust to your own drawing.
- Draw a light oval for the head and a vertical center line.
- Mark shoulders, waist, and knees using head-height units.
- Sketch a relaxed S-curve for the spine and a slight hip shift.
- Block arms with simple tubes and hands with mitt shapes.
- Check that the figure fits the page with space for the feather.
Shape the dropped-waist dress
The flapper dress typically has a dropped waist that sits near the hips, not at the natural waist. First locate the natural waist roughly midway between the shoulders and the hips. Draw a fitted bodice from shoulders to hips, then flare the skirt to knee length. Keep the hem uneven or slightly curved to suggest movement. Place the drop-waist line at hip level, near the hips; for a 3 cm head, the drop waist is near the hip, not 3 cm below the natural waist.
Add a narrow sash or belt at the drop waist. The silhouette should read as loose and vertical, not tightly fitted at the natural waist.
- Draw the bodice as a soft rectangle from shoulders to hips.
- Mark the drop-waist line at hip level, near the hips.
- Flare the skirt outward to knee level with a gentle curve.
- Add a thin sash at the drop waist.
- Erase construction lines lightly before adding fringe.
Add layered fringe
Fringe is the key texture. Draw three horizontal bands of short vertical strokes: one at the bodice hem, one at the drop waist, and one at the skirt hem. Vary stroke length slightly so the fringe looks handmade, not printed.
Use a consistent stroke direction and spacing. If you use a ruler, measure your own spacing; a hypothetical example is 4 mm between strokes. Keep the fringe inside the dress outline so the silhouette stays clear.
- Draw the first fringe band at the bodice hem.
- Add a second band at the drop waist.
- Draw the longest fringe at the skirt hem.
- Vary stroke length by about 10 percent for a natural look.
- Check that fringe does not cross the body outline.
Finish the headband and feather
Draw a narrow headband across the forehead, just above the eyebrows. Add a small feather on one side, angled upward and slightly back. Keep the feather simple: a central stem with short barbs on both sides.
Add a small face with minimal features: eyes, a small nose line, and a subtle smile. The headband and feather should be the strongest details on the head.
- Draw a curved band across the forehead.
- Add a small feather stem and barbs on one side.
- Place eyes, nose, and mouth lightly.
- Darken the headband and feather outline.
- Check that the feather does not cover the face.
Worked example
Draw a flapper with a 3 cm head on a 20 cm page, a dropped waist at hip level, and three fringe bands.
Worked answer
Head oval 3 cm tall; shoulders about one neck length below the chin; drop waist at hip level, near the hips; skirt hem at knee level; three fringe bands at bodice hem, drop waist, and skirt hem; headband across forehead with a small feather angled back.
Four practice exercises
Exercise 1
Draw a flapper standing with one hand on the hip and the other holding a small clutch. Use a 3 cm head and a 20 cm figure. Add three fringe bands and a headband with a feather on the left.
Show answer and check
A standing figure with a dropped waist, three fringe bands, a left-side feather, and a small clutch near the hip.
Why: The pose uses a clear hip shift and arm placement; the dropped waist and fringe bands preserve the flapper silhouette.
Check: Check that the shoulders sit about one neck length below the chin, the drop waist sits at hip level, three fringe bands are visible, and the feather is on the left.
Exercise 2
Draw a flapper seated on a simple stool. Keep the dropped waist and fringe visible. Use a 2.5 cm head and an 18 cm figure. Add a headband with a feather on the right.
Show answer and check
A seated figure with bent knees, a dropped waist, three fringe bands, and a right-side feather.
Why: Seated poses change leg angles but keep the torso and dress construction the same; fringe remains readable on the skirt.
Check: Check that the drop waist sits at hip level, the fringe bands are not hidden by the stool, and the feather is on the right.
Exercise 3
Draw a flapper in a slight walking pose with one foot forward. Use a 3 cm head and a 22 cm figure. Add three fringe bands: bodice hem, drop waist, and skirt hem. Add a headband with two small feathers.
Show answer and check
A walking figure with a forward foot, three fringe bands at the bodice hem, drop waist, and skirt hem, and two small feathers on the headband.
Why: The walking pose adds movement; three bands keep the silhouette clear while testing spacing control.
Check: Check that the three fringe bands sit at the bodice hem, drop waist, and skirt hem; that the forward foot is visible; and that the two feathers do not cover the face.
Exercise 4
Draw a flapper from a three-quarter view. Use a 3 cm head and a 20 cm figure. Add three fringe bands and a headband with a feather angled backward. Keep the face simple.
Show answer and check
A three-quarter view figure with a dropped waist, three fringe bands, and a backward-angled feather.
Why: Three-quarter view tests the headband curve and fringe alignment; simple facial features keep the focus on the costume.
Check: Check that the headband follows the forehead curve, the feather angles back, and the fringe bands follow the dress surface and stay parallel to each other.
Common mistakes
- Placing the waist at the natural waist instead of the hips. Move the drop-waist line to hip level and redraw the sash there.
- Drawing fringe as one solid block. Use three separate bands of short vertical strokes with slight length variation.
- Making the feather too large and covering the face. Keep the feather shorter than the head height and angle it away from the face.
- Using heavy construction lines that remain visible. Erase or lighten construction lines before adding final details.
Self-check rubric
- Pose is relaxed and balanced, with clear head, shoulders, hips, and knees.
- Dropped waist is visibly lower than the natural waist.
- Three distinct fringe bands are present and readable.
- Headband crosses the forehead and feather is simple and clear.
- Construction lines are light or erased.
- Valid alternatives are accepted: different arm positions, feather side, or fringe spacing, as long as the silhouette and period cues remain clear.
Questions and answers
Do I need a ruler?
No. A ruler helps with spacing, but you can estimate spacing by eye. If you measure, use your own paper and tools.
Can I change the pose?
Yes. Keep the dropped waist and fringe bands; change arm and leg positions for variation.
How many fringe bands should I draw?
Three bands are enough: bodice hem, drop waist, and skirt hem. More bands can clutter the silhouette.
What if my figure looks too tall?
Check head-height units. A common guide is 7 to 8 head-heights for an adult figure; adjust the legs first.