Free original lessons
Draw Overlapping Mermaid Tail Scale Rows on a Curved Form
Learn to draw overlapping scale rows on a curved mermaid tail using a simple convention, step-by-step panels, and self-checking practice tasks.
Free lesson
Four exercises
Worked answers
Object Drawing Lessons
This lesson teaches a repeatable method for drawing overlapping scale rows on a curved mermaid tail. You will use a defined scale convention: each scale is a rounded, slightly pointed arch whose width is about twice its height, drawn from one side to the other along an imaginary row line. Rows overlap so that each new row covers the lower edge of the row above by roughly one-third of a scale height. Because tail curvature changes row spacing, you will measure spacing along the curve rather than using a fixed grid. The lesson includes a worked example, four self-contained practice tasks, a rubric that accepts valid stylistic alternatives, and a plan for printable resources that are proposed but not yet built.
Practice materials: Printable downloads are not available for this lesson yet. Use the instructions and four exercises below.
Reference illustration
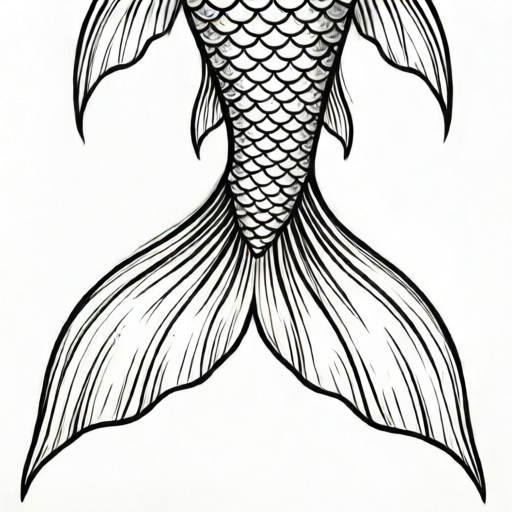
Use the stated measurements and conventions for each exercise.
Set the scale convention and row geometry
Define one scale as a rounded arch with a soft point at the bottom center. Its width is about twice its height. Draw scales left to right along a row line that follows the tail curve. Keep scale size consistent within a row; allow slight variation between rows only if you state it in your rubric.
Rows overlap by about one-third of a scale height. This means the bottom of each scale in a new row sits slightly above the bottom of the scales in the row above, covering their lower edges. Mark row lines as gentle arcs that follow the tail outline, not straight horizontal lines.
- Draw or trace a curved tail outline with a centerline and two side edges.
- Mark three to five row lines as arcs that follow the tail curve, spaced about one scale height apart near the widest part.
- On the top row line, draw scales left to right using the arch convention, keeping width about twice height.
- Start the next row one-third of a scale height lower, offsetting scales by half a scale width so they overlap the gaps above.
- Continue down the tail, checking that each new row covers the lower third of the row above.
Adapt spacing to curvature
On a curved tail, row lines are not parallel straight lines. Near the narrow end, reduce scale width slightly or reduce the number of scales per row so the row still fits. Near the wide part, keep scale size consistent and add more scales per row.
Measure spacing along the curve with a paper strip or a ruler held gently against the arc. Label any numerical values you choose as hypothetical examples; for instance, a practice scale height of 1 cm and row overlap of 0.3 cm are hypothetical and should be adjusted to your actual drawing size.
- Measure the arc length between row lines at the centerline and at each side edge.
- If the arc length at an edge is shorter, reduce the number of scales in that row rather than shrinking every scale unevenly.
- Keep the overlap fraction consistent: about one-third of scale height on every row.
- Check that no scale crosses the tail outline; trim or adjust the last scale in a row if needed.
Shade and check overlap
Shade each scale with a light tone at the top and a slightly darker tone near the lower edge that is covered by the next row. This shading reinforces the overlap direction. Keep the light source consistent across the tail.
Check overlap by tracing a vertical line through two adjacent rows. The lower row should cover the bottom third of the upper scale. If a gap appears, shift the lower row up slightly or widen the scale. If the lower row covers more than half, shift it down.
- Shade the top of each scale lightly and the covered lower edge slightly darker.
- Trace one vertical check line through two rows and confirm the one-third overlap.
- Repeat the check at the narrow and wide parts of the tail.
- Erase construction row lines only after the overlap check passes.
Worked example
A tail outline is 12 cm long at the centerline. You plan four rows. Hypothetical scale height is 1 cm and overlap is 0.3 cm. How much vertical space do four rows occupy along the centerline, and where should the fourth row line start relative to the first?
Worked answer
Each new row advances by scale height minus overlap: 1 cm minus 0.3 cm equals 0.7 cm. Four rows advance three times: 3 times 0.7 cm equals 2.1 cm. The fourth row line starts 2.1 cm below the first row line along the centerline. This fits within the 12 cm tail length. These numbers are hypothetical; measure your own drawing.
Four practice exercises
Exercise 1
On a tail outline 10 cm long at the centerline, you draw three rows. Hypothetical scale height is 1.2 cm and overlap is 0.4 cm. How far does the third row line start below the first row line?
Show answer and check
1.6 cm below the first row line.
Why: Each row advances by 1.2 cm minus 0.4 cm equals 0.8 cm. Three rows advance two times: 2 times 0.8 cm equals 1.6 cm.
Check: Measure the distance between the first and third row lines along the centerline with a ruler; it should read about 1.6 cm.
Exercise 2
A row near the narrow end has an arc length of 6 cm. Hypothetical scale width is 1.5 cm. How many scales fit in that row if you keep scale size consistent?
Show answer and check
Four scales fit.
Why: 6 cm divided by 1.5 cm per scale equals 4 scales. Keeping scale size consistent means reducing the count rather than shrinking scales.
Check: Count the scales in the row and confirm each is about 1.5 cm wide; the total should be about 6 cm.
Exercise 3
You draw two adjacent rows. The upper scale height is 1 cm. The lower row covers 0.5 cm of the upper scale. Is the overlap within the one-third convention? Explain.
Show answer and check
No. The overlap is 0.5 cm out of 1 cm, which is one-half, not one-third.
Why: One-third of 1 cm is about 0.33 cm. A 0.5 cm overlap is too large and should be reduced by shifting the lower row down or adjusting scale height.
Check: Trace a vertical line through the two rows and measure the covered portion; it should be about 0.33 cm, not 0.5 cm.
Exercise 4
A tail outline curves so that the arc length between two row lines is 8 cm at the centerline and 6 cm at the left edge. You plan scales 1 cm wide. How many scales should the row have at the centerline and at the left edge, and what should you do if the counts differ?
Show answer and check
Eight scales at the centerline and six at the left edge. If counts differ, reduce the number of scales near the edge rather than shrinking every scale unevenly.
Why: 8 cm divided by 1 cm equals 8; 6 cm divided by 1 cm equals 6. Curvature changes arc length, so scale count can vary across a row while scale size stays consistent.
Check: Measure the arc lengths and count scales at both locations; confirm scale width remains about 1 cm and the row does not cross the tail outline.
Common mistakes
- Drawing row lines as straight horizontals on a curved tail. Redraw row lines as gentle arcs that follow the tail outline, then place scales along those arcs.
- Making scales too tall so overlap looks like stacking. Keep scale width about twice height and overlap only about one-third of the height.
- Shrinking every scale in a narrow row until they become tiny. Reduce the number of scales in that row instead, keeping scale size consistent with neighboring rows.
- Shading the covered edge lighter than the exposed top. Shade the covered lower edge slightly darker to show that the next row overlaps it.
Self-check rubric
- Scale convention is stated and followed: rounded arch, width about twice height, soft bottom point.
- Row lines follow the tail curve rather than straight horizontals.
- Overlap is about one-third of scale height and is consistent across rows.
- Scale size is consistent within a row; narrow rows reduce scale count rather than shrinking all scales.
- Shading reinforces overlap with a slightly darker covered lower edge.
- Valid stylistic alternatives are accepted if overlap, row spacing, and curvature are consistent.
Questions and answers
Do all scales need to be identical?
No. The convention defines a rounded arch about twice as wide as tall, but slight stylistic variation is acceptable if the overlap and row spacing remain consistent.
How do I know the overlap is correct?
Trace a vertical line through two rows. The lower row should cover roughly one-third of the upper scale height. Adjust by shifting the row or changing scale width.
Can I use a fixed grid on a curved tail?
A fixed grid will not follow the curve. Use arc-shaped row lines and measure spacing along the curve instead.
What numerical values should I use?
Choose values that fit your drawing. Any specific numbers in this lesson are hypothetical examples; measure your actual paper and tail outline.