Free original lessons
Bicycle Rider Drawing: Frame Geometry and Posture
Learn to draw a bicycle rider by mapping frame geometry and posture onto a side-view grid, with clear conventions and checkable steps.
Free lesson
Four exercises
Worked answers
Object Drawing Lessons
Drawing a bicycle rider well depends on two linked systems: the frame geometry that positions the wheels, seat, and handlebars, and the rider's posture that connects body to bike. This guide uses a side-view grid and a simple convention: x-height is measured from baseline to midline, and letter styles vary, so treat proportions as adjustable ranges rather than fixed rules. You will measure your own reference equipment if available, label any chosen numbers as hypothetical examples, and use arithmetic checks to keep units consistent. The goal is a believable side-view rider, not a single universal answer.
Practice materials: Printable downloads are not available for this lesson yet. Use the instructions and four exercises below.
Reference illustration
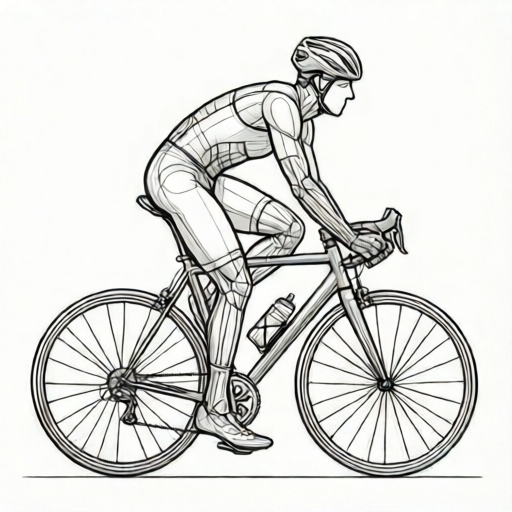
Use the stated measurements and conventions for each exercise.
Set up the side-view grid and frame geometry
Begin with a side-view grid on paper. Mark a baseline for the ground and a midline for the rider's hip height. Use the same unit throughout, such as centimeters on your reference or grid squares on paper. If you measure a real bicycle, record wheelbase, seat tube length, and head angle; if not, choose hypothetical values and label them as examples. For instance, a hypothetical wheelbase of 100 units, seat tube of 50 units, and head angle of 70 degrees gives a stable starting layout.
Place the rear wheel center and front wheel center on the baseline separated by the wheelbase. Draw wheel circles with equal radius. The seat tube rises from the bottom bracket toward the saddle; its angle from horizontal is the seat angle. The head tube angle is measured from horizontal at the front. Keep these angles consistent with your chosen values. The saddle sits above the seat tube top, and the handlebars sit above the head tube. This geometry creates the anchor points for the rider.
- Mark baseline and midline; choose one unit and write it at the top.
- Place rear and front wheel centers on the baseline using your wheelbase value.
- Draw equal wheel circles and mark their centers.
- Draw the seat tube from bottom bracket to saddle; label its angle.
- Draw the head tube at the front; label its angle from horizontal.
- Add saddle and handlebar anchor points above their tubes.
Overlay rider posture on the frame
With the frame anchors set, build the rider from the contact points: saddle, handlebars, and pedals. The hip sits on the saddle, the torso leans toward the handlebars, and the arms reach to the grips. The legs bend from hip to knee to foot on the pedal. Use the midline to check that the hip height matches your chosen saddle height. Posture is a range: a relaxed rider has a more upright torso, while a sporty rider leans further forward. Both are valid if the contact points remain consistent.
Draw the head above the shoulders, then the torso as a tapered shape from hip to shoulder. The upper arm goes from shoulder to elbow, and the forearm from elbow to hand at the grip. The thigh goes from hip to knee, and the lower leg from knee to foot. Check that the knee is forward of the hip when the pedal is forward, and that the foot rests on the pedal. Use simple shapes first, then refine. Keep the rider's proportions plausible relative to the frame; if the torso looks too long, adjust the lean rather than stretching the frame.
- Mark saddle contact, handlebar grip, and pedal contact points.
- Draw hip on saddle and shoulder toward handlebars; connect with torso shape.
- Draw upper arm and forearm to the grip; check elbow bend.
- Draw thigh and lower leg to the pedal; check knee position.
- Add head above shoulders and refine outlines.
- Compare hip height to midline and adjust posture lean if needed.
Check proportions with simple arithmetic
Use checkable arithmetic to catch proportion errors. If your wheelbase is 100 units and each wheel radius is 30 units, the wheel diameter is 60 units, so the gap between wheel edges is 100 minus 60, which is 40 units. If the saddle height above the bottom bracket is 50 units and the hip is 5 units above the saddle, the hip height is 55 units. These numbers are hypothetical examples; replace them with your measured or chosen values and keep units consistent.
For posture, estimate the torso length and arm reach. If the torso is 40 units and the arm is 35 units, the hand can reach about 75 units from the hip when extended, but the actual reach depends on lean angle. A simple check is to confirm that the hand lands on the grip and the foot lands on the pedal without stretching the limbs unnaturally. If a limb looks too short, adjust the anchor point or the lean, not the frame geometry, unless the frame itself is inconsistent.
- Write your chosen wheelbase, wheel radius, seat tube, and head angle with units.
- Compute wheel diameter and edge gap; confirm the frame fits the wheels.
- Compute hip height from saddle height plus offset.
- Check hand-to-grip and foot-to-pedal distances visually against limb lengths.
- Adjust posture lean or anchor points before refining details.
Refine line quality and presentation
Once proportions check out, refine the drawing with clean outlines. Use a darker line for the frame and a lighter line for the rider, or vice versa, as long as the convention is stated. Keep the wheels circular and the frame tubes straight between anchors. Add the saddle, handlebars, and pedals as simple shapes. For the rider, show the bend at elbows and knees clearly. Avoid shading until the structure is correct.
Finally, label your drawing with the chosen geometry values and the posture notes, such as torso lean and hip height. This makes the drawing checkable and useful for revision. Remember that letter styles and x-height conventions vary; if you add handwritten labels, define your baseline-to-midline convention so others can interpret your proportions. The drawing is successful when the frame anchors and rider contacts are consistent and the arithmetic checks pass.
- Trace final outlines over construction lines.
- Keep frame tubes straight and wheels circular.
- Clarify elbow and knee bends.
- Label geometry values and posture notes.
- Erase construction lines and review against checks.
Worked example
Using hypothetical values, draw a side-view rider with wheelbase 100 units, wheel radius 30 units, saddle height 50 units above bottom bracket, and hip 5 units above saddle. Check the wheel edge gap and hip height.
Worked answer
Wheel diameter is 60 units, so edge gap is 100 minus 60 equals 40 units. Hip height is 50 plus 5 equals 55 units. Place wheel centers 100 units apart on the baseline, draw equal 30-unit radius wheels, set saddle 50 units above bottom bracket, and place hip 5 units above saddle. Draw torso to handlebars and legs to pedals, then confirm contacts.
Four practice exercises
Exercise 1
A hypothetical bicycle has wheelbase 120 units and wheel radius 25 units. Compute the wheel diameter and the gap between wheel edges. Then describe where to place the wheel centers on a baseline.
Show answer and check
Diameter is 50 units; edge gap is 120 minus 50 equals 70 units. Place rear and front wheel centers 120 units apart on the baseline and draw equal 25-unit radius circles.
Why: Diameter is twice the radius. The edge gap is wheelbase minus diameter. Centers are separated by the wheelbase.
Check: Recompute 2 times 25 equals 50, then 120 minus 50 equals 70. Confirm both wheels use the same radius.
Exercise 2
A rider has saddle height 45 units above the bottom bracket and hip offset 6 units above the saddle. What is the hip height? If the midline is at 50 units, is the hip above or below it?
Show answer and check
Hip height is 45 plus 6 equals 51 units. The hip is 1 unit above the midline.
Why: Add saddle height and hip offset. Compare the result to the midline value.
Check: Subtract 50 from 51 to get 1; confirm the addition 45 plus 6 equals 51.
Exercise 3
A side-view drawing shows a torso length of 40 units and an arm length of 35 units. The hand must reach a grip 60 units from the hip. Is the reach plausible without stretching? Explain using a simple range check.
Show answer and check
Yes, because 40 plus 35 equals 75 units, which is greater than 60 units. The arm can bend to cover 60 units without full extension.
Why: The combined torso and arm length is an upper bound. If the required reach is less than this sum, the pose can be plausible with bending.
Check: Confirm 40 plus 35 equals 75 and 75 is greater than 60. Check that the elbow is bent in the drawing.
Exercise 4
You choose a head angle of 70 degrees from horizontal and a seat angle of 73 degrees from horizontal. Describe how to place the head tube and seat tube on the grid, and state one consistency check.
Show answer and check
Draw the seat tube from the bottom bracket at 73 degrees from horizontal to the saddle. Draw the head tube at the front at 70 degrees from horizontal. Check that the saddle and handlebar anchors sit above their respective tube tops and that the wheels remain on the baseline.
Why: Angles are measured from horizontal. The tubes connect the bottom bracket to saddle and the front frame to handlebars.
Check: Use a protractor or grid slope to confirm each angle, then verify anchors align with tube tops and wheels touch the baseline.
Common mistakes
- Drawing the rider first and forcing the frame to fit. Set wheel centers, seat tube, and head tube first, then place the rider on the anchors.
- Using different units for wheelbase and saddle height. Choose one unit and write it at the top; convert all values before drawing.
- Making the torso too long to reach the handlebars. Adjust the lean angle or move the grip anchor slightly, then recheck limb lengths.
- Treating x-height as a universal letter rule. State your baseline-to-midline convention and allow valid style variations.
Self-check rubric
- Frame anchors are placed consistently with chosen geometry values and units.
- Wheels are equal and circular; wheelbase and edge gap arithmetic is correct.
- Rider contact points match saddle, grips, and pedals without unnatural stretching.
- Posture lean is plausible and within an acceptable range.
- Labels state the x-height convention and allow valid style alternatives.
- Construction lines are removed and final outlines are clear.
Questions and answers
Do I need a real bicycle to measure?
No. You can use hypothetical values labeled as examples, but if you measure real equipment, record the actual numbers and units.
What if my rider looks too upright or too leaned?
Posture is a range. Check that hands reach grips and feet reach pedals; adjust lean until contacts are natural.
How do I check wheel spacing?
Subtract wheel diameter from wheelbase to get the edge gap. Keep units consistent and confirm the frame fits.
Can I use different letter styles for labels?
Yes. Define your x-height convention from baseline to midline and allow valid alternatives in the rubric.