Free original lessons
Black and White Owl Drawing: Tonal Contrast and Hatching
Learn to draw a full black-and-white owl using hatching for light, mid, and dark tones. Includes a worked example, four practice tasks, and a rubric.
Free lesson
Four exercises
Worked answers
Object Drawing Lessons
This lesson teaches you to draw a complete black-and-white owl with clear tonal contrast using hatching. You will plan three value zones—light, mid, and dark—and apply hatching at different spacings and angles to create depth. The method works on any paper and pencil; all numerical values are hypothetical examples you can adjust after measuring your own tools. By the end, you will have a full owl drawing and a repeatable checking routine.
Practice materials: Printable downloads are not available for this lesson yet. Use the instructions and four exercises below.
Reference illustration
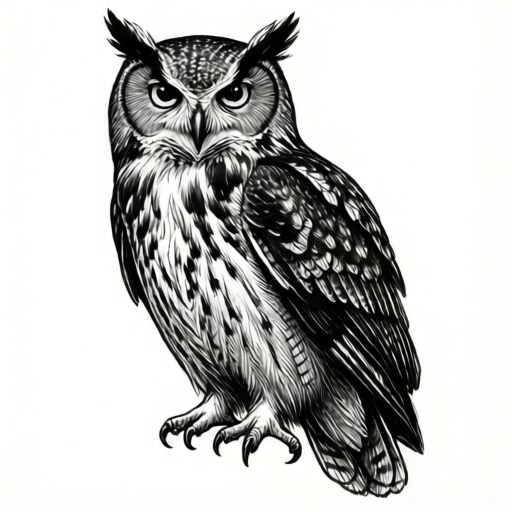
Use the stated measurements and conventions for each exercise.
Planning the Owl and Its Tonal Zones
Begin by drawing a full owl outline: a rounded body, a distinct head with two ear tufts, a facial disc, two eyes, a beak, folded wings, and feet. Keep the outline simple so hatching remains the main tool for contrast. Decide which areas will be light (facial disc, chest), mid (wing coverts, back), and dark (ear tufts, wing tips, shadows under the body).
Use a pencil and paper. Measure your pencil tip and paper texture first; the values below are hypothetical examples. For light tone, hatch lines about 3 mm apart at a shallow angle. For mid tone, hatch about 1.5 mm apart and cross with a second layer at 45 degrees. For dark tone, hatch about 1 mm apart with three crossing layers. Keep line weight consistent and avoid smudging.
- Draw the full owl outline lightly, including head, body, wings, feet, and ear tufts.
- Mark three zones on the outline: light, mid, dark.
- Test hatching spacings on a scrap area: 3 mm, 1.5 mm, and 1 mm as hypothetical examples.
- Hatch the light zones first with widely spaced lines.
- Add mid-tone cross-hatching to wing coverts and back.
- Layer dark hatching on ear tufts, wing tips, and under-body shadow.
- Check contrast by stepping back and comparing zones.
Hatching Technique for Contrast
Hatching uses parallel lines to suggest tone. The closer the lines, the darker the area appears. For mid tone, cross-hatching—two sets of lines at an angle—creates a denser texture without pressing harder. For dark tone, a third layer increases density. Keep the pencil at a consistent angle and move from the elbow to keep lines even.
Do not outline every feather. Instead, let hatching describe form: curve lines slightly around the body to suggest roundness. On the facial disc, use light hatching radiating outward. On wing tips, use tight dark hatching following the feather direction. Leave paper white for the brightest highlights, such as the eye reflections.
- Hold the pencil at a comfortable angle and practice even parallel lines.
- For light tone, space lines widely and do not cross them.
- For mid tone, add a second layer at about 45 degrees to the first.
- For dark tone, add a third layer at a different angle.
- Curve hatching lines to follow the owl’s body form.
- Leave small white gaps for highlights on eyes and beak.
Checking and Refining the Drawing
After hatching, check tonal contrast by squinting or stepping back. The dark zones should read clearly darker than mid zones, and mid zones darker than light zones. If two zones look similar, adjust spacing rather than pressing harder. Use a soft eraser to lift hatching if a zone becomes too dark.
Check the owl’s structure: ear tufts should be symmetrical, eyes level, and feet grounded. Ensure hatching follows form and does not flatten the body. Finally, confirm that the drawing is black and white only—no colored marks—and that hatching is visible in all three tonal zones.
- Squint at the drawing to compare light, mid, and dark zones.
- Adjust line spacing where contrast is weak.
- Erase gently to lighten over-dark areas.
- Verify owl structure and symmetry.
- Confirm the drawing uses only black and white tones.
Worked example
Draw a full owl outline with a light facial disc, mid-tone wings, and dark ear tufts. Use hatching with hypothetical spacings of 3 mm for light, 1.5 mm for mid, and 1 mm for dark. Check contrast by squinting.
Worked answer
The owl outline includes a rounded body, head with two ear tufts, facial disc, eyes, beak, folded wings, and feet. The facial disc is hatched with lines 3 mm apart in one direction. The wings are hatched at 1.5 mm and crossed at 45 degrees. The ear tufts are hatched at 1 mm with three crossing layers. White gaps remain on the eyes and beak. Squinting shows three distinct tones: light facial disc, mid wings, dark ear tufts. The drawing is black and white only.
Four practice exercises
Exercise 1
Draw a full owl outline. Hatch the facial disc with lines 3 mm apart (hypothetical), the wings with 1.5 mm cross-hatching, and the ear tufts with 1 mm triple-layer hatching. Check contrast by squinting.
Show answer and check
A full owl outline with three distinct tonal zones: light facial disc, mid wings, dark ear tufts. Hatching spacings match the hypothetical values, and squinting shows clear contrast.
Why: Wide spacing creates light tone, medium spacing with cross-hatching creates mid tone, and tight triple-layer hatching creates dark tone. Squinting compresses detail and reveals tonal differences.
Check: Step back and squint. Confirm the ear tufts are darkest, wings are mid, and facial disc is lightest. Verify hatching lines are visible in each zone.
Exercise 2
Draw an owl with a light chest, mid-tone back, and dark under-body shadow. Use curved hatching lines that follow the body form. Leave white gaps for eye highlights.
Show answer and check
An owl outline with curved hatching: wide spacing on chest, medium cross-hatching on back, tight hatching under the body. White gaps on eyes. Tonal zones are distinct.
Why: Curved lines suggest roundness. Different spacings create contrast. White gaps prevent flattening and add life to the eyes.
Check: Check that hatching curves around the chest and back. Squint to confirm three tones. Ensure eye highlights are white.
Exercise 3
Draw an owl and intentionally make the mid and dark zones too similar. Then adjust by increasing line density in the dark zone only. Describe your change.
Show answer and check
Initial drawing has similar mid and dark tones. After adjustment, the dark zone uses tighter spacing or an extra crossing layer, making it clearly darker. The mid zone remains unchanged.
Why: Contrast depends on relative density. Increasing density only in the dark zone separates it from the mid zone without altering the light zone.
Check: Squint before and after adjustment. Confirm the dark zone is now clearly darker than the mid zone. Check that the light zone remains lightest.
Exercise 4
Draw a full owl with ear tufts, wings, and feet. Use hatching for all tones. Then list three checks you performed to verify contrast and structure.
Show answer and check
A complete owl drawing with hatching in light, mid, and dark zones. Checks listed: squinting for tonal contrast, verifying ear tuft symmetry, and confirming white highlights on eyes and beak.
Why: A complete owl requires all major parts. Hatching creates tone. Checks ensure contrast and structural accuracy.
Check: Verify the list includes a contrast check, a structure check, and a highlight check. Confirm the drawing is black and white only.
Common mistakes
- Pressing harder to make dark areas instead of hatching closer. Keep pencil pressure light and increase line density with additional crossing layers.
- Hatching in straight lines across a curved body. Curve hatching lines to follow the owl’s form, such as around the chest and wings.
- Leaving no white highlights, making the owl flat. Reserve small white gaps on eyes, beak, and facial disc for highlights.
- Making all zones similar in tone. Use clearly different spacings: wide for light, medium for mid, tight for dark, as hypothetical examples.
Self-check rubric
- Full owl outline includes head, body, wings, feet, and ear tufts.
- Three tonal zones are clearly distinguishable: light, mid, dark.
- Hatching is used for all tones; line spacing varies appropriately.
- Hatching follows the owl’s form where possible.
- White highlights are preserved on eyes and beak.
- Drawing uses only black and white tones.
- Contrast check is performed by squinting or stepping back.
- Valid alternatives: different hatching angles, spacings, or line directions are acceptable if tonal contrast is clear.
Questions and answers
Do I need special pencils?
No. A regular graphite pencil works. Measure your pencil tip and paper texture to choose hatching spacings that suit your tools.
Can I use a pen instead of pencil?
Yes, but pen cannot be erased. Practice hatching spacings on scrap paper first to avoid over-darkening.
How do I know if my contrast is strong enough?
Squint or step back. The dark zones should be clearly darker than mid zones, and mid zones darker than light zones.
What if my hatching looks messy?
Slow down and keep lines evenly spaced. Curve lines to follow form, and avoid overlapping layers at random angles.