Free original lessons
Builder Drawing: Hard Hat, Tool Belt, and Stance
Learn to draw a builder figure with a hard hat, tool belt, and confident stance using simple proportion guides and a clear construction sequence.
Free lesson
Four exercises
Worked answers
Object Drawing Lessons
This lesson teaches a reliable way to draw a builder figure from scratch. You will build the figure in layers: first the stance and proportion guides, then the torso and tool belt, then the head and hard hat, and finally the details that make the figure read as a builder. The method uses simple shapes and checkable measurements so you can judge your own work. A convention is defined for x-height and letter styles so that labels and notes on your drawing are consistent. All numerical values are hypothetical examples; measure your own paper and tools. The practice tasks are self-contained and can be solved from the text alone.
Practice materials: Printable downloads are not available for this lesson yet. Use the instructions and four exercises below.
Reference illustration
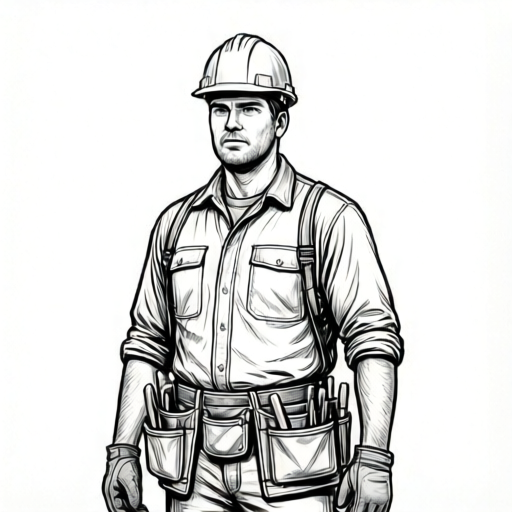
Use the stated measurements and conventions for each exercise.
Stance and Proportion Guides
Begin with the stance. Draw a vertical center line for the body. Mark the ground line and a top line for the hard hat. Divide the space between ground and top into eight equal parts; this is a hypothetical proportion guide, not a universal rule. Place the hip line at about the fourth part from the ground, the shoulder line at about the sixth, and the chin line at about the seventh. These marks keep the figure balanced.
For a confident builder stance, set the feet about shoulder-width apart. Draw two short lines from the hip line to the ground to represent the legs, angling them outward. Add small ovals for the feet, pointing slightly outward. Check that the distance between the feet is roughly equal to the shoulder width; adjust if needed.
- Draw a vertical center line and mark ground and top lines.
- Divide the height into eight equal parts and mark hip, shoulder, and chin lines.
- Draw two leg lines from the hip line to the ground, angled outward.
- Add small ovals for feet, pointing slightly outward.
- Check that feet are about shoulder-width apart.
Torso and Tool Belt
On the shoulder line, mark the shoulder width. A practical guide is to make the shoulder width about two head-widths; measure your own head width from the chin line to the top line. Draw a rounded rectangle for the torso from the shoulder line to the hip line. Keep the sides slightly curved to suggest a work shirt.
The tool belt sits at the hip line. Draw a horizontal band across the hips, about one finger-width thick. Add two small pouches: one on the left hip and one on the right hip. Use simple rectangles with rounded corners. A hammer loop can be a small U-shape on one side. Keep the belt level; check with a horizontal line.
- Mark shoulder width about two head-widths.
- Draw a rounded rectangle for the torso from shoulder to hip.
- Draw a horizontal band at the hip line for the tool belt.
- Add two pouches as rounded rectangles on the hips.
- Add a small U-shape for a hammer loop on one side.
Head and Hard Hat
Draw an oval for the head between the chin line and the top line. The hard hat sits on top of the head. Draw a dome shape that covers the upper half of the head oval, with a brim that extends forward. The brim should be a shallow curve, not a straight line. Add a small ridge line on the dome for detail.
Use the x-height convention for any labels: x-height is the distance from the baseline to the midline of your lettering. Keep letter styles consistent; choose either all uppercase or all lowercase for labels, and use the same stroke width. This makes your notes readable and comparable.
- Draw an oval for the head between chin and top lines.
- Draw a dome shape for the hard hat over the upper half of the head.
- Add a shallow curved brim extending forward.
- Add a small ridge line on the dome.
- Label parts using the x-height convention and consistent letter style.
Details and Final Check
Add simple details: a collar line at the neck, two short lines for arms hanging at the sides, and small circles for hands. Keep arms relaxed but slightly away from the body to show a confident stance. Add a few short lines on the pouches to suggest tools, but do not draw individual tools in detail.
Final check: the figure should stand on the ground line, the hard hat should sit on the head, the tool belt should be level at the hips, and the feet should be about shoulder-width apart. Use a ruler to check the belt level and the foot spacing. If any part is off, adjust the guide lines rather than erasing the whole figure.
- Add a collar line and two arm lines with small hand circles.
- Add short lines on pouches to suggest tools.
- Check ground line, hat placement, belt level, and foot spacing.
- Adjust guide lines as needed.
Worked example
Draw a builder figure on a sheet of paper. Use a vertical center line, mark ground and top lines, and divide the height into eight equal parts. Place the hip line at the fourth part, shoulder line at the sixth, and chin line at the seventh. Draw a confident stance with feet about shoulder-width apart, a rounded rectangle torso, a level tool belt with two pouches, an oval head, and a hard hat with a dome and curved brim. Label three parts using the x-height convention.
Worked answer
The finished drawing shows a figure standing on the ground line with feet about shoulder-width apart. The tool belt is level at the hip line, the hard hat sits on the head with a curved brim, and three labels are written with consistent letter style and x-height. The figure reads clearly as a builder.
Four practice exercises
Exercise 1
A builder figure is drawn with the hip line at the fourth part from the ground and the shoulder line at the sixth part. The total height from ground to top is 16 cm. What is the distance from the ground to the hip line, and from the ground to the shoulder line?
Show answer and check
Hip line: 8 cm from the ground. Shoulder line: 12 cm from the ground.
Why: Each part is 16 cm divided by 8, which is 2 cm. The fourth part is 4 times 2 cm = 8 cm. The sixth part is 6 times 2 cm = 12 cm.
Check: Check by subtracting from the total: the hip line is 16 cm − 8 cm = 8 cm from the top; the shoulder line is 16 cm − 12 cm = 4 cm from the top. Both distances are positive and consistent with the total height.
Exercise 2
The shoulder width of a builder figure is set to two head-widths. The head width is 3 cm. The feet are placed 5 cm apart. Is the stance narrower or wider than the shoulder width, and by how much?
Show answer and check
The stance is narrower than the shoulder width by 1 cm.
Why: Shoulder width is 2 times 3 cm = 6 cm. The feet are 5 cm apart. 6 cm minus 5 cm = 1 cm, so the stance is 1 cm narrower.
Check: Compare 5 cm to 6 cm directly; the difference is 1 cm. If the feet were 6 cm apart, the stance would match the shoulder width.
Exercise 3
A tool belt is drawn as a horizontal band centered on the hip line, extending 2 cm above and 2 cm below the hip line. What is the total height of the belt? If the left side of the belt is drawn 1 cm higher than the right side, is the belt level?
Show answer and check
The total height of the belt is 4 cm. If the left side is 1 cm higher than the right side, the belt is not level.
Why: The belt extends 2 cm above and 2 cm below the hip line, so the total height is 2 cm + 2 cm = 4 cm. A level belt has both sides at the same height; a 1 cm difference means it is tilted.
Check: Measure the belt height at the left and right sides; both should read 4 cm. Then compare the top edges: if they align horizontally, the belt is level. A 1 cm difference in height between sides means it is not level.
Exercise 4
A hard hat dome is drawn to cover the upper half of a head oval. The head oval is 4 cm tall. The dome is drawn 3 cm tall. Does the dome cover the upper half of the head? By how much does it differ from the required 2 cm?
Show answer and check
No, the dome is 1 cm taller than the upper half of the head.
Why: The upper half of a 4 cm head oval is 2 cm. The dome is 3 cm tall, so it exceeds the upper half by 3 cm minus 2 cm = 1 cm.
Check: Measure the head oval height and divide by 2. Compare that value to the dome height; the difference should be 0 cm for an exact cover.
Common mistakes
- Drawing the hard hat as a flat line on top of the head. Use a dome shape that covers the upper half of the head oval, with a shallow curved brim.
- Placing the tool belt too high or too low. Align the belt with the hip line, which is about the fourth part from the ground in the eight-part guide.
- Making the stance too narrow or too wide. Set the feet about shoulder-width apart; check with a horizontal line between the feet.
- Using inconsistent letter styles for labels. Choose all uppercase or all lowercase and keep the same stroke width; use the x-height convention.
Self-check rubric
- Stance: feet are about shoulder-width apart and the figure stands on the ground line.
- Proportion: hip, shoulder, and chin lines are marked and used consistently.
- Torso: rounded rectangle shape is clear and connects shoulder to hip.
- Tool belt: level at the hip line with two pouches and a hammer loop.
- Head and hard hat: oval head with dome-shaped hat and curved brim.
- Labels: x-height convention and consistent letter style are used.
- Overall clarity: the figure reads as a builder without extra tools or scene details.
Questions and answers
Do I need to use the eight-part proportion guide exactly?
No. The eight-part guide is a hypothetical example. You can adjust the divisions to suit your figure, as long as the hip, shoulder, and chin lines are consistent with your chosen proportions.
What if my builder figure looks stiff?
Check the stance: feet should be about shoulder-width apart, and arms should hang slightly away from the body. A small outward angle in the legs can help.
How do I label parts without making the drawing messy?
Use the x-height convention and a consistent letter style. Keep labels short and place them near the part with a thin leader line.
Can I add tools to the tool belt?
Yes, but keep them simple. Short lines or small shapes on the pouches are enough to suggest tools without drawing detailed equipment.