Free original lessons
Pen Cat Drawing: Contour, Line Weight, and Hatching
Learn to draw a cat in pen using contour control, varied line weight, and directional hatching. Includes exercises, rubric, and a worked example.
Free lesson
Four exercises
Worked answers
Object Drawing Lessons
This lesson teaches a pen-and-ink cat drawing built on three controllable skills: contour, line weight, and hatching. You will use a simple cat outline as a scaffold, then practice varying line thickness and adding directional hatching to suggest form. The convention for line weight is explicit: thin lines are drawn with light pressure and a single pass; thick lines use firmer pressure or a second pass over the same path. Hatching direction follows a stated rule: hatch lines run parallel to the form's curve or at a consistent angle across a flat area. Letter styles and handwriting vary, so the rubric rewards deliberate, consistent choices rather than one universal look. All measurements are hypothetical examples; measure your own pen and paper before relying on any number.
Practice materials: Printable downloads are not available for this lesson yet. Use the instructions and four exercises below.
Reference illustration
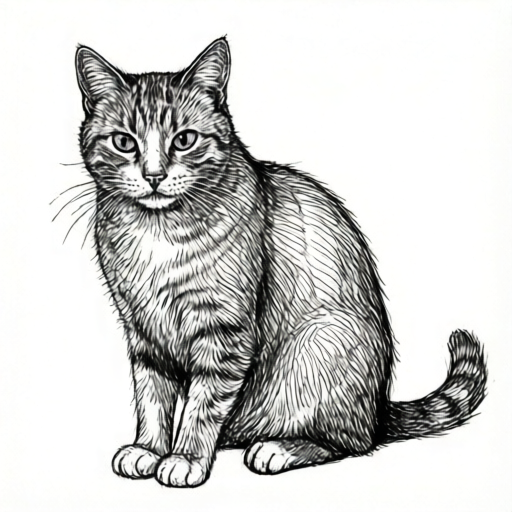
Use the stated measurements and conventions for each exercise.
Contour Control: Building a Clean Cat Outline
Contour is the boundary line of a shape. For a pen cat, start with a simple seated profile: a rounded head, two triangular ears, a curved back, a tail curling to one side, and four short legs. Keep the first pass light so you can adjust before committing to darker ink.
Use a single continuous line where possible. If you must lift the pen, restart exactly at the end point of the previous line. Gaps and double lines are the most common contour errors. A clean contour reads as confidence even when the shape is simple.
Define your line-weight convention before drawing: thin lines are one light pass; thick lines are one firm pass or two light passes. Do not mix conventions mid-drawing. This makes the result checkable.
- Draw a light oval for the head, about 3 cm wide (hypothetical example; measure your own space).
- Add two triangular ears on top, each about 1.5 cm tall.
- Draw a curved back line from the base of the head to the tail base.
- Add a tail curve that ends in a soft point.
- Draw four short legs with rounded paws.
- Check for gaps and double lines before adding weight.
Line Weight: Making the Cat Read Clearly
Line weight is the thickness of a line. In pen, you control it with pressure and repetition. A thin line suggests light, distance, or fine detail. A thick line suggests weight, shadow, or a strong edge. Use thick lines on the underside of the cat and around the paws; use thin lines on the top of the head and along the back.
A line-weight comparison strip helps you calibrate. Draw three short lines: one light single pass, one firm single pass, and one double pass. Label them thin, medium, and thick. Use these as your reference for the whole drawing.
Avoid changing weight randomly. Every thick line should have a reason: shadow, contact with the ground, or a major contour. This rule makes the drawing checkable and prevents muddy results.
- Draw a comparison strip with three lines: thin, medium, thick.
- Outline the cat with thin lines first.
- Go over the underside of the body and the paws with medium or thick lines.
- Keep the top of the head and the back thin.
- Check that every thick line has a stated reason.
Hatching: Directional Lines for Form
Hatching is a set of parallel lines used to suggest shadow or texture. The direction rule for this lesson: hatch lines run parallel to the nearest curved contour, or at a consistent angle across a flat area. On the cat's back, hatch lines follow the curve of the spine. On the chest, they run vertically. On the tail, they follow the tail's curve.
Spacing controls darkness. Close spacing reads darker; wide spacing reads lighter. Keep spacing consistent within one area. Do not cross-hatch unless you state a second direction and a reason.
Hatching should not cover the entire cat. Leave the lit side open. A common mistake is hatching everywhere, which flattens the form. Choose one shadow side and hatch only there.
- Choose a light source, for example from the upper left (hypothetical).
- Mark the shadow side lightly with a few guide dots.
- Hatch the shadow side with lines parallel to the nearest contour.
- Keep spacing even within each area.
- Leave the lit side unhatched or very lightly hatched.
Putting It Together: A Checkable Pen Cat
Combine contour, line weight, and hatching in one drawing. First draw the contour thin. Then thicken the underside and paws. Then hatch the shadow side. Finally, check the drawing against the rubric: clean contour, consistent weight convention, directional hatching, and a clear light side.
The worked example below shows a complete cat with a stated light source and a consistent convention. Use it as a model, not a template. Your cat can have a different pose, tail direction, or ear shape as long as the conventions are consistent.
- Draw the contour thin.
- Thicken the underside and paws.
- Hatch the shadow side with directional lines.
- Check against the rubric.
- Adjust any line that breaks the convention.
Worked example
Draw a seated cat in pen with a light source from the upper left. Use thin lines on the top and back, thick lines on the underside and paws, and hatch the shadow side with lines parallel to the nearest contour. State your line-weight convention.
Worked answer
The cat is drawn with a thin contour first. The top of the head and the back remain thin (one light pass). The underside of the body and the paws are thickened with one firm pass. The shadow side is the right side and the underside. Hatching on the back follows the curve of the spine; hatching on the chest runs vertically; hatching on the tail follows the tail curve. The lit side (upper left) is left open. The convention is: thin = one light pass; thick = one firm pass. Check: every thick line has a reason (shadow or contact), hatching direction matches the nearest contour, and the lit side is open.
Four practice exercises
Exercise 1
Draw a cat head only (no body) with a light source from the upper right. Use thin lines on the top and left, thick lines on the right and underside, and hatch the right side with lines parallel to the head curve. State your convention.
Show answer and check
A cat head with thin top and left contour, thick right and underside contour, and hatching on the right side following the head curve. The convention is stated: thin = one light pass; thick = one firm pass.
Why: The light source from the upper right means the right side is shadowed. Thick lines on the shadow side and underside follow the weight rule. Hatching parallel to the head curve follows the direction rule.
Check: Check that the top and left are thin, the right and underside are thick, hatching follows the head curve, and the convention is stated. Count thick lines and confirm each has a reason.
Exercise 2
Draw a cat tail curling to the left. Use thin lines on the outer curve and thick lines on the inner curve. Hatch the inner curve with lines parallel to the tail's curve. State your convention.
Show answer and check
A tail curling left with thin outer curve, thick inner curve, and hatching on the inner curve parallel to the tail. Convention stated.
Why: The inner curve is the shadow side, so it gets thick lines and hatching. The outer curve is lit, so it stays thin. Hatching follows the tail curve.
Check: Check that the outer curve is thin, the inner curve is thick, hatching is parallel to the tail curve, and the convention is stated.
Exercise 3
Draw a cat paw with four toes. Use thin lines on the top of the paw and thick lines on the bottom and between the toes. Hatch the bottom with short vertical lines. State your convention.
Show answer and check
A paw with thin top contour, thick bottom and toe separations, and short vertical hatching on the bottom. Convention stated.
Why: The bottom is the shadow side and contact point, so it gets thick lines. Toe separations are major contours, so they get thick lines. Vertical hatching is a consistent angle for a flat area.
Check: Check that the top is thin, the bottom and toe separations are thick, hatching is vertical and evenly spaced, and the convention is stated.
Exercise 4
Draw a complete seated cat with a light source from the upper left. Use thin lines on the top and back, thick lines on the underside and paws, and hatch the right side and underside with lines parallel to the nearest contour. State your convention and list three thick lines with their reasons.
Show answer and check
A complete seated cat with thin top and back, thick underside and paws, and hatching on the right side and underside following the nearest contour. Convention stated. Three thick lines listed with reasons: underside of body (shadow), paws (contact with ground), right side of head (shadow).
Why: The light source from the upper left makes the right side and underside shadowed. Thick lines and hatching go there. The top and back are lit, so they stay thin. Listing thick lines with reasons makes the drawing checkable.
Check: Check that the top and back are thin, the right side and underside are thick, hatching follows the nearest contour, the convention is stated, and three thick lines are listed with reasons.
Common mistakes
- Hatching in random directions across the cat. State the direction rule before hatching: parallel to the nearest contour or a consistent angle. Check each area against the rule.
- Using thick lines everywhere, which makes the cat look heavy and muddy. Reserve thick lines for the underside, paws, and major contours. Keep the top and back thin.
- Leaving gaps or double lines in the contour. Restart exactly at the end point of the previous line. Check for gaps before adding weight.
- Hatching the entire cat, which flattens the form. Choose one shadow side and leave the lit side open. Hatch only where shadow is stated.
Self-check rubric
- Contour is clean with no unintended gaps or double lines.
- Line-weight convention is stated and followed consistently.
- Every thick line has a stated reason (shadow, contact, or major contour).
- Hatching direction follows the stated rule (parallel to nearest contour or consistent angle).
- Hatching spacing is even within each area.
- One shadow side is chosen and the lit side is left open or lightly hatched.
- The drawing is checkable against the stated conventions, allowing valid alternative poses and shapes.
Questions and answers
Do I need a specific pen?
No. Use any pen you have. Measure your own pen's line width with a test line before relying on any numerical example.
Can I use cross-hatching?
Yes, but state a second direction and a reason. Keep the first direction consistent with the contour rule.
How do I know if my line weight is consistent?
Use a comparison strip with thin, medium, and thick lines. Every thick line in the drawing should match one of these and have a stated reason.
What if my cat looks different from the example?
That is allowed. The rubric rewards consistent conventions, not a single universal shape. Different poses and ear shapes are valid if the rules are followed.